
Figure 21 - Chimney flue grout
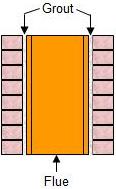
The sections of flue lining should be cemented close and flush with each other. Their joints should be thoroughly filled and have no projections on the inside, which could cause soot to accumulate. Layer after layer of flue is laid in this fashion until the chimney reaches the desired height.
Project the last course or two of bricks out a minimum of 4″ to provide a water drip, as shown in Figure 22. Extend the last section of flue 4″ above the last course of brick, as shown in Figure 22. Trowel in mortar to seal over the brickwork and form an angle between the top of the brick and 1″ below the top of the flue, as shown in Figure 23.
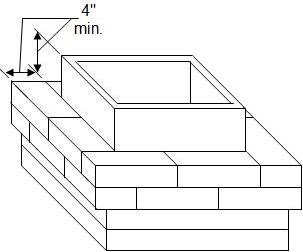
Figure 22 - Chimney top dimensions
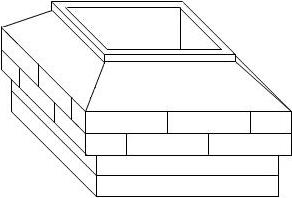
Figure 23 - Sloping chimney top
If downdrafts are a problem, you might erect masonry pillars at the corners of the chimney once the sloping mortar bed is laid. These pillars project to approximately four courses over the flue projection. A stone is then laid over and cemented to the pillars, as shown in Figure 24. Be sure that the stone is slightly pitched so it can shed water properly.
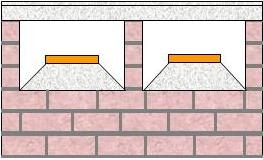
Figure 24 - Double chimney flue with cap
When chimneys run for long distances unsupported, extra reinforcement is provided by placing steel bars at each corner of the flue, between the flue and the brick, as shown in Figure 25. In addition the chimney can be anchored to the building frame by placing an iron strap around the flue and reinforcing rods, and tying it to the house structure. The problem with anchoring the chimney to the house frame is that in the event of differential settlement in the foundations, the chimney may induce stresses in the house frame that could cause structural problems. We do not recommend it.
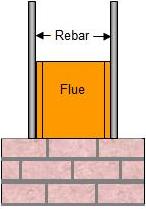
Figure 25 - Chimney flue grout
Weatherproofing The Fireplace and Chimney:
In fireplace and chimney construction, as in every other aspect of building, it is very important to keep water from leaking into the structure. When a fireplace is located on the exterior of a building, all the joints between the masonry work and the building structure should be thoroughly waterproofed. Apply waterproof paper at every joint where the masonry butts against the framing members. Seal the joint further by applying caulking compound, as shown in Figure 26.
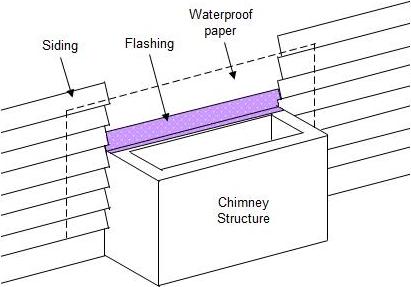
Figure 26 - Chimney flue grout
It is important to waterproof not only the joints between the building and the fireplace, but also any other exposed fireplace surface – particularly those lying perpendicular to the angle of water and snowfall, since they are the most subject to leakage. To divert water away from these surfaces, install metal flashing. Place the flashing underneath the exterior wall finish and cover it with a layer of waterproof paper, as shown in Figure 26. The piece of flashing that fits into the brickwork is mortared to the joint and sealed with mastic.
The chimney also requires careful flashing.
Additional information on chimney flashing.
Additional information on fireplaces.
Additional information on fireplace chimney design.
Additional information on drying logs for fireplaces.
Additional information on marble mantels for fireplaces.