
The shelves should be a minimum of 12 inches wide and go to the back wall of the closet. Providing that at least half of the shelf is supported by the vertical boards it is not necessary that the vertical boards be the same depth as the shelf. However, enclosing the shelving, which means having the vertical boards at the same depth as the shelves does give a nicer overall appearance.
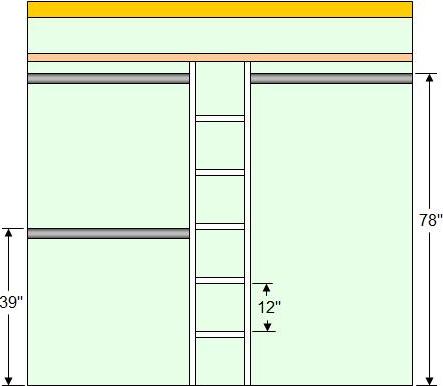
Figure 11 - Closet organizer - shelves in middle
Note: Do not make shelves wider than 36 inches unless you place a strengthen batten on the underside of the shelf. Shelves longer than 36 inches will sag in the center over time unless they are supported in some manner.
Shelf Mounting:
The shelves can be installed and held in position in four different manners:
- They can be screwed through the vertical boards.
- A batten can be used below each shelf on each side, screwed horizontally through the verticals.
- For shelf flexibility, vertical shelf standards and support clips can be used on both of the verticals, as shown in Figure 10.
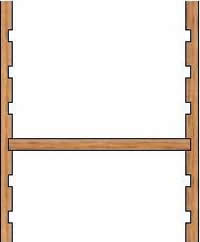
Figure 16 - Dados in vertical boards allow shelf height adjustment
- If you have a dado cutter for your circular or table saw, or even better yet, if you have a router you can also make flexible shelving by cutting a horizontal dado to the same thickness as the shelves in each of the vertical boards every couple of inches along the height, starting at about 10 inches from the floor, as shown in Figure 16. You can then slide the shelves into any position on the verticals which provides much more flexibility in what items can be stored on each of the shelves.
If you want to add the dados to the vertical boards, you should fix the bottom shelf and one shelf in the middle of the shelving unit, by screwing the shelf through the vertical board. This will prevent the shelving unit from bowing in the center which in turn will hold the vertical boards true and prevent the shelves from slipping out of the dados.
It is best, from a storage standpoint, that you cut the closet rod into two sections and add additional closet rod mounting brackets on the outside of the vertical boards. Closet brackets without a closet rod are available on-line or at your big box home improvement center. As an option a second closet rod with mounting brackets could be installed on one side of the shelving unit to provide additional hanging space for shorter clothes.
Note: If for some reason you would prefer not to cut the closet rod, you can drill holes for the closet rod in both vertical boards, as shown in Figure 5 – Part 2 and feed the closet rod through the holes before installing or assembling the closet organizer shelving unit.
Note: If you are constructing the shelving unit by fixing the shelves to the vertical boards using screws the unit can be built outside of the closet and placed into position. Although with this method of construction the shelving unit is free standing it is wise to secure the shelving unit to the upper shelf and the floor.