
In our example we know we will need 4 new 15 amp circuits to provide the necessary electrical services for our finished basement, attic or addition. We now have to look at the electrical distribution panel (load center), Figure 1) to see if we have the necessary free breaker positions.
Note 1: For this exercise we will presume an electrical panel with circuit breakers and not fuses. If you are going to the expense of adding an addition or finishing a basement and still have a fuse panel in your home, now is the time to consider replacing it with a breaker panel!
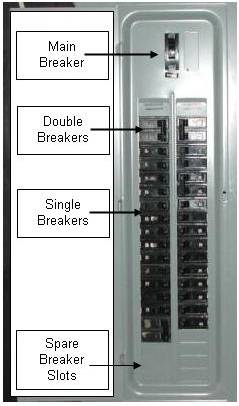
Figure 1 - Electrical distribution panel (load center)
Your home electrical distribution service is made up of one or more electrical breaker panels, called distribution panels or load centers. Each breaker represents a separate circuit. If your electrical panel looked like the picture on the right, you would have 7 free spots for additional circuit breakers. This is not always the case. Many electrical panels are filled with breakers requiring you to add a sub-panel in order to have more breaker positions.
As Posh Electrical Services Cambridge advises, 'Before adding a sub-panel, it’s crucial to assess the current load on your existing panel to ensure that your electrical system can safely handle the additional circuits.'
The best way to add a sub-panel is to feed it from a double breaker in the main distribution panel (load center) which if the main panel is full, would require moving 2 of the current circuits to the sub-panel, opening up a space for the new double breaker.
We have determined that we have enough free spots in our main electrical distribution panel to add the 4 circuit breakers required.
The next stage in the exercise is to take our original draft layout and refine the drawing by adding additional wall electrical outlets (receptacles) and determining which items will operate from which of the 4 circuits.
I find it much easier to use colored circles to define each of the different circuits, Figure 2. At this time it is also wise to add the electrical switch locations into the drawing to ensure that you do not try to control 2 circuits with one switch.
Note: This is not a diagram to indicate how to run the wires. It only represents which electrical devices are on which circuits.

Figure 2 - Determining circuits for an addition or finished basement
From this plan we can determine that we have balanced the load for all the circuits as shown in Table 1.
Table 1 - Circuit Load Balance |
||
Circuit |
Color |
Estimated Amperage |
1 |
12 |
|
2 |
11 |
|
3 |
8 |
|
Total |
31 |
|
4 |
15 |
|
How the wires are actually run from the distribution panel (load center) to the individual electrical devices and from one electrical device to another is determined by the location of the distribution panel and obstacles and obstructions between the panel and devices.
Figure 3 is a drawing showing one approach that might be utilized based on a subjective location of the distribution panel (load center) and free access to each of the devices.
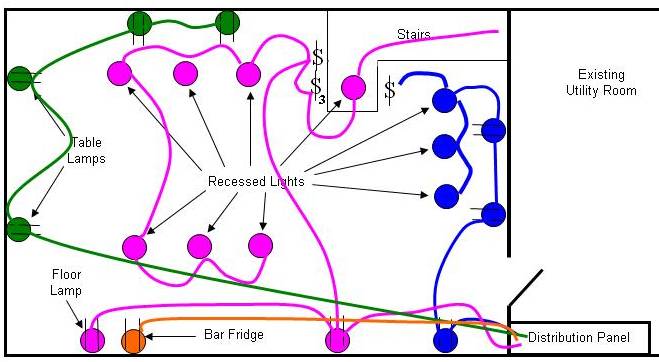
Figure 3 - Connections from main distribution panel (load center) to individual circuits in new living space
When commencing the electrical installation start with installing all the electrical boxes in their appropriate positions. Then run the wires. Install the breakers after all the wires have been terminated.
Installing the electrical boxes and running the wires is called the rough-in
portion of the electrical project. The rough-in is done prior to installing any finishing materials such as drywall and acoustic ceilings.
Installing the devices such as electrical switches, outlets (receptacles), cover plates, and light fixtures is termed the trim-out
and is usually done towards the end of the project, after painting.
You should consider structured wiring for your TV, Media center and telephone.
Additional information on installing electrical receptacles.
Additional information on electricity.
Additional information on wire sizes.