home improvement

Whole House Fan

Subscribe to our diy, home improvement newsletter.

home improvement diy newsletter

Home

Blog

New Pages

Main Index

New Product Showcase

Gardening

Flooring

Bathroom

Kitchen


Home Improvement Categories

A

Additions

Air Cleaners

Air Conditioning

Air Quality

Appliances

Articles

Asphalt Driveway

Attic


B

Backsplash

Basement

Bathroom

Before & After Pictures

Blinds

Books

Building Permits


C

Cabinets

Calculators

Carpet

Caulking

Ceilings

Concrete

Condensation

Construction

Contractor

Converters

Cork

Counter Tops


D

Decks

Demolition

Design / Layout

Doors

Driveways

Drywall


E

Electricity & Electrical

Environmental

Exterior


F

Fans

Faucets

Fences

Financing

Fireplace

Fixtures

Flooring


G

Gardening

Garage

Glass Blocks


H

Heating

Home Automation

Hot Water Systems

Humidity


I

Insulation

Insurance


K

Kitchen


L

Laminate Flooring

Landscaping

Lead Based Paint

Lighting

Luxurious Materials


M

Magazines

Mold & Moisture


P

Painting

Patio

Plans - Free

Plumbing

Publications


R

Roofing

Roofs


S

Safety

Security

Sinks

Skylights

Stairs

Steel Studs

Structured Wiring


T

Tile - Flooring

Toilets

Tools


V

Vacuums - Central

Ventilation

Vinyl Flooring


W

Wallpaper

Walls

Window Decor

Windows

Wood Flooring


  Find a Contractor

Home Design Studio for Mac


Sizing, Installation, Advantages, & Disadvantages Of A Whole House Fan

A whole house fan is a large fan that mounts in the ceiling at the highest point of the interior of the home, draws outdoor air through the home and exhausts into the attic space, providing a relatively inexpensive means to reduce temperatures in a home.
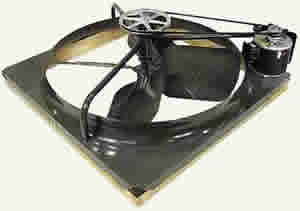
Selection of whole house fans


whole house ventilation fan


One should remember that the cooling ability of a whole house fan is subject to the outdoor temperature and humidity as the fan itself does not provide any cooling or dehumidification.  It brings in outdoor air, which means that windows must be open and should you live in an area with a lot of dust, this may be a definite disadvantage to a whole house fan.

If you live in a climate where outdoor temperatures are reasonable, at least during a number of months of the year, then a whole house fan can be beneficial in the reduction of energy expense during those months.

The initial equipment cost of a whole house fan is similar to that of a single room window air conditioner, however, the operating costs are substantially less.  A window air conditioner can cost as much as $0.25 per hour to operate where as a whole house fan should not cost more than $0.05 an hour to operate and an efficient unit could operate for as little as $0.01 per hour.  The cost to operate a central air conditioning system for an average size home is $0.10 per hour, but the upfront equipment cost starts at $2,000.

One advantage over other cooling systems is that a whole house fan can remove unwanted odors from a home very quickly.

One large disadvantage is that the fan provides an non insulated access to your attic, which if not properly sealed in the winter can cause large amounts of heat to escape from the living quarters into the attic.

Sizing A Whole House Fan:

For a whole house fan to operate correctly it must, like any other ventilation device, be sized and installed correctly to be of any benefit.

  • Calculate the volume of the living space in your house this includes hallways and excludes attic space, garage and unfinished basements.

The volume calculation fro a single story home is: length of house X width of house X height of living space.  Remember if you have a two story or split level house you must calculate for all of the living space as the calculation shown would only suffice for single story homes.   A two story house would require twice as much as a single story house.

Example a single story house that is 40' long, 30' wide and has 8' ceilings has a volume of 9,600 cubic feet.

  • The proper sized whole house fan will be between 50% and 100% of the cubic foot volume of the home in cfm (cubic feet per minute).  In the example, you would require a whole house fan between 4,800 cfm and 9,600 cfm.

Whole House Fan Attic Ventilation:

What the fan draws into the attic must be exhausted out of the attic.  This is one of the biggest mistakes made by installers.  If you do not have adequate venting in the attic for the whole house fan you are wasting your money on the installation.

  • The attic ventilation calculation is:  cfm of fan (if the fan is multi-speed, the cfm chosen for the calculation must be for the high speed or the highest cfm). divided by 750.


If the fan chosen has 9,600 cfm as its highest air movement, the ventilation area would be 9,600 ÷ 750 = 10 square feet.  This is a minimum number!

And this is where the mistake is made:  The 10 square feet from the calculation is based on totally unobstructed ventilation.  If your attic vents have screens (which is the case 99% of the time) or louvers, then this number must be doubled to 20 square feet of attic ventilation.

The ventilation can be a combination of roof, soffit, gable or ridge vents.

  • If there are any other areas that provide air access from the living quarters to the attic, they must be sealed to prevent the whole house fan from forcing air back into the living quarters.  This can occur with bathroom and kitchen fans vent into the attic rather than correctly venting to the outside through a wall, roof or soffit.

Installation:

The installation of the whole house fan should take advantage of open spaces.  In a single story home, a hallway that has provides access to a number of rooms is the best choice.  In a multi-story house, the best positioning is above a stairwell or the hallway leading to the stairwell.

The installation of a whole house fan may require changes to the roof structural support as well as electrical additions to power and control the fan.  This may put a whole house fan, as a home improvement, out of the capabilities of many diy home handymen.

Always follow the manufacturer's instructions

To determine the attic location of your fan, relative to a location in the living quarters:

  • Tape the template provided by the manufacturer on the ceiling in the chosen location.

  • Drill 1/8" holes in each of the 4 corners of the template and using a coat hangers or pieces of 14 gauge wire poke them through the holes in the ceiling and into the attic.  When you go into the attic you will be able to see the area that must be removed to house the ceiling fan.

If fan ends up in an area that is not convenient you may wish to move it a somewhat to clear any daunting obstacles that would have to be moved or worked around such as duct work or vent pipes.

Depending on the size of the fan it may be necessary to remove a section of a ceiling joist in order to accommodate the fan body.  Detailed instructions for removing a section of ceiling joist can be found here.

  • Before you start the installation determine where you will draw your electrical power from (remember that the circuit you choose must be able to handle the additional amperage of the motor for the whole house fan) and where you will locate the fan controls.  Additional information on fishing electrical wires. 

  • If you live in a colder climate consider that you will want to place a box over the fan to prevent hot air from escaping though the fan opening in winter months.  If the fan has louvers, these are not sufficient to provide a barrier to hot air loss.  Consider building a box that can be installed in the attic that would sit over the fan, resting on the ceiling joists and providing insulation in the winter months.


Manufacturers, Retailers, Dealers - Advertise on this page!

diy

Contact

home improvement

whole house fan installation

copyright 2006/8 - all rights reserved

installing a whole house fan