
The post hole should have approximately 6 inches of gravel placed in the bottom to allow for water drainage, as shown in Figure 2 (Part 1).
- The post hole can be filled with concrete (recommended) or earth.
- A single piece metal post base spike or bracket with integral ground spade see Figure 3.
- Forming a concrete peer and using a post bracket with a rebar base see Figure 4 and 5.
- Forming a concrete peer and attaching a post bracket see Figures 5 and 6.
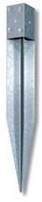
Figure 3 - Single piece metal fence post spike
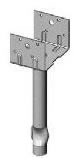
Figure 4 - Post bracket for use in a concrete or masonry peer
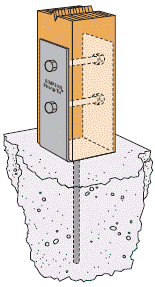
Figure 5 - Post bracket mounted in concrete peer
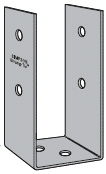
Figure 6 - Post bracket for concrete peer or wood base
Another consideration is if the fence will abut a wall. There are three basic methods of adhering a fence structure to a wall.
- A post can be placed against the wall and be installed in the same manner as any other post, as shown in Figure 7.
- A piece of wood such as a 2 x 4 can be lag bolted to the wall in order to accept cross members, as shown in Figure 8.
- Brackets can be mounted on the wall to accept the cross members directly, as shown in Figure 9.

Figure 7 - Fence post placed next to house wall
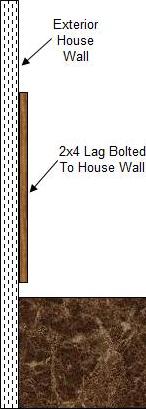
Figure 8 - 2x4 lag bolted to house wall
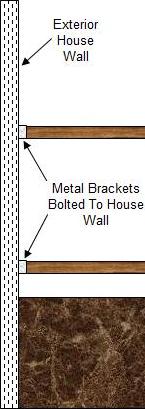
Figure 9 - Fence brackets mounted directly on house wall
The method of attaching a fence to a wall is usually determined by aesthetics and logistics. In some cases, it can be very difficult to dig a hole next to a wall in order to install a support post, hence, using a wood brace bolted to the wall or metal brackets may be an easy method around the problem. All of the methods mentioned are structurally sound, if the appropriate fasteners are used.
Post spacing is usually six or eight feet, because lumber is available in those lengths. If you are hoping to reduce cutting and use standard lumber lengths, don’t forget to include the thickness of the post in your calculations. It is usual to have one section an unusual size because of the actual property length or width. As a rule of thumb, you should keep all sections below ten feet. This is something to consider when laying out the fence post, positions.
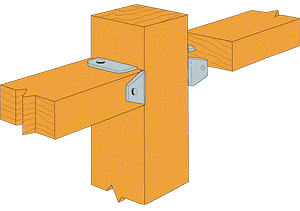
Figure 10 - Horizontal fence boards connected on flat using a metal bracket to fence post
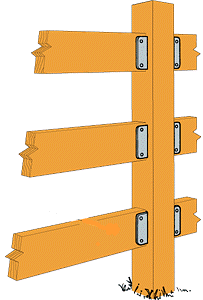
Figure 11 - Horizontal fence boards connected on upright using a metal bracket to fence post
If you are using pre-fabricated fence sections, the distance between posts becomes critical.
As there are hundred’s of fence styles, and the construction of the fence between the posts is relative to the style, it is impossible to give detailed instructions for each type here.
However there are some basics.
Posts are installed first (make sure that the concrete has cured before starting the next phase of construction), then cross members. Cross members can be affixed to the posts in numerous manners and using different styles of joinery and brackets, as shown in Figures 10 and 11.
One area that is often not considered is the fence hardware. If you are using pressure treated lumber, remember that the primary metal used in the pressure treating is copper (follow this link to obtain additional information on pressure treated lumber and hardware). If you are using non-pressure treated lumber use galvanized or preferably stainless steel fasteners.
The hinges and latches that you choose should be robust and they should be identified as gate hinges and gate latches. Door hinges, in general cannot support the weight of a gate. When choosing your latch mechanism consider the mounting height (children), whether the gate latch should open from both sides and if you require a locking feature of some sort.