
Warning: The amount of sanding you can do is predicated on whether on not you have a solid hardwood floor or an engineered hardwood floor. Engineered hardwood is a veneer or layer of approximately 1/8 inch hardwood laminated to plywood. Sand through the hardwood layer and you have a plywood floor!
Tip: You will need a hand power sander to get into 90 degree corners.
Tip: Be cautious when approaching base boards. It is very easy to damage baseboards and non hardwood floor that butts up against the hardwood floor with a orbital or belt floor sander and if you have little experience you may want to consider using a hand power sander around the edges.
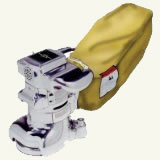
Figure 2 - Orbital floor sander
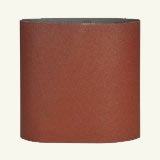
Figure 3 - Floor sanding belt
If you are a novice use an orbital floor sander rather than a belt or drum sander. The orbital sander, as shown in Figure 2, is a little slower but you are less likely to damage the floor. Either sander must be in continuous motion, if you stop in a spot with the sander running it will leave gouge marks in the floor.
Sandpaper Grit:
The grit of the sandpaper is the measurement of its roughness. The lower the number the rougher the sandpaper. The lower grit sandpaper will leave some marks on the floor and it will not provide a surface for finishing. When sanding your hardwood floor it will be necessary to go from a course grit to a fine grit. What number sandpaper you start at is relative to how bad the floor is. If the floor is uneven or has deep (1/16 inch or deeper) marks I would suggest starting with a 20 grit sandpaper and sanding at a 45 degree angle to the flooring boards. If the floor is in reasonably good shape then you can start with a 60 grit and finish with a 150 grit sandpaper. The sanding with 60 grit and 150 grit should be done running parallel to the flooring boards.
The rental facility that you rent your floor sander from will give you instructions on the machines operation and how to change discs (orbital sander) or belts (Figure 3). Buy extra sandpaper as the rental facility should be willing to take back any unused sandpaper - discs or belts. You can also rent a hand power sander if you don't own one or wish to purchase one.
To avoid scuff marks on the newly sanded floor where a heavy pair of socks rather than shoes.
Remove all the dust from the floor and the room:
This is the area where many people fail! After sanding, which is a very exhausting exercise you want to finish the floor. It is critical, if you want a high quality finished project to ensure that all wood dust has been removed from the room. Any wood dust left will end up in the finish creating speckles and bubbles. Vacuum and use a tack cloth to ensure that all the dust is collected. Don't forget to vacuum above windows, door frames and along baseboards.
Look for gaps between boards, fibers that have been raised, chips, and gouges. The stain and/or urethane finish will not hide these marks or defects. In fact the finish will amplify them! Any gaps, chips, scars and gouges must be filled with a flooring filler that will accept stain - if you are staining and accept the finish that you have chosen. Remember that the fill will not take the stain the same as the natural wood.
Repair any loose or squeaky boards with finishing nails with the heads countersunk and fill the nail holes with a filler.
Once you have filled the damages or gaps, sand the area so that it is flush with the floor and vacuum and tack rag the area and the rest of the room.
When you are sure that you have removed all of the dust - vacuum again and use the tack rag again!!
Tip: The filtration on industrial vacuums is poor and a percentage of the dust being vacuumed up is being exhausted back into the room. In the final vacuum use a machine with a HEPA filter.
The next step in the finishing process is to stain the floor. If you do not want to change the color of the floor then move on to the next step.
Applying the stain:
- Start by staining and top coating a sample of the exact wood you intend to finish
- The actual color of the stain and clear finish can vary depending on the type of wood - its natural color, texture, grain, porosity, and section of the log from which it was cut
- Depth of color can be altered depending on the length of time the stain is allowed to remain on the wood surface before wiping
- With a good quality, soft bristle brush or a folded, soft cloth, apply over an area approximately four square feet
- Use long, even strokes
- Do not flood the surface with stain
- Allow the stain to remain for up to five minutes, then wipe
- Continue with staining and wiping in the same manner until the entire floor is completed
- Allow three to four hours of drying time before applying the clear finish
Once the stain has dried or if you haven't stained you can apply the clear finish coats
- Begin coating the floor at the back corner of the room
- Coat segments two or three feet wide, brushing across the grain, then finish off by brushing with the grain
- Continue coating the same size area, ending at the doorway
- When complete, block the doorway
- After an overnight dry, the surface is ready for the final coating. Apply the finish evenly in long strokes, brushing it to the wet edge.
- As a section is complete, inspect work by viewing at an angle. If an area appears dull it has been missed and should be touched up immediately.
- Floor will be ready for use after drying overnight.
Tip: For extra protection in high traffic area apply three coats of finish.
Tip: Flat, satin or low gloss finishes should not be used as the initial first coat. An initial application of high gloss is always recommended followed by a flat, satin or low gloss finish if that is what is desired.
Always follow the manufacturer's instructions - believe it or not they do know the proper methods for applying their products.
- When replacing the furnishings consider using felt floor protectors under furniture and chair legs.
- Do not drag furniture across floors - carry it into position!