
In order to keep small particles of dirt and minerals out of the pumps and nozzles of dishwashers, manufacturers install a small screen in the primary inlet water line to trap any contaminants. Over time these screens become clogged and limit the amount of water entering the dishwasher, hence the dishwasher fills slower than it did when new. This applies to both portable and fixed dishwashers.
Cleaning the screen should rectify the problem.
- Turn off the power using the appropriate method;
- shut off the appropriate breaker at the main electrical panel, or
- remove the fuse from the fuse panel, or
- unplug the dishwasher.
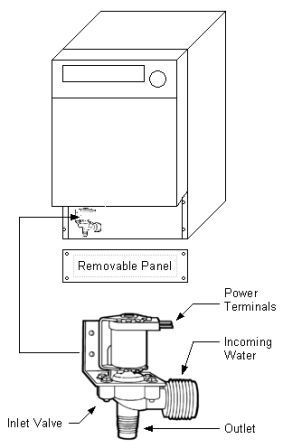
Figure 1 - Location of dishwasher inlet valve
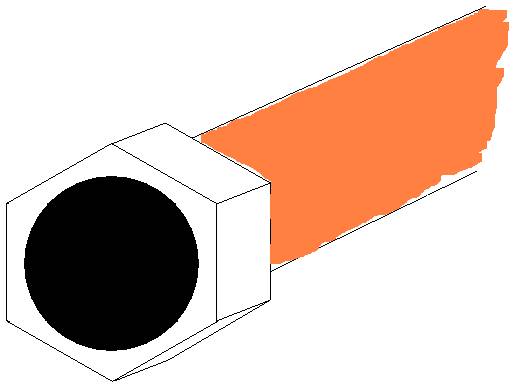
Figure 2 - Hex fitting at end of incoming water line to dishwasher
- Turn off the water supply valve to the dishwasher (usually located under the sink), or disconnect hoses from the faucet.
- Below the dishwasher door is a panel. The panel is either held in position with screws and is removable or is hinged to allow it to fold downwards. Remove or open the panel. This panel provides access to most of the dishwasher components.
- Installed in the front area of the opening will be an inlet valve, see Figure 1. This is where the incoming water supply to the dishwasher is automatically turned on and off depending on the dishwasher's working cycle. Each manufacturer's inlet valve looks somewhat different (a sketch of a basic unit is shown), and the mounting configuration could place the outlet on the top or side, however you should be able to identify the unit, quite easily.
- Newer dishwasher installations will have copper piping or a flexible armored hose connected to the inlet valve, while older units will have a rubber hose. Most will be connected using a hex fitting, as shown in Figure 2. Using a wrench, or pliers loosen the fitting and pull the pipe or hose away from the inlet valve:
- The filtering screen will be located in one of two places:
Note 1: There will be water in the line and it will most likely spill out when the hex fitting is released. It is wise to have a large sponge and some rags available to pick-up the spilled water to avoid any damage.
Note 2: In order to undo the hex fitting it may be necessary to remove the wires that supply power to the inlet valve. In most cases the wires are connected to the inlet valve using quick connect terminals. To remove the wires use a pair of needle nose pliers and pull on the connector that is attached to the end of the wire. DO NOT pull on the wire itself as it is more than likely that you will pull the wire out of the connector. Identify which wire goes to which terminal before removing the wires.
- Inside the hex connector of the incoming hot water line, or
- Inside of the male threaded connector attached to the inlet valve where the hex connector screws too.
- Using a small flat head screwdriver remove the screen from its location. Remember which side of the screen was on the inside.
- Clean the screen under running water using a soft brush and dish washing soap. If necessary you can use products such as CLR or vinegar to remove calcium or other minerals.
- Prior to replacing the screen in either the hose or inlet valve Inspect the insides of both fittings to ensure that no dirt or grime came off during the removal of the screen. Clean away any debris that may be present.
- Replace the screen, making sure it is installed in the correct direction.
- Replace the hose or copper pipe connection and tighten the fitting.
- Turn the hot water shut off valve on until you hear water flow, check the fitting and ensure it is not leaking.
- Replace the wires to the inlet valve (if they were removed), making sure that each wire is connected to the correct terminal.
- Open the hot water shut off valve all the way and again look for leaks.
- Replace the removable panel or raise the hinged panel as the case may be.
- Turn the power back on to the dishwasher.