
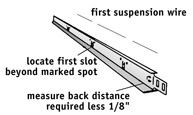
Figure 1 - Measuring and cutting main T
for the suspended ceiling
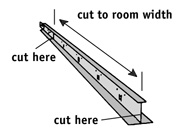
Figure 2 - Cutting main T
for shorter than full length measurements
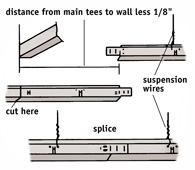
Figure 3 - Splicing the main T
for a suspended ceiling
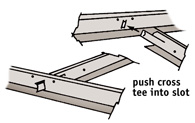
Figure 4 - Inserting cross T
into Main T
of a suspended ceiling
Installing Main T
:
- Most main
T
are 12' long and have crossT
slots punched every 12 inches beginning 6 inches from each end. - Refer to your layout sheet to determine the distance from the wall to the first cross
T
. Now measure this distance along the top flange of the mainT
and locate the slot just beyond this point, as shown in Figure 1. - From this slot, measure back the same distance, subtract 1/8 inch and saw the main
T
at that point. The 1/8inch subtraction is for the thickness of the wall angle. - If the wall angles are not square, position the cross
T
slots accordingly. - When main
T
are installed in rooms less than 12 feet across, cut the mainT
to the exact measurement of the room, allowing 1/8 inch for the thickness of the wall angle, as shown in Figure 2. - Remember that if the distance is less than a full main
T
length, you do not want the mating flange to remain. - For rooms wider than 12 feet, the main
T
can be spliced, as shown in Figure 3. Be sure to align the splice so that the suspension wires are correctly positioned. Splice carefully, or all the mainT
will be thrown off. - Install the main
T
so that they are all level with the wall angle already mounted. Use a long level or a laser level to perform this task.
Installing Cross T
- Install the cross
T
by inserting the ends of the crossT
into the slots in the mainT
, as shown in Figure 4. Use the manufacturer's instructions for fitting the crossT
into position. - Determine the location of the cross
T
by the pattern you selected-either 2' × 2' or 2' × 4'. - Be sure the lock tab on the cross
T
is on the outside of the slot. This attachment is slightly different in some types ofT
. - You can remove most cross
T
by depressing the lock tab with a screwdriver.
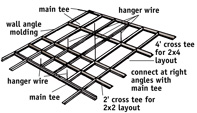
Figure 5 - Completed suspended ceiling grid.
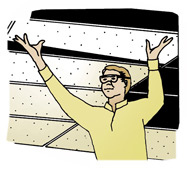
Figure 6 - Installing ceiling tiles into suspended ceiling grid.
- Border cross
T
are installed between the wall angle and the last mainT
. - Measure from the last
T
to the wall angle, allowing 1/8 inch for the thickness of the wall angle. Cut the crossT
and install them by inserting the connector in the mainT
and resting the cut edge on the wall angle. - Your final main and cross
T
arrangement will look similar to Figure 5. The top part of the drawing shows an arrangement of a 2' × 4' layout, while the lower half shows main and crossT
arranged for a 2' × 2' layout.
Installing Ceiling Panels:
- Drop the ceiling panels into position by tilting them slightly (Figure 6), lifting them above the framework and letting them fall into place.
- If it is necessary to cut a ceiling tile to width and/or length it is best if you score the surface with a razor blade or utility knife before cutting. This will ensure that you do not have pieces of the ceiling tiles breakaway when cutting.
Make sure that your hands are clean, after setting each tile!
Section 1
Section 2
Section 3