
Insulating Basement Walls
Adding insulation to basement walls when the basement is not going to be used as a living area will save very little in energy costs and the funds would be better spent on other energy saving projects.
The amount of insulation required for a basement wall is relative to where you live. Your municipal building department can provide you with the R factor guidelines.
Prior to insulating basement walls it is imperative that all areas that might have air leakage such as water and vent pipes be properly sealed. Insulating without fixing any air leak problems is a waste of insulation dollars.
If there is any moisture on the basement walls or ingress of any water through cracks or breaches in the mortar these situations must be corrected before insulating.
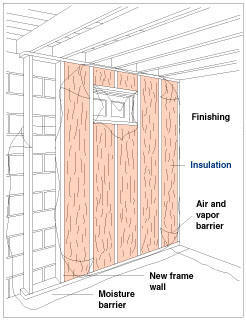
Figure 1 - Insulated basement wall
When contemplating the insulation of basement walls there are 2 choices. You can insulate the interior or the exterior of the walls. In general insulating the interior is an easier and less expensive proposition. However, if you are having drainage work done around the basement walls, insulating the exterior becomes a valid option.
Insulating With Batts:
The most common basement wall insulation is an insulated frame wall which can be finished to create livable space, as shown in Figure 1.
Install a polyethylene moisture barrier against the basement wall to protect the insulation against ground moisture. The polyethylene need only extend up to the grade level, but leave some excess at the bottom to run beneath the framed wall. The framed wall should be set off from the basement wall at least one inch to keep the lumber out of contact with the concrete. The bottom plate should sit on the polyethylene moisture barrier.
This method is not advisable in very wet basements. Although the wall can be protected against moisture, you would still be taking a chance if the basement is very wet.
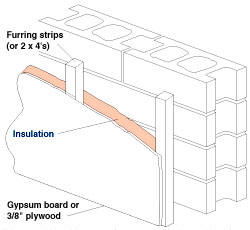
Figure 2 - Rigid foam insulation on an interior wall
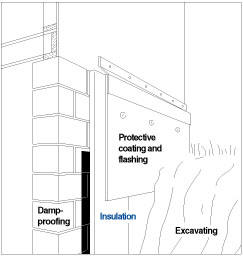
Figure 3 - Rigid foam insulation on an exterior wall
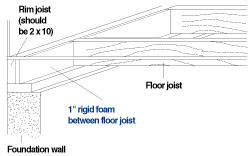
Figure 4 - Rigid foam insulation installed against rim joist
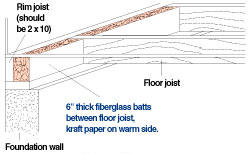
Figure 5 - Faced batt insulation installed against rim joist
Installing Foam Insulation On An Interior Wall
The most common alternative to a framed wall is to apply rigid foam insulation directly to the wall and cover it with an appropriate fire-related sheathing, such as drywall, as shown in Figure 2.
Special fastening systems are available that hold the foam in place and also serve as a screw base for gypsum wallboard.
Another technique is to install wood furring strips which hold the foam in place and serve as a nail base for the wallboard, as shown in Figure 2.
Installing Foam Insulation On An Exterior Wall
The only practical way to insulate a basement on the outside is with rigid foam. To avoid excavation expense, the foam can be installed only on the top portion of the foundation extending down below the frost area, where the greatest heat loss occurs, as shown in Figure 3.
One of the most common mistakes made when insulating a basement wall is to neglect to insulate the area between the floor joists, up against the rim joists.
The best method to insulate this area is to use rigid foam against the rim joist between each on the floor joists and then apply caulk to the seams between the floor joist and the foam (Figure 4).
As an alternative to the rigid foam you can install faced batts using staples to attach the edges of the batts to the floor joists Figure 5).