
- Stripped machine screw
It is not uncommon to have loose kitchen cabinet door pulls or drawer knobs. In many cases they will not tighten because the the threads in the pull or knob are stripped. This is why we suggested, at the beginning of this article, that you always buy spares.
If, however you do not have spare cabinet knobs or pulls you can attempt a repair by wrapping the threads of the machine screw with number 0000 steel wool.

Figure 9 - Machine screw tap
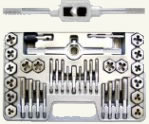
Figure 10 - Tap and die set
- Replacing drawer slides
This will work in a few instances, but is a temporary repair at best.
The best alternative, if possible, and this is very dependent on the thickness and manufacturing method of the kitchen cabinet knob or pull is to tap (Figure 9) a new thread, slightly larger than the current bolt size into the knob or pull.
A tap and die set (Figure 10) is a tool that most home handymen should consider having.
Whether or not this can be accomplished is subject to how much material is available in the knob or pull to accept a larger bolt size.
Many manufactures use a hardened metal insert in the knob or pull to accept threading as the knob or pull itself does not have the material characteristics necessary to accept direct threading. The thickness of this insert will determine whether or not you can go up a thread size.
The most common damage to drawer slides is caused by to much weight in the drawer. However, drawer slides are mechanical devices that will wear out over time, how much wear they can take is dependent on the initial quality of the drawer slide.
It is almost impossible to fix a broken drawer slide. A damaged drawer slide needs to be replaced and should be replaced as a set, left and right.
There are two dimensions which are critical to choosing a replacement drawer slide, the length of the slide when closed and the thickness of the slide. There are no standards!
Remove the drawer, and the slide mechanisms on both the drawer and the adjacent left and right walls. Measure the length and thickness of the slide, the height is arbitrary and should have no effect on purchasing a replacement. Do not worry about screw hole positions. If you are lucky one or two of the old screw holes may line up with the holes in the new drawer slides. If a couple of screw holes do line up it will help with alignment when installing the new drawer slides.
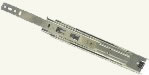
Figure 11 - Full extension, ball bearing drawer slide.
The best drawer slides ride on ball bearings and have full extension (Figure 11), which means you can conveniently get access to the back of the kitchen cabinet drawer.
It is not necessary to replace all the drawer slides in any specific cabinet at the same time as long as they are replaced in pairs, left and right.
- Repairing The Cabinet Finish
No matter how careful you and your family are, it is inevitable that at some point the cabinet finish will receive some damage or just reach a point where the shine has been removed.
To undertake a finish repair requires some skill and knowledge. The knowledge is knowing exactly what materials your kitchen cabinetry are made of and have been finished with.
Note: You should always use extreme caution and the proper safety gear when using any finishing materials. Most are toxic, some are corrosive and many are flammable.
Repairing the finish on kitchen cabinetry is no different than repairing the finish on a dining room table or bedroom set. This is when having a repair kit from the kitchen cabinet manufacturer is very beneficial.
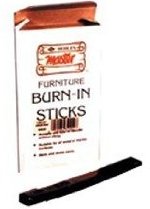
Figure 12 - Shellac burn-in sticks
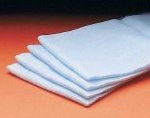
Figure 13 - Tack cloth
- Apply coats of stain and/or finishes very thinly. You can always apply a second coat, however once the color is to dark, it requires sanding to bring it back to a point where you can start over again.
- There are a vast assortment of touch-up sticks, from felt tip markers to colored shellacs (Figure 12) that are melted into the surface of the wood to accomplish a repair to a damaged or marred piece of wood (these are used by professional furniture repair and refinishers).
- Always use a tack cloth, Figure 13, after sanding. Wood dust that has a finish painted over it, results in a bumpy surface.
- If you are using spray applicators, spray guns or aerosols, always mask the surrounding areas and use, tarps or polyethylene sheets on the floor.
There are numerous cabinetry repair techniques and good cabinetry repair is an art, done by experienced craftsmen. That being said, if you have some wood finishing abilities there are products that can help. Have patience, some repairs may require numerous coats of finishes and each must be thoroughly dry before you proceed on to the next step. Always follow the manufacturer's instructions of all the products.
If you are inexperienced at wood finish repair, I suggest you practice on a scrap piece of lumber before you tackle your kitchen cabinets.
Some tips: