
When an attic is made over into living space it is very common to install kneewalls in the area, as shown in Figure 1. Many homes also have kneewalls because of the design of the roof line.
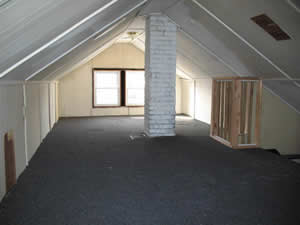
Figure 1 - Attic kneewall
A kneewall is used to create a wall rather than having the roof end at the base of the floor, as shown in Figures 2 and 3.
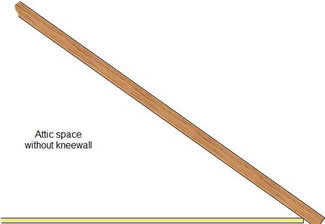
Figure 2 - Attic space without kneewall
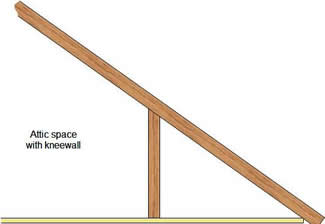
Figure 3 - Attic space with kneewall
Behind the kneewall is vacant space that with a little ingenuity can be used to bury the backend of cabinets. This provides additional storage space without any impact to the home structure.
Most handymen can easily insert a cabinet into a kneewall space.
Step 1:
Identify the area that you would like to use for a cabinet.
Step 2:
If there is an access panel to the space behind the kneewall, look behind the kneewall and check for electrical wires, plumbing pipes and HVAC ducts.
Note: Kneewall space is often used for HVAC ducts and if these exist behind your kneewall it is best to construct your cabinet so that the bottom of the cabinet will be above the HVAC ducts.
If there is no access wall, it will be necessary to cut out a piece of the drywall in order to see what is behind the kneewall. Identify the wall studs and cut the drywall in the middle of 2 studs. If you should find that there are obstacles such as plumbing pipes which prevent you from installing the kneewall cabinet in that location, repairing the drywall will be relatively simple.
Note: The kneewall should be insulated, as shown in Figure 4. It is important that insulation is maintained behind and around the cabinet, to save energy and to protect the living areas from drafts and cold spots.
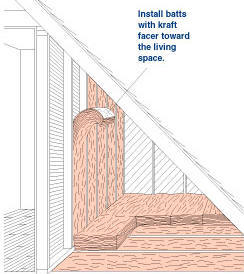
Figure 4 - Insulating a kneewall
Additional information about kneewall insulation
Step 3:
Based on a location has been chosen and is free and clear of obstacles.
Choose a cabinet size. For convenience, design your cabinet so that it will fill the space between X number of 2 x 4 studs. As an example a 30 inch cabinet will take up the space between 2 studs and hence will only require the removal of one stud. If you have the cabinetry skills you can create kneewall cabinet inserts to suit any and all requirements, as shown in Figure 5.
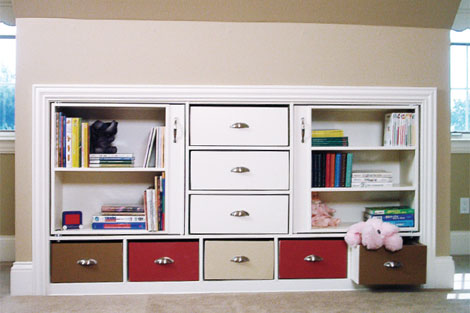
Figure 5 - Kneewall cabinet and storage
Note: Do not build the cabinet so that it is tight against the 2 x 4 walls studs. Allow at least a 1/4 inch on both sides and the top.
The hole should be cut a minimum of 6 inches above the floor to allow for the room’s baseboard to continue under the cabinet.
Step 4:
As mentioned in Step 2, the kneewall should be insulated to reduce drafts and save energy on heating and air conditioning.
Frame the inside of the cavity where the cabinet will be located with 2 x 4 lumber and insulate it as shown in Figure 4. If building a frame in the cavity is logistically difficult you can use a number of hard Styrofoam panels to insulate the cavity as required.
Step 5:
Construct the basic cabinet as a box. The size of the cabinet will be subject to the area available and your needs and requirements.
If you are going to use the cabinet for drawers, then the cabinet box can be constructed from 1/2 inch plywood or particle board. If the cabinet will have doors the cabinet should be constructed from veneered particle board or veneered plywood. Depending on your requirements, the veneer can be a laminate or wood.
The box should have a face-frame that is large enough to cover the hole that was made in the kneewall.
Step 6:
Construct two floor supports for the cabinet from 2 x 4 lumber. The dimensions will be relative to the depth of the cabinet and height of your cabinet from the floor.
Ensure that the supports are level, use shims if necessary and then screw the supports into position to the floor inside the kneewall cavity.
Step 7:
Slide the cabinet box, with its face frame attached, into the cavity so that it rests on the supports.
Double check the cabinet to ensure that it is square and level. Insert two screws from the inside of the cabinet into each of the supports that were installed in Step 6.
Step 8:
If the cabinet is to house drawers (Figure 6) then mount the drawer slides at this time.
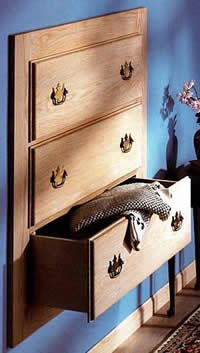
Figure 6 - Kneewall cabinet
If the cabinet is to have doors you may wish to finish the inside of the cabinet first, if it is a wood veneer. Then mount the doors to the cabinet face-frame.