Snap a chalk line and locate the board. Nail the second row in the same manner as the first. This time, however, make sure that you’re nailing up far enough along the siding to clear the lower course of boards, as shown in Figure 11. The remaining courses are installed in the same manner.
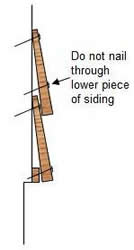
Figure 11 - correct nailing of lap siding
To fit around windows and doors, butt the siding up against the frames. If you think you may have a waterproofing problem, leave a 3/16 inch gap between the end of the siding and the frame and fill it with an appropriate caulking.
Here are a few general points to remember while installing lap, clapboard or beveled siding:
- Try to minimize the number of joints. Joints are the point of least resistance to weather. The fewer joints, the more weather tight the wall will be. To minimize joints, use longer pieces of siding under windows, over doors, and whenever there is a long uninterrupted stretch of wall. Save the smaller pieces for areas in between openings.
- Joints should occur over studs and should be staggered between courses.
- For additional protection against moisture penetration, dip or brush the ends of the siding in a water repellent preservative before nailing the board in place.
- Check that all the ends are perfectly square. Joints must be good and tight, otherwise water may find its way in. Whenever cutting the siding is necessary, cut it with a table saw, a radial arm saw, miter saw, chop saw or miter box to ensure a perfectly square end.
Installing Corners:
There are two corner conditions you have to worry about, the inside and outside corners. Outside corners are easier and can be handled in a number of ways. The two most popular ones are mitering and butting against a wood strip.
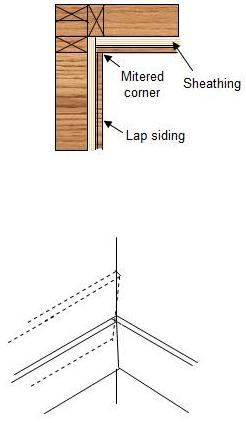
Mitered corners involve cutting both corner boards at an angle that will form a 90 degree corner when butted against each other, as shown in Figure 12. Miter corners have a tendency to come apart, so add extra nails around the miter joint on both boards.
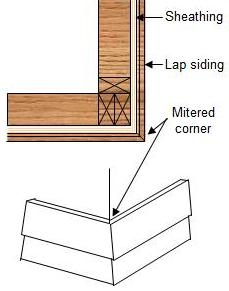
Figure 12 - Mitered outside siding corner
Another way to handle outside corners is by using a rectangular piece of lumber as a trim strip. This type of joint involves nailing two vertical wood strips at the corner of the building; this will serve as a surface against which both pieces of siding can butt, as shown in Figure 13.
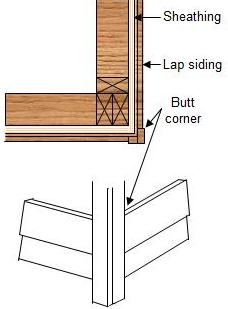
Figure 13 - butt outside siding corner
Interior corners are trickier. Mitering doesn’t work in this type of corner. One solution is to place a trim strip in the corner and butt up the ends of the siding to it, as shown in Figure 14.

Figure 14 - Butt inside siding corner
Another, more difficult joint involves taking one piece of siding and butting it right up to the sheathing, as shown in Figure 15. The other side is cut to fit the first. This is done by holding the siding in place against the one you’ve just nailed and scribing it at the roper angle. Cut the siding at this angle and nail it in place, as shown in Figure 15.