
Natural wood siding, lap, clapboard or beveled is still a common exterior finish. Installing wood siding is not an overly difficult process, but there are some keys to a successful project.
An important aspect of the installation of wood siding, as shown in Figure 1, is to use the correct nails. Corrosion-resistant, galvanized, stainless steel, or other nails made of similar metals will not bleed and spot the siding’s surface. These nails, however, will probably cost more but they are worth the investment. In terms of shape, the nails used for siding are usually thin and have a flat head (box nails). The reason why thin nails are used is to reduce the chance of the wood splitting.

Figure 1 - Lap, clapboard or beveled wood siding
You must be careful, however, to drive them only to the wood’s surface. Driving the nails to hard could show hammer blows and increase the chances of crushing the wood. The hammer used should have a smooth surface on the face not a checkered or milled face, as shown in Figure 2.

Figure 2 - Hammer faces, smooth and milled
Lap, clapboard or beveled siding should lap no less than 1 inch and preferably 2 inches. The recommended exposure distances (exposure distance is the amount of siding left exposed to the weather) are 4 inches for 6 inch siding, 8 inches for 10 inch siding and so on, as shown in Figure 3.
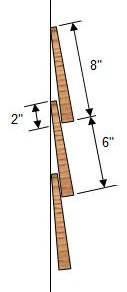
Figure 3 - Lap siding exposure
Both from the standpoint of weather resistance and appearance, the exposure distance is changed and adjusted to meet the fixed dimensions of windows and doors, as shown in Figures 4a and 4b.
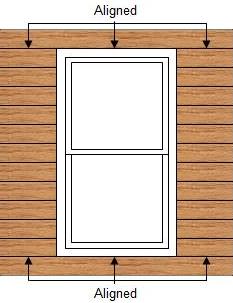
Figure 4a - Correct lap siding window alignment
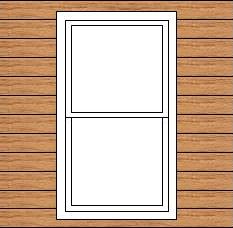
Figure 4b - Incorrect lap siding window alignment
The procedure used to determine how much the recommended exposure distance has to be adjusted to meet these dimensions in not difficult. Let’s say that you are using 8 inch siding and the window height is 55 inches. The number of courses needed between the top and the bottom of the window is found by dividing 6 inches (the recommended exposure distance for 8 inch siding) into 55 inches, the height of the window, as shown in Figure 5a, 5b and 5c.
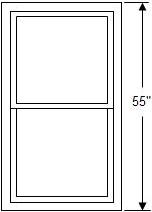
Figure 5a - Step 1 - Determine number of siding courses
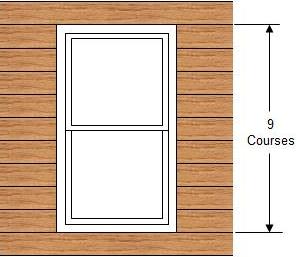
Figure 5b - Step 2 - Determine number of siding courses
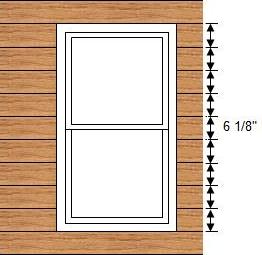
Figure 5c - Step 3 - Determine number of siding courses
You need 55 ÷ 6 = 9 1/6, or nine courses. To find out precisely the exposure the siding must be to get nine courses, divide 55 inches (the window height) by 9 (the number of courses). You need 55 ÷ 9 = approximately 6 1/8 inch exposure for each course of siding to meet the window flush at the top and bottom.
The exposure for siding located between the window sill and the foundation wall should also be adjusted. You may, otherwise, find yourself with two noticeably different siding exposures or a very narrow end course within the same wall, as shown in Figure 6.
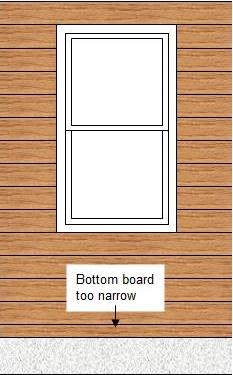
Figure 6 - Bottom siding board is too narrow
For example, if the distance between the bottom of the window sill and the top of the foundation wall is 31 inches, you need 31 ÷ 6 = 5 1/8 courses between the two. To arrive at the necessary exposure for the right number of courses divide 31 inch by 5 and you get 6.2 inches, or 6 3/16, which is only slightly over what the exposure will be for siding above the sill and therefore the difference will be hardly noticeable.