
The frame for the hole for the sink is constructed in the same manner as the outside frame for the mold. However, the sequence for the construction of the frame for the sink hole is the reverse of the sequence for the outside mold frame.
Step 1:
Draw a rectangle on the inside of sink hole outline on the base of the mold. This rectangle should be smaller on all sides by twice the thickness of the laminate covered MDF. In our example this would be 2 x 3/4 inch or 1 1/2 inches, as shown in Figure A.
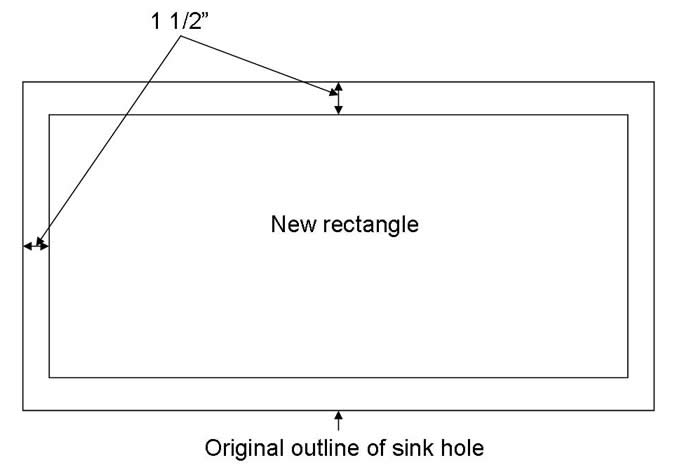
Figure A - Forming the hole for the sink
Step 2:
Cut some strips from the laminate covered MDF approximately 2 1/2 inches wide and place them flat against the inside of the new rectangle that you drew in Step 1. Countersink and screw them down through the base of the mold and into the top of the workbench using 2 inch drywall screws. Cover the heads of the screws with modeling clay.
Note: Do not bother to miter the corners of the frame. Butt joints are preferred.
Step 3:
Cut some side strips 1 inch shorter than the depth of the finished concrete. In our example this would be 2 1/2 inches less 1 inch or 1 1/2 inches.
Step 4:
Screw these strips to the outside of the flat strips that you installed in Step 1. Countersink the heads of the screws.
Step 5:
Cut some side strips the height of the finished concrete countertop. In this example it would be 2 1/2 inches.
Step 6:
Cut them to length and place them around the outside laminate covered MDF that you installed in Step 4. Do not screw them into position yet.
Step 7:
Using your 4 foot level check that the heights of the side walls of the mold and the heights of the side walls for the hole for the sink are all perfectly level.
Step 8:
Using a 3/4 inch roundover bit, round the ends of these side wall pieces, as shown in Figure 11. Then seal the non laminated edges with the spray adhesive and cellophane tape as described below Figure 11.

Figure 11 - Outside corner of sink hole - 3/4" roundover
Step 9:
Place a bead of silicone adhesive on the bottom and mating ends of these side wall pieces.
Step 10:
Screw the sink side wall boards from the inside of the hole for the sink to the side wall boards installed in Step 4, and as shown in Figure 12. There should not be any screw heads in the area where the concrete will be poured. Cover the screw heads with modeling clay.
Step 11:
Apply a bead of silicone caulk on the outside edge between the base and the side and end pieces. Smooth with your finger or a caulk bead tool to create a concave finish, as shown in Figure 13.

Figure 13 - Details of side wall mold construction
Continued - Inserting the aluminum dividers into your concrete countertop mold
How to Make Concrete Countertops - Index