
Note: Some books will suggest that you can get away with only adding fibers to the concrete mix and avoid the use of rebar and wire mesh. We highly recommend the use of rebar and wire mesh for your concrete countertop.
The rebar and wire mesh is placed independently in each half of the countertop. You cannot allow the rebar and/or wire mesh to join one side of the concrete countertop to the other side. The placement of the rebar is to reinforce and strengthen the edges of the concrete countertop while the wire mesh reinforces and strengthens the body of the concrete countertop.
The rebar and wire mesh is placed independently in each half of the countertop. The placement of the rebar is to reinforce and strengthen the edges of the concrete countertop while the wire mesh reinforces and strengthens the body of the concrete countertop.
Install the 1/4 inch or 3/8 inch rebar first, use pieces of the 1 inch foam to raise the rebar off the bottom of the mold. The foam positions the rebar 1 inch from the surface of the countertop and protects the base of the mold from being scratched by the rebar as you are placing it in position. The foam will be removed once the rebar and wire mesh are fastened to the mold. Figure 17 shows the finished placement of the rebar.
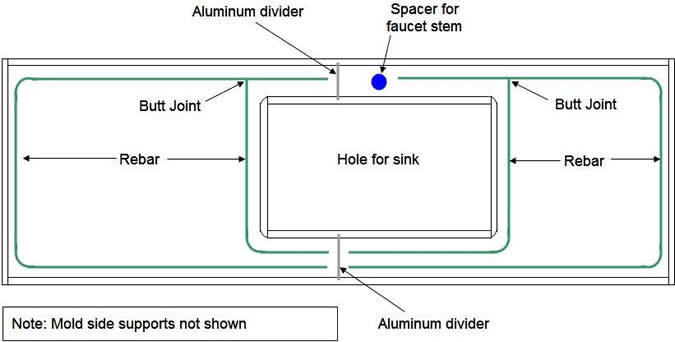
Figure 17 - Rebar placed in mold
Note: When placing the rebar into position remember that the rebar is to remain at least 1 1/2 inches from any of the countertop edges, including any spacers or the hole for the sink.
Note: Where possible, bend the rebar rather than using individual pieces that are wired together.
Note: Do not overlap the rebar use butt joints only. (This is specifically for architectural pieces, such as countertops. If you were placing rebar for a concrete patio or driveway, then you would overlap the rebar.)
Note: If you have a large overhang on your countertop add additional rebar to help reinforce the overhang. Place the rebar on 6 to 8 inch centers with a layer of wire mesh on top of the additional rebar. The rebar should run from the area of the concrete countertop that is supported towards the outer edge of the overhang that is not supported.
Once the rebar is in its proper position, place a layer of 6 inch by 6 inch or 4 inch by 4 inch wire mesh over the rebar. The wire mesh will be supported by the rebar. Cut the wire mesh, preferably with the bolt cutters, so that it is at least 1 1/2 inches away from any edges of the concrete countertop, as shown in Figure 18.
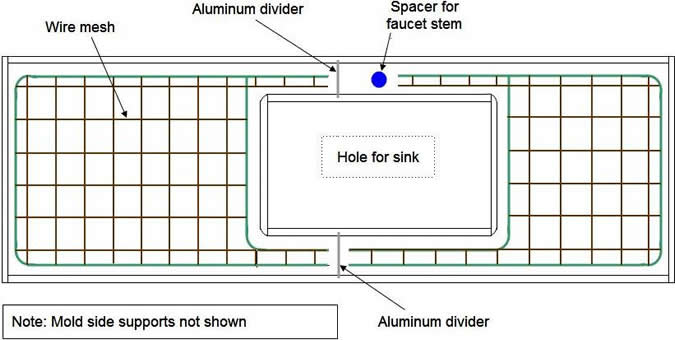
Figure 18 - Wire mesh placed in mold
Note: Fasten the wire mesh to the rebar using a single twisted tie wire. Fastening the wire mesh to the rebar is not a structural requirement it is only meant to hold the wire mesh in position while you are pouring and then vibrating the concrete. You do not have to use the tie wire at every point where the wire mesh meets the rebar. You only need a sufficient number of tie wires to hold the wire mesh in position.
Once you have fastened the wire mesh to the rebar, remove the assembly and vacuum the mold again. This will ensure that any dust and dirt from the wire mesh and rebar have been removed from the mold.
Place the rebar and wire mesh assembly back in the mold, resting on the foam pillows. To suspend the cage, place some screws, every foot, around the outside, on the sides of the mold and on the inside of the hole for the sink, to act as anchors.
Note Do not allow the screws to penetrate through to the interior of the mold!
Place a piece of tie wire around the screw and make a wire hook on the other end. The wire hook slips under the rebar and will hold it in position, as shown in Figure 19. Once the rebar and wire mesh are properly supported you can remove the foam pillows. Ensure that the rebar and wire mesh are floating approximately 1 inch from the surface of the base of the mold.
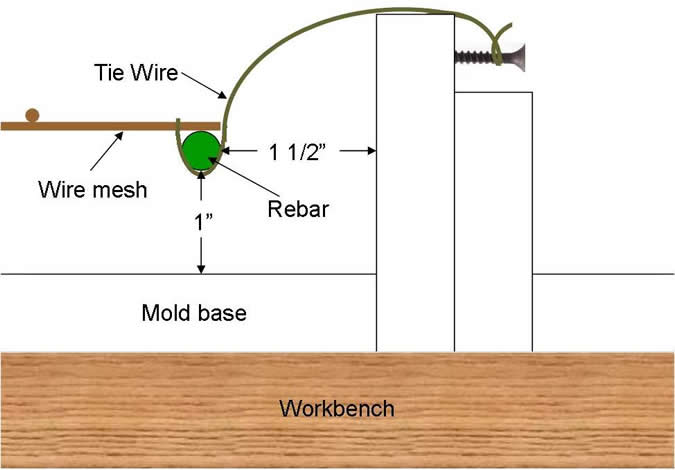
Figure 19 - Rebar fastened and supported by side walls of mold
Note: The wire hooks will be cut just below the surface of the concrete once it has been poured. At that time, the concrete itself will hold the rebar and wire mesh assembly in position.
The mold is now complete. But before you mix and pour the concrete you should run through the following checklist:
- Make sure that the mold is completely level in all directions.
- Make sure that all screw heads have been covered in modeling clay.
- Check the inside of the mold and ensure that it is perfectly clean.
- Ensure that all the foam pillows have been removed from beneath the rebar and wire mesh.
- Ensure that the mold is secured to the top of the workbench.
- Make sure that all the internal laminate mold joints have been covered with silicone caulk.
Tip: Count and make a note of the number of screws that are holding the mold securely to the workbench. When the concrete has cured and you are removing the mold, it will help if you know that you have actually removed all of the screws holding the mold to the workbench.
Continued - The concrete mix for your countertop
How to Make Concrete Countertops - Index