
Safety First:
It is important that during the abatement process you do not stir up any flakes or powder from the lead based paint. Homes with central heating and/or air conditioning systems are especially susceptible to taking in the fine lead based paint powder and distributing it through the rest of the home. As well, performing the abatement process with windows open might spread the lead based paint flakes and powder to other areas of the home.
Lead based Paint Abatement Safety Tips:
- Lead based paint abatement is not a family project! Children and women who are pregnant should remain well away from the area where the abatement is taking place. This is a perfect time for the kids to spend a few nights visiting their grandparents.
- Turn furnaces and any other ventilating systems within the home off.
- Tape 6-mil polyethylene sheets over all openings into and out of the abatement area including doors, fireplaces and kitchen pass-throughs. Fireplaces provide a constant up-draft for hot air, even when the fireplace is not on. This up-draft can circulate any small flakes and/or powder.
- It is best if the room is empty while performing the abatement procedures to ensure that any lead based paint flakes or powder do not end up embedded in other objects. If items cannot be removed, cover them with 2 layers of the 6-mil polyethylene sheets, taping all the seams with duct tape.
- Cover the floor with a layer of 6-mil polyethylene and tape the sheeting to the baseboards using duct tape. Ensure that the corners of the floor are protected, as it is not uncommon to have small gaps between the polyethylene and the walls where walls intersect at right angles.
- You can easily become the method of distributing the lead based paint flakes and powder throughout your home if you do not follow strict safety procedures. As well, it is important that you protect yourself from inhaling any lead based paint particles.
- Do not eat, drink or smoke in the abatement area or outside the abatement area if you are still wearing your protective clothing.
- When you are finished working in the abatement area you should wait at least 15 minutes for all any particles that are in the air to settle. Remove disposable clothing in the abatement area. If you have any particles on your clothes, vacuum with a HEPA filter vacuum (Figure 10).
- You should shower as soon as practical after completing work.
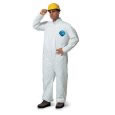
Figure 4 - Disposable coveralls
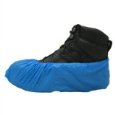
Figure 5 - Disposable shoe covers

Figure 6 - Disposable hair covers
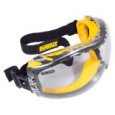
Figure 7 - Goggles
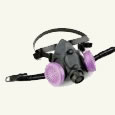
Figure 8 - HEPA Respirator
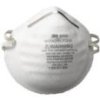
Figure 9 - Dust mask
Dress in disposable coveralls (Figure 4), use disposable shoes or shoe covers (Figure 5), use a disposable hair cover (Figure 6), goggles (Figure 7) and an approved respirator that utilizes a HEPA filter, as shown in Figure 8. It should be noted that basic paper and/or fiber dust masks (Figure 9) are not sufficient to protect you from inhaling small lead based paint particles.
Note: An approved respirator will show an approval number that is in this sequence, TC-21C-xxx, on the unit.
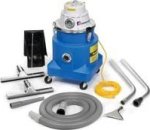
Figure 10 - HEPA Filter Vacuum
Note: A HEPA filter vacuum is the only type that should be used on the abatement project. Once all of the abatement is completed, remove the HEPA filter from the vacuum and dispose of it as part of the contaminated material. Don't forget to clean the vacuum itself, vacuum hoses, wands and accessories, in order to avoid spreading particles next time you use the vacuum cleaner.