
A pedestal sink, as shown in Figure 1, is a good alternative to a vanity and sink combination especially in smaller bathrooms and powder rooms. Bathroom vanities tend to make a small bathroom look and feel smaller.
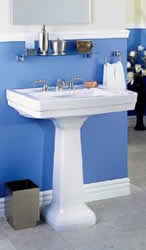
Figure 1 - Pedestal Sink
What you are giving up with a pedestal sink versus a traditional sink and vanity is storage space. Installing a pedestal sink helps provide greater room in small bathroom areas. Bathroom decorating is more flexible and easier with a pedestal sink due to its less square footage, allowing homeowners to add more functional and creative design elements.
Many people want to install pedestal sinks to benefit from the advantages, such as easy maintenance and cleaning. Many homeowners and commercial property owners seek professional advice for pedestal sink installation queries. When you’re a budding home handyman, you have to know the different pedestal sink options and how you can install one professionally.
You can find the step-by-step procedure on how to install a pedestal sink like a pro below.
Selection of pedestal sinks.
Pedestal sink installation:
There are a few things that the home handyman must keep in the back of his or her mind when planning the installation of a pedestal sink.
Whereas a vanity will hide all the plumbing – drain lines and water lines, with a pedestal sink, they are somewhat visible. This means that the positioning of the drain lines and water lines must be accurate, and level. For the installation to look professional the water lines must protrude out of the wall at the same height and be symmetrical with the drain pipe as shown in Figure 2.
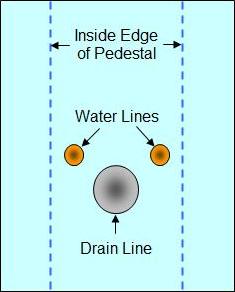
Figure 2 - Plumbing lines should be symmetrical and be in a tight configuration.
They should also be close to one another rather than spread out and come out of the wall or up from the floor directly behind the pedestal.
Note: As every manufacturer has different size pedestals it is impossible to provide dimensions.
Drain and water line connections will be visible to some degree and hence the use of PVC black drain pipe and grey plastic water lines will not look good. For the best appearance you should use chrome or brass colored drain and water pipes that best match the sink faucets that you have chosen.
The bathroom floor and walls should be finished before you install the pedestal sink. The pedestal should sit on top of the floor. It should not have tile or other flooring material butting up against the pedestal. As well the sink should sit up against the finished bathroom wall and not have tile or other finishing material butting against it.
How much space should you allocate between the pedestal sink and the toilet? Most often than not, you can provide bare minimum clearances. Make sure that the toilet’s centerline is at least 15 inches apart from the nearest sink or wall. The preferred measurement is 18 inches.
Although the pedestal supports most of the weight of the sink, it is very important that the sink be properly fastened to the wall. This usually requires the installation of a piece of plywood, if the wall behind the sink is going to be tiled then you can use a piece of exterior grade plywood in place of the drywall. If the wall is going to be painted then you should add a piece of 2 x 4 blocking between the appropriate 2 x 4 studs.
Once the floor and walls are finished and the drain and water lines are protruding through the wall you can install the pedestal sink.
Step 1:
Place the sink and pedestal in their final positions, with the back of the sink against the wall. Mark the positions of the holes in the back of the sink on the wall and on the floor for the pedestal base.
Move the units away from the wall and drill appropriate size pilot holes for the fasteners that you are planning on using.
Note: Never leave the sink on top of the pedestal when it is not bolted to the wall and the floor. If you leave the sink sitting on the pedestal without support I can guarantee that it will fall to the floor and break!
Step 2:
Attach the faucet, according to the manufacturer’s instructions, the appropriate length flexible water lines and the drain line to the sink.
Step 3:
Move the sink and pedestal back into position and fasten the sink to the wall and the pedestal to the floor.
Note: The fasteners should be snug, but do not over tighten them or you may crack the pedestal or the sink. Porcelain is very brittle.
Step 4:
Connect the water lines to their appropriate shut-off valves. Connect the drain line to the wall using a drain trap.
Note: In many cases it is easier to connect the plumbing lines without the pedestal in position. Never leave the sink hanging from the wall based on the sink’s wall fasteners. They will general not support the weight of the sink. Use 2 x 4 lumber and have someone holding the sink while you connect the plumbing lines until you can replace the pedestal.
Step 5:
Apply caulking to the edge of the sink where it butts against the wall. Also apply some caulking around the pedestal base where it rests on the floor.
Takeaway
The best thing about having a pedestal sink is that it takes up less space than a shelf vanity and bathroom sink. So, it pays off installing one at home. If the right plumbing is already in place, installing a pedestal sink can take just a day. Now you’re more confident to install a pedestal sink. Continue to hone your plumbing knowledge and skills by staying updated with the latest techniques and trends.