
There are numerous reasons that you may need to replace an electrical outlet / receptacle.
- Turn Off The Power To The Circuit
- Remove The Faceplate
- Pull The Outlet Forward
- Remove The Wires
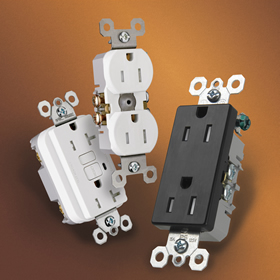
- Wiring The New Outlet
- Green screw is for the bare copper ground wire.
- Dark brass screws are for connection of black or red wires.
- Light brass screws are for connection of white wires.
- Insert The New Outlet (Receptacle)
- Turn The Power On
Turn-off the breaker or remove the fuse that supplies power to that circuit. Verify that the power has been turned off by using an electrical tester or by plugging in an electrical device such as a lamp, or drill. Always test both the upper and lower portion or the outlet.
Note: Even though there is no power on the outlet, there may still be live wires in the electrical box for other circuits.
In most cases the faceplate will be held in place to the outlet by a screw in the center of the outlet (receptacle) or with two screws one on the top and one on the bottom of the outlet (receptacle). Some of the newer faceplates are screw-less and snap on to the receptacle.
Remove the upper and lower screws that hold the outlet to the electrical box. Pull the outlet forward. There should be four to six inches of wire that has been folded back into the electrical box that will allow the outlet (receptacle) to come forward with the wires still connected.
Note: Some receptacles are designed for 15 amp service and others for 20 amp service. A 20 amp outlet (receptacle can always be used to replace a 15 or 20 amp outlet (receptacle). A 20 amp outlet (receptacle) should be replaced with a 20 amp outlet (receptacle).
There will be a minimum of three wires connected to the outlet (receptacle) and there may be as many as five. Three wires indicate that the receptacle is the last device in the circuit while 5 indicate that the outlet (receptacle) feeds other devices farther on.
The wires may be connected using screw terminals on the side of the outlet (receptacle) or they may be connected using push-in connections on the back of the receptacle body. If screw terminals were used, unscrew the terminals and remove the wires. If push-in connections were used, cut the wires at the base of the outlet (receptacle) - they will have to be stripped to install the new outlet (receptacle).
If there are more than three wires, it is important that you check the terminal connection strips on the outlet (receptacle) that you removed. This is a strip of brass that connects the screw terminals together on each side of the outlet (receptacle). If either or both of the strips are broken (no connection between terminals), you must break the connection on the new outlet (receptacle) in the same manner as the old.
The screw terminals are identified by color as to the correct wire colors:
It does not matter which of the two terminals which of the black or red wires goes on, providing they are both on the dark brass terminals and it does not matter which of the light brass terminals has which white wire.
Always wrap the wire around the terminal in a clockwise direction.
Bend the wires so that they will tuck neatly into the electrical box and install the mounting screws.
Install the cover plate.