Installing Starter Strips:
The first step in the installation is to run a chalk line around the perimeter walls, those that are to have siding installed. The chalk line should identify the top of the starter strip, not the bottom.
It is very important that the starter strip be in a horizontal position perpendicular to the soffit, or the last piece of siding will have to be cut on an angle. As well, we visually see the building as its relationship to the roof line. If the siding panels are not true and perpendicular to the roof line they will appear to be out of kilter.
Nail or staple the starter strip, starting at the first available slot and then every 8 inches, following the aforementioned nailing instructions. For best results, use the lowest row of slots that are accessible.
The easiest way to cut the starter strip is with a pair of tin snips or aviation sheers.
If you have to use more than one piece of starter strip, allow a 1/2 inch separation between the ends of the strips for expansion, as shown in Figure 8.
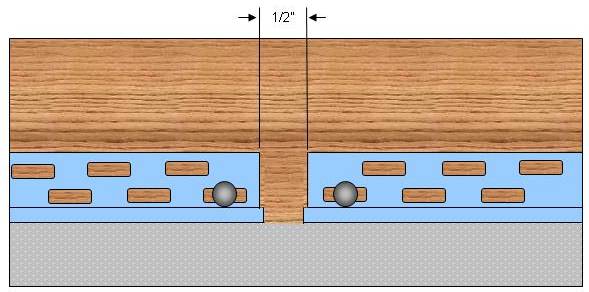
Figure 8 - Gap between starter strips of vinyl siding
Figure 9 shows how to mate to an outside or inside edge leave a 1/2 inch separation between the end of the starter strip and the nailing hem of the edge trim. Cut the edge trim so that the bottom is 3/4 inch below the starter strip.
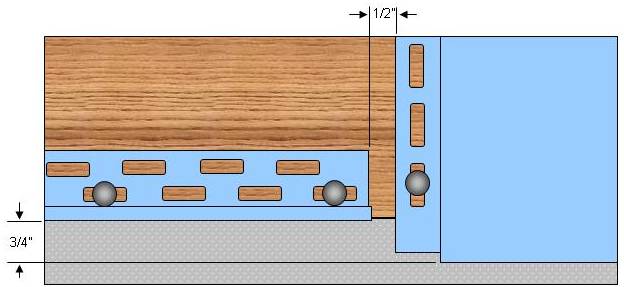
Figure 9 - Gap between starter strip and edge trim for vinyl siding
Installing The Panels:
Once the starter strips and the inside and outside corners are in place, you can start installing the panels.
Note 1: Some installers prefer to install all of the trim pieces around eaves, windows and doors prior to installing any of the siding panels and by doing so they get the finicky part of the project completed while they are still fresh. I lean towards this method myself. However, it makes no difference to the finished project if you install all the trim first or install it throughout the panel installation process.
Note 2: If you are installing siding that has a foam backing, the insulation has to be cut back at points where the panels meet and where the panels intersect with trim pieces. As well, it may be necessary to add shim pieces to bring trims into position. Each manufacturer has there own rules and instructions for trimming back the insulation and installing the shims. Follow the manufacturer's instructions!
Some of the manufactures make their panels with ends that are not completely square. If this is the case with your panels, it is best to square the ends. Panels can be cut with a fine toothed circular saw or by scoring the surface with a utility knife and bending the panel away from the score mark. The panel can also be cut using tin snips or aviation sheers, but it is harder to get a clean, square edge with either of these tools.
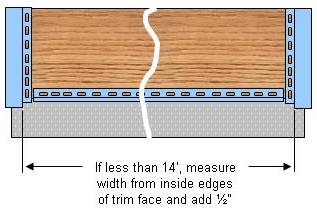
Figure 10 - Measuring vinyl siding panels
The panel should be inserted into the inside or outside corner trim a 1/4 inch. If a whole panel is longer than the width of the area being covered, measure from the inside of the face of the corner trims and add 1/2 inch, as shown in Figure 10, (3/4 inch if working in cold climates, see following note), which will provide a 1/4 inch (3/8 inch in colder climates) for each side.
Note: In colder climates use a depth into channels of 3/8" rather than 1/4 inch to allow for a greater amount of contraction during cold periods.
Make sure that the panel locks into the starter strip or the preceding course. Check that the panels are level every 3 courses. The longer the wall, the easier it is to go off level. A laser level can be an excellent tool to keep the siding courses level.
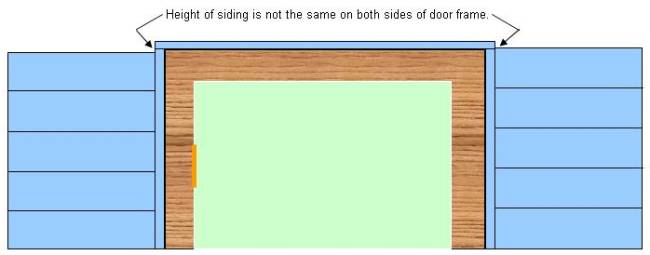
Note: When installing siding on both sides of a window or door opening (Figure 11) it is easy to have the courses end up at different heights. This often happens when the sides of the opening are being sided by different installers. One pulling the siding tighter than the other. If you have a door frame that is 7 feet high, and the siding is 8 inches wide and one installer picks up 1/32 inch at each course, when you reach the top of the door frame the siding will be out of alignment by more than 5/16 inch, which is very noticeable.