
Overlapping & Seams:
If the distance is greater than the length of the panel, insert the first panel a distance of 1/4 inch (3/8 inch in colder climates) into the corner trim and then measure from the edge of the first panel to the corner and add 1 1/4 inches (1 3/8 inches in colder climates). This will allow for a 1 inch panel overlap and a 1/4 inch (3/8 inch in colder climates) into the corner trim. Try to use pieces at least 1 foot long. If you are short, just a few inches, cut the first panel back 1 foot in order to make the remaining piece larger.
Allow a 1/2 inch gap between the edges of the nailing hems on the panels.
Insert the first nail or staple 6 inches from the edge of the face of the trim, as shown in Figure 12. The closest nail or staple at a seam should be 6 inches from the edge. Additional nailing or stapling should occur at a minimum of 16 inch intervals.
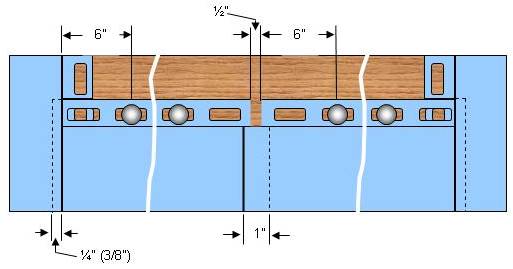
Figure 12 - End of vinyl siding panel

Figure 13 - End of vinyl siding panel
The 1/2 inch gap shown in Figure 12, between the nailing hems of the panels is a minimum dimension. If the manufacturer of the siding provides a back cut of the nailing hem at the end of a panel, use the dimension that the manufacture uses for the required space between nailing hems (Figure 13).
When overlapping joints there is some consideration to be made in the direction of the overlap. The overlap should be in the direction of the most prevalent line of sight, as shown in Figure 14. For most home owners the prevalent line of sight is from the street in front of the house.
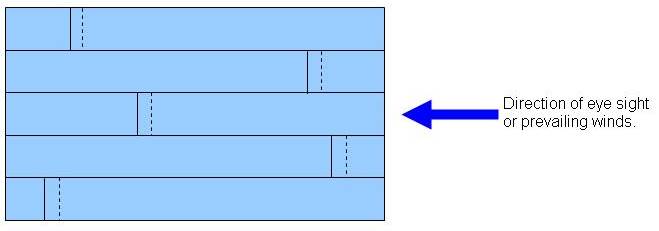
Figure 14 - Direction of seams on vinyl siding
There is an exception, if you are in an area that commonly has winds from a specific direction it is wise to have the overlap in the same direction as the wind, as shown in Figure 14.
For the best visual and aesthetic results, seams should be staggered and not repeated if at all possible over the entire wall surface.
If at all possible do not have overlaps or seams directly below any opening such as a window.
Trim Installation Around Windows & Doors:
Installing the trims around windows and doors is one of the most time consuming parts of the entire siding project. The most usual trim used for windows and doors is the versatile J-Channel.
Install the J-Channel and water diverters for the corners of the window in this order:
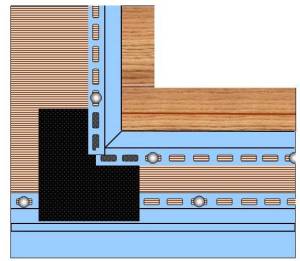
Figure 15 - Installing vinyl siding around doors and windows
- Water diverters: Use a piece of roof felt, or flexible plastic in the corners of the widows to deflect any water run-off over the siding. Without the diverter water could run behind the siding. The diverter should be a minimum of 6 inches wide and be at least 2 inches above the bottom of the window sill.
- Bottom of window,
- Sides of window,
- Top of window.
Install the J-Channel for a door in this order:
- Sides of door,
- Top of door.
The neatest job is accomplished by using mitered corners, although it is quite common to see J-Channel trim butt joint to other pieces of J-Channel trim.
Once the J-Channel has been placed around the window and door frames you can continue with the installation of the siding panels.
The panel directly below a window opening will most likely have to be notched in order to fit properly. Allow a 1/4 inch gap on both sides of the window frame. Install a finishing trim inside the J-Channel, as shown in Figure 16. Depending on the style of siding and the depth of the notch you hay have to add a shim behind the finishing trim, as shown in Figure 17. Some manufacturers make a double finishing trim, as shown in Figure 18, that allows the installer to decide, based on the depth of the notch, whether to use the inside or outside joint in order to maintain a flat appearance to the finished siding below the window sill.
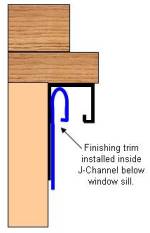
Figure 15 - Finishing trim inside J channel
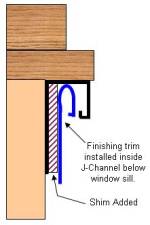
Figure 16 - Finishing trim with shim inside J channel
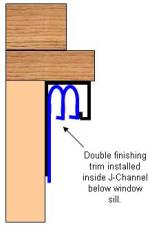
Figure 17 - Double finishing trim inside J channel
When measuring the height of the notch, remember that the panel cut-out is measured from the bottom of the lock on the previous channel, not from the top of the nailing hem.
Make tabs on the cut panel, every 16 inches using the snaplock punch, as shown in Figure 18. The tabs should face away from the wall. Install the panel so that the tabs lock into the finishing trim.
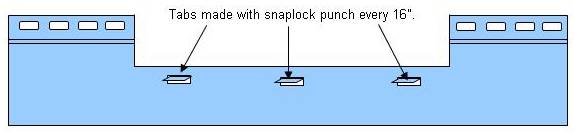
Figure 18 - Tabs placed in vinyl siding panel
Final Course:
The upper most course of siding will most likely have to be cut length wise in order to fit in the gap left between the second last course and the J-channel.
Measure the distance, every 24 inches, from the inside of the J-channel to the lock of the preceding course and cut a piece to fit. Remember to deduct a 1/4 inch from the total height to allow for expansion of the siding panels.
Install a finishing trim and create tabs in the panel's cut edge, as described in the preceding section on trimming windows and doors.
Transitioning:
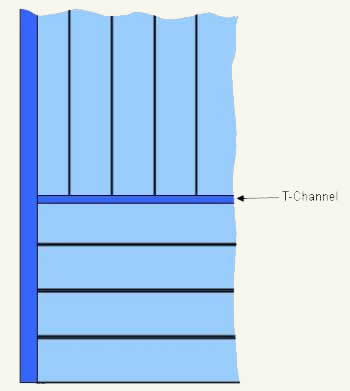
Figure 19 - Transitioning from horizontal to vertical siding
There are times when you wish to transition from horizontal to vertical or vertical to horizontal siding panels, as shown in Figure 19. One of the most common times is at the top of a wall where it meets a gable.
Having the ability to conveniently transition between directions is provided by the T-channel trim, as shown in Figure 20.

Figure 20 - T-channel siding trim
The horizontal siding should be finished in the same manner as if you were using a J-channel, by inserting a finishing trim into the lower part of the T-channel before inserting the siding.
Additional information on installing siding on soffits and fascia.