Note: A common mistake made by the diy home handyman is to use a dull pencil or not to accurately use the first staircase stringer as the template to mark all the other stringers. If the cutouts in the staircase stringers are not truly identical, the stair treads will not sit properly, and over time they will develop creaks and squeaks!
Once all of the stringers are cut, stack them on top of one another. If you see any variances in the stringer cutouts, they must be corrected and/or a new stringer must be cut.
Once you are satisfied that all of the stringers are identical, you are ready to start the assembly of your staircase.
The stairs have to be anchored to the bottom floor. To do that, you add a 2 x 4 to the bottom of the stringers. Cut out a notch in the bottom of the stringers so that the staircase stringers will be prevented from moving forward (similar to chalking the wheels of a car or truck so that it cannot move forward) once the 2 x 4 is anchored to the bottom floor, as shown in Figure 4.
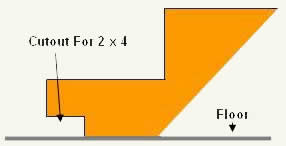
Figure 4 - Notch in stringer for the bottom 2 x 4 which attaches to the floor
The staircase stringers also have to be supported at the upper floor joists or the floor support wall if there is one in that position.
There are two common ways of accomplishing this:
- Use of a 3/4 inch plywood (do not use particle board, MDF or other processed lumber material as it will not have the necessary strength to hold the staircase over time) hanger board attached to the top of the staircase stringers and then to the floor joists, as shown in Figure 5. The use of a hanger board is the most convenient method of fastening the upper portions of the stairs in locations where there is no support wall behind the staircase.
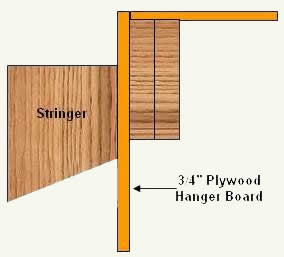
Figure 5 - Hanger board attached to top of staircase stringer and upper floor joists
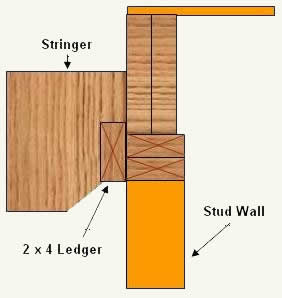
- Use a 2 x 4 ledger board. The stringers must be notched to provide a fit for the ledger board, as shown in Figure 6. The ledger board is first nailed to the stringers and then to the support wall. The 2 x 4 ledger board works best when there is a support wall behind the staircase. Make sure the support wall is properly attached at the top and bottom and that the studs are in good shape.