
Installing the stringers:
If you have installed a hanger board measure down from the finished surface of the upper floor an amount equal to one stair rise plus the thickness of the tread as shown in Figure 1. Draw a level line on the hanger board which marks the position of the top of the stringer.
Note: A common mistake is to forget to include the thickness of the "finished floor", which may include a plywood or other material as a sub-floor and a finishing material such as hardwood, or tile. In many cases the finished floor can add 3/4 inch or even more to the current height of the upper floor.
If you do not take the finished floor thickness into account when measuring the position of the staircase, the first step will be deeper than all the other steps and this leads to people falling down stairs!
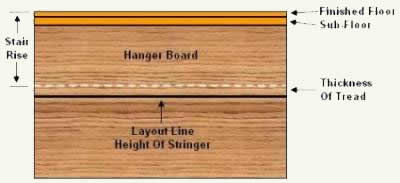
Figure 1 - Measuring the position for attaching stringers to hanger board.
With the stringers positioned on the layout line, drive 4 inch common nails through from the back of the hanger board into each stringer. If you do not have adequate access to the back of the hanger board to drive nails, use metal angle brackets to hold the stringers in place.
Stringers can also be nailed or fastened to walls, when the walls are already in place. Before nailing stringers to walls, determine whether or not you need to leave space for drywall and/or a skirt board as shown in Figure 2.
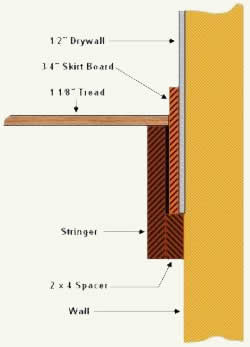
Figure 2 - Leaving space on sides of stringers for drywall and/or skirt boards
Install the kickboard, that will stop the staircase from moving forward, on the lower floor, see Figure 3. If the floor is wood you can screw the kickboard into position. If the floor is concrete it is wise to use lead anchors and lag bolts. Use metal angle brackets or toe nail the stringers to the kickboard.

Figure 3 - Kickboard attached to bottom floor to accept staircase stringers
Once you have the staircase stringers nailed and/or screwed into position you can start to install the risers and treads.
Remember that the staircase stringers are the structural support for the staircase. It must be securely fastened at the top and bottom floors to avoid squeaks and creaks.
The risers are installed first and would be ripped from a 1 x 8 board to 7 1/8". As shown in Figure 4, the risers sit behind the stair tread, hence, they must be installed before the stair treads.
If you are staining the finished staircase then you can use a hardwood veneered plywood for the risers. The risers can be nailed into the stringers from the front, or if you would prefer not to have marks that have been filled with nail hole putty, you can use glue and nail blocks, or use metal angle brackets attached to the stringer and then screw the risers into place from the backside of the staircase.
It should be noted that risers are not necessary for the structural integrity of the staircase. Staircases are often made without risers.
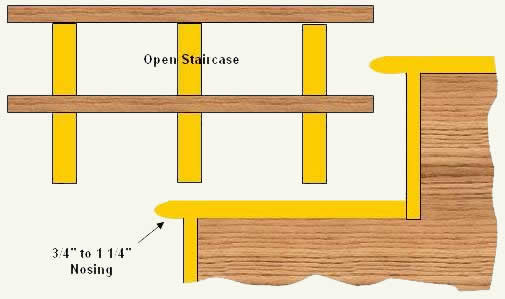
Figure 4 - Risers installed behind stair treads and an open staircase
If the stairs are open, no walls on one or both sides, the stair tread can extend past the stringers as shown in Figure 4.
On staircases that have risers, the stair tread should have a nosing that extends 3/4" to 1 1/4" out, past the face of the stair riser as shown in Figure 4.
Once the risers are in place you can secure the treads to the stringers. Use construction adhesive and nails or screws. Wood blocks or metal brackets can be used if you prefer not having any fastener marks visible from the top side.