

Figure A - Custom tile design
There is no right or wrong design, pattern or layout. If it is pleasing to your eye then it has accomplished is requirement.
There are some things however that you must keep in mind if your are going to create an intricate tile pattern.
- Pattern Intricacy:
- Different Size Tiles:
The more intricate the pattern the longer it will take to install the tiles and the more chances there are that a pattern mistake may be made during installation. To try to avoid mistakes, always keep a copy of your design drawing close at hand and if possible use chalk lines on the floor to layout the pattern.
A tile pattern that utilizes different sized tiles in its design is not overly difficult providing the manufacturer of the tile provides the sizes that you need. If you are contemplating cutting the tiles (Figure B) in order to provide different sizes within the overall layout you will have to pay attention to edges and grout width.
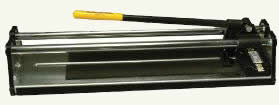
Figure B - Ceramic tile cutter
- Tile Edges:
The edges of man made tiles such as ceramic and porcelain generally have a soft, slightly rounded edge, which allows the grout to be slightly below the top of the tile, see Figure 1. When a tile is cut, it has a 90 degree edge which will not provide an edge for the grout in the same manner as the manufactured edges.

Figure 1 - Manufactured Versus Cut Tile Edges
- Grout Width:
When a tile is cut the two pieces will add up to the whole plus the material that has been lost to the cut. When a tile cutter is used, there is no material lost, hence the two pieces that remain are the same size as the tile before cutting. If a wet saw is used, the thickness of the blade, which is usually 1/8 inch, will be lost and the two pieces will be the same size as the tile before cutting, less an 1/8 inch.
This is important because in the case where a tile cutter is used, there is no space available for grouting between the two pieces of tile that have been cut.
If we look at the following example, Figure 2 shows the pattern that we desire.
Figure 2 - Desired Pattern
Figure 3 shows the finished size of the two pieces of tile when you use a tile cutter to make the cut. There is no space available for grout.
Figure 3 - No Space To Insert Grout Between Tiles
This means that if you are going to attempt to use a tile cutter (Figure B) to create tiles that are a different size in order to fulfill your overall tile design, you will not be successful. Tile cutters are an excellent tool for cutting ceramic tiles, that run the edges of a room, to size.
As well, tile cutters are primarily for ceramic tile. All other tile materials, including porcelain, marble, granite or other natural stone should be cut using a wet saw, as shown in Figure C.
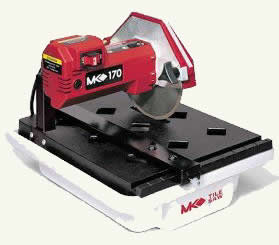
Figure C - Tile wet saw for porcelain, marble, granite, limestone
The use of a wet saw to cut tiles will give you about an 1/8 inch (it is important that you measure the thickness of the blade you are using) and if you are using 1/8 inch grout spacing than you will probably need to do little else to create your design or pattern. If however, your grout lines are wider than 1/8 inch you will have to take a second pass with the tile through the wet saw in order to give you the required grout spacing.