
Additional Toilet Information
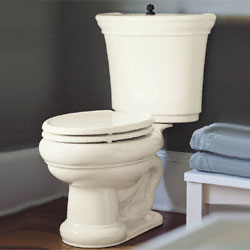
Figure 1 - Two piece toilet
The parts that you will need to replace a toilet are:
- Toilet – either one piece or a bowl and tank combo (Two piece) (Figure 1).
Selection of toilets.
Click on picture for larger view
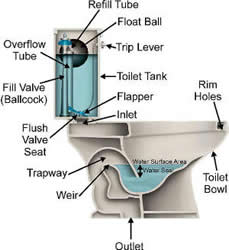
Figure 1 - Drawing of a toilet and its parts
- Toilet Gasket – wax or urethane ring that seals the base of the toilet bowl to the drainpipe flange.
- Toilet Flange Bolts – brass bolts that fasten the toilet bowl to the drainpipe flange and holds the toilet snuggly against the floor.
- Flexible Water Supply Line – provides connection from the water valve to the float valve in the toilet tank. Water supply lines are available in two standard lengths; 12 and 20 inches.
Items 2, 3 and 4 are all available individually or in kit form as shown in Figure 2. The kit is usually less expensive than buying each of the parts individually.
In some cases, you may also need to purchase a toilet seat or reuse the one from the toilet you are removing. You may also want to purchase the caps that cover the toilet flange bolts.
The tools that will be required to replace a toilet are:
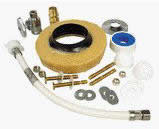
Figure 2 - Toilet installation kit

Figure 3 - Water pump pliers
- Water Pump Pliers (Figure 3) – this is the easiest tool to use to tighten the water supply connection to the toilet tank. However a medium size adjustable wrench will also work.
- Adjustable Wrench or Wrench Assortment – used to tighten the nuts on the flange bolts, the nuts on the bolts that mount the tank to the bowl and to tighten the water supply line to the water valve.
- Large Screwdriver – used to hold the bolts in place that tighten the tank to the bowl.
- Small Scraper – needed to scrape any old gasket material off the floor flange.
- Deep Socket Set - not a mandatory requirement, but they do make the assembly much easier.
Procedure to remove the old toilet:
- Turn off the water supply to the toilet.
- Remove the toilet seat if it is going to be reused. Two bolts go through the hinge assembly (you may have to pop up a cap that hides the head of the bolt) on the back of the toilet bowl. The nuts are located under the rim of the bowl.
- Flush the toilet.
- Remove the lid on the toilet tank and sponge out any remaining water. Note: The toilet has a water trap molded into the bowl. Hence, there will be residual water left in the toilet, below the bowl.
- Undo the nut that connects the water supply line to the toilet.
- Remove the nuts on the bolts on the base of the toilet bowl. These may be covered by caps that can be removed by placing the tip of a screwdriver between the edge of the cap and the bowl.
- Lift the toilet straight up to clear the flange bolts. As pointed out in item 5, there is still water in the trap molded into the base of the toilet bowl. Tipping the bowl left to right or front to back will cause the water in the trap to flow onto the floor!
- Remove the two flange bolts and discard.
- Remove any gasket material that remains on the flange.
- Remove the water supply pipe at the valve end and discard.
Procedure to install the new toilet:
- Mount bowl to tank by using the gasket, brass nuts, bolts, and washers supplied with the toilet. (I find it easier to mount the tank to the bowl because in many cases it is very difficult to get access to the tank bolts once the bowl is installed. However, some people prefer to install the bowl first, because it is much lighter to maneuver into position and then mount the tank on top.)
- Install the new water supply pipe to the valve.
- Install the new flange screws in the slots in the flange.
- Install the flange gasket on the base of the toilet bowl.
- Lift the toilet bowl above the height of the screws and lower so that the two flange bolts appear through the holes in the base of the toilet bowl.
- Tighten the bowl to the flange by alternate tightening of the two nuts on the flange bolts. Don’t forget to install the flange bolt cover bases, if applicable, over the bolts before placing the nuts on the bolts.
- If you have installed the bowl without the tank then install the tank to the bowl at this time.
- Connect the water supply line to the bottom of the tank bowl float valve. It is always wise to use some pipe thread tape on any threaded pipe fittings to help prevent leaks.
- Turn the water on and look for leaks.
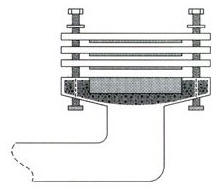
Figure 4 - Toilet extension flange
- Install the flange bolt caps if applicable. It may be necessary to cut the height of the bolts with a hacksaw in order for the caps to fit.
- Install the toilet seat.
- Place cover on top of the toilet tank.
If you need to raise the drainpipe flange in order to have it level with the surface of the floor you should use a toilet extension flange, as shown in Figure 4.
CAUTION: All toilets are molded from porcelain, which is a very brittle material. Tightening any bolts, with to much force, may cause the porcelain to crack!
Additional information on toilets