
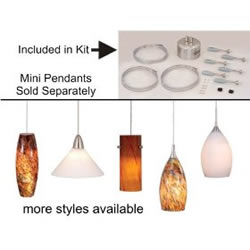
Figure 1 - Track lighting installation kit
Track lighting's versatility is provided by the track, which gives you a great deal of design, position and directional flexibility. It conveniently allows you to add and remove lights at will, change the direction of the heads and even attach special track pendant lights to give a room some extra style and flare.
Selection of track lighting.
Note: In most cases the light fixture heads chosen must be of the same manufacture as the installed track. There are numerous mounting differences between manufacturers, so it is important that you consider possible future changes before you purchase your track lighting kit.
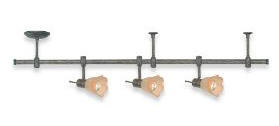
Figure 2 - Track lighting
Track lighting is the perfect solution for areas in your home that are tight, poorly lit spaces. The heads cast light on these, otherwise shadowy areas, making the space useable.
Directional heads are perfect for accentuating wall art, sculptures or mantelpieces. Simply turn a couple of the light heads toward the item you want to highlight and the track lighting system will bring out its best qualities.
Track lighting is frequently installed above a kitchen island or bar, providing diners with adequate light for eating, reading and socializing, while providing a comfortable ambience. The light from a track lighting system also provides highlights to granite, stone and synthetic countertops, making them sparkle as they were meant to do.
Hardwood floors also look their best under the glow of some soft track lighting. Track lighting has the tendency to bring out the best in your home.
If you're thinking about installing track lighting in your home, there are a few things to consider. If you have an existing ceiling light fixture that you would like to replace with a track lighting system - the installation is a relatively simple DIY project well within the limits of most home handymen or women. If you don't have an existing ceiling fixture to replace then you're going to need a brand new outlet box and switch, along with the proper wiring. If adding a new electrical circuit is not a project that you are comfortable undertaking, you may wish to consider contracting the project to a licensed electrician.
Most track lighting kits that you buy in stores come with detailed instructions, meant to help guide you along. If any of this makes you nervous - that's another sign you need to employ an electrician.
The following information should guide most handymen through the basic installation of a track lighting system. However, always read and follow the manufacturer's instructions. They understand the proper and safe installation and use of their track lighting products.
Installation (Where a previous ceiling fixture was installed):
- Verify That You Have All Of The Parts:
- Remove The Existing Fixture:
- Attach The New Track Light Connector:
- Attach The Track To The Ceiling:
- Attach The Connector Cover:
- Mount Light Head Fixtures:
- Completion:
Take a look at the instructions you receive with your track lighting kit. Make sure you have all of the parts that are supposed to be included and that you have purchased any additional parts that are necessary to complete the installation.
If the light fixture has not been used, ensure that the outlet still has live power by turning the appropriate wall switch on then off. Turn the power off by switching off the appropriate circuit breaker. Double check that the power is no longer on the light fixture by turning the switch on again.
Don't forget that any electrical box can contain more than one circuit. Hence there still may be live wires in the electrical box. There is no need to disturb any additional wires that may be present, you are only concerned with the wires that currently connect to the old light fixture.
Disconnect and remove the old light fixture.
The wires that previously connected the old light fixture are attached to the new track lighting connector. Don't ignore the ground wire, it is important for the safety of you and your family. Ensure that the wire nuts used to join the wires together are secure.
Plug the wire connector into the end of the track.
Hold the track in its final mounting position and mark the location of the screw/anchor holes using a sharp pencil. Use a 1/8" or smaller drill bit and drill pilot holes through the screw/anchor location marks. This will tell you if you have a joist or open space behind the drywall or plaster. If you have a joist you will need to use a wood screw and if it is hollow you will require a drywall or plaster anchor.
Using the appropriate fasteners connect mount the track to the ceiling.
Snap the connector cover over the connector body ensuring that all the wires are neatly tucked inside the connector body. Don't allow any wires to become crimped or trapped by the cover.
Mount each lighting head into the track by aligning the contact blades parallel to the track. Rotate the base of each head approximately 90 degrees allowing each head should lock into place. To move heads along the track, simply unscrew the base and move it to your desired location.
You can easily add or remove heads, as desired. When adding heads ensure that you are not exceeding the total wattage rating of the track lighting.
Install the light bulbs in the light heads.
Turn the power back on to the circuit.
Turn the track lighting on at the switch and adjust the direction of the heads accordingly. Tighten all position adjustment screws to ensure that the light heads will not move over time due to their weight or the vibrations that occur normally in all homes.