
- Check light switch, and ceiling electrical box wiring.
- Wiggle the toggle on the switch (if there is more than one switch in the circuit for that light fixture you will have to do this to each switch) and see if you can cause the lights to flicker. If the lights flicker when wiggling the toggle on the switch, it is most likely a defective switch and should be replaced. If that does not cause the lights to flicker than move on to the next item.
- Turn the power off to the circuit by either removing the appropriate fuse or turning off the circuit breaker.
- Remove the switch cover plate.
Rotary and slide dimmers are notorious for becoming intermittent after a period of time. If you have a dimmer on the circuit move the dimmer lever or rotate the knob on the dimmer. If the lights only flicker when the dimmer switch is in one position or if moving the dimmer switch slightly makes the lights go on and off, you most likely have a defective dimmer switch.
WARNING: If there is more than one switch in this electrical box, turning a specific circuit breaker off or removing a fuse may not have removed the power from other switches in that electrical box!
- Remove the screws that are holding the switch to the electrical box and pull the switch forward. Depending on how the electrical cable was run the switch (providing there is only one switch in the circuit) may have a black and white wire or two black wires, one on each of the switch terminals. If there is a white wire being used as a switch leg, it is acting as a black wire within the circuit.
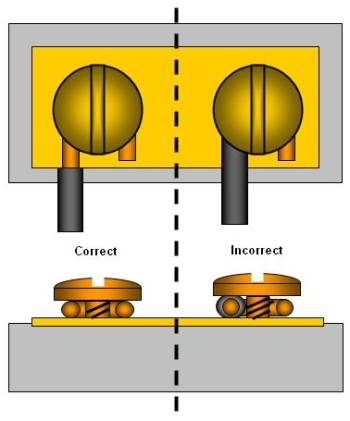
Figure 3 - Correct wiring of a switch or receptacle screw terminal
- Check all wire terminations on the switch, make sure they are all tight. Look for broken wires. It is possible that a wire can appear to be connected to a switch and yet the conductor can be broken. This occurs when the wire has been nicked during stripping and is being held in place by the insulating jacket surrounding the wire.
- If there are any wire nuts on any of the wires running to the screw terminals remove the nut and ensure that there are no broken wires and that the wire connection has been terminated properly.
- Take a look at the wires and ensure that there are no nicks in the insulation. If there are the nicks can be repaired by covering them with electrical tape.
As well, if the insulting jacket is under the screw, as shown in Figure 3, the screw cannot be tight against the conductor causing an intermittent connection. The insulating jacket should not be under the terminal screw.
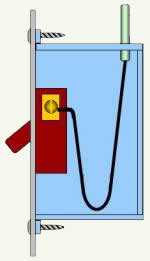
Figure 4 - Bending wires into an electrical box
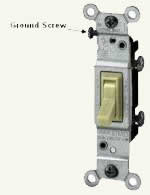
Figure 5 - Ground screw on switch
- If all the wires are tight, none are broken and any wire nut connections are have proper mechanical connections remove the light fixture and inspect the wires and connections in that electrical box in the same manner as was done in the switch electrical box.
- At some point it is worth trying to correct the problem by replacing the light switch. Whether you replace the light switch prior to inspecting the light fixture electrical box is usually relative to the difficulty in getting to it. If the light fixture is over a stairwell and requires some fancy ladder work, then replacing the light switch before inspecting the wires in the light fixture electrical box is probably the easiest progression. If however, the light fixture is in a position with easy access, you should investigate the wiring in the light fixtures electrical box.
- Installing the switch back into the electrical box should be done with some care. As with most things there is a right way and a wrong way. As shown in Figure 4, the wires should be bent away from the entry point of the cable and then back towards the entry point of the cable. This prevents the wires from crimping and being stressed. The same wire bending technique should be used for receptacles as well.
- When inspecting the electrical box for the light fixture a common problem is the wire connections between the light fixture and the electrical wires powering and/or switching it.
The new electrical switches have a ground wire connection (Figure 5) on the switch, this is a relatively new requirement under the electrical code. If you are replacing a switch that did not have a ground termination on the switch body and the new one does, you have a choice.
You can either connect the a piece of ground wire to the box or junction of the other ground wires in the electrical box,
You can ignore the switch ground termination screw.
The ground termination screw is not required for the switch or the circuit to work.
Another common problem occurs when replacing a switch, receptacle or light fixture is putting the wire nut connections in the electrical box. Many times these bulky items, with respect to the size of the electrical box are pushed in using screwdrivers and other tools so that there is enough room for the electrical device. Electrical boxes can become very crowded, especially those containing dimmers and GFCI devices, due to the large size of the device itself.
If the wire nut joints are not placed in the electrical box "gently" it is not uncommon for the joint to pull away or for a wire to break, especially if the copper conductor has been nicked when it was stripped.
I have seen many instances, when troubleshooting a circuit and the devices are unscrewed from the electrical box and the wires pulled out that the problem disappears. The wire nut joints are pushed back into the box, the device is mounted and the problem is back again. In 99% of the cases this is caused by a bad connection in a wire nut.
The cause of the problem is that almost all light fixtures use stranded wire and in some cases they use a smaller gauge wire than the electrical wires used throughout your home.
When a light fixture has stranded wire coming out of it for connection to the house wiring it is connected via a wire nut. It is not uncommon that the wire nut pushes the stranded wire down rather than rapping it around the solid wires creating a strong mechanical connection. This is especially common when joining one stranded wire to one solid wire, but does occur when there are multiple solid wires and one stranded wire.
Remove the wire nuts that connect the light fixture to the line and neutral or switch legs and ensure that the connections are mechanically sound.