
- Use a chalk line to mark the center of the room in the same direction that you plan on installing the vinyl plank flooring, as shown in Figure 2.
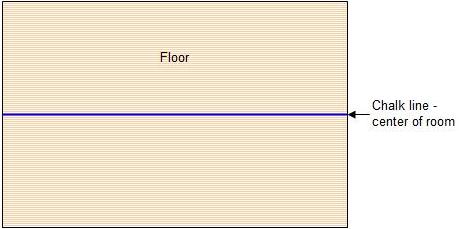
Figure 2 - Chalk line on sub-floor
- Lay the edge of a vinyl plank against the chalk line and then lay another vinyl plank against that vinyl plank until the wall or vertical surface of an object, such as a counter, prevents you from laying another complete vinyl plank. The space that is left between the last vinyl plank and the vertical surface should be at least half of the width of a vinyl plank, as shown in Figure 3.
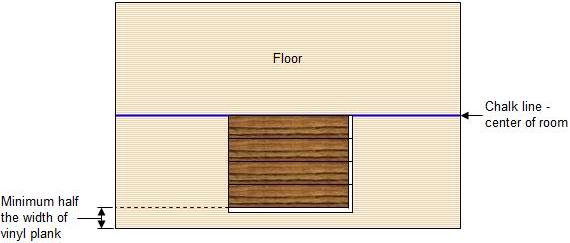
Figure 3 - Vinyl plank floor layout
- Measure the length of the room and determine how many vinyl planks you will need to go from one end to the other. The easiest method of cutting vinyl plank flooring is with a straight edge and a utility knife. Score the face of the plank to approximately half of the thickness of the plank, bend the plank away from the scoring and it should separate cleanly.
Measure the distance and subtract 1/8 inch. Write this number down!
If you have less than half a the width of a vinyl plank remaining between the last vinyl plank and the vertical surface move the chalk line from the center point of the room half the width of a vinyl plank. This will prevent the installation of small width vinyl planks.
Note: It is important that you lay the vinyl planks in the middle of the room, as shown in Figure 3. In most cases the room is widest at the center of the room.
Note: Change the blades in your utility knife frequently.
- Starting in the left corner place the first cut vinyl plank on the floor, adhesive to the outside, as shown in Figure 4. Don’t forget to leave the 1/8 inch gap between the wall and the vertical surface. Remove the paper that is protecting the adhesive.
Figure 4 - First vinyl plank in position
- Place the second vinyl plank next to the first by placing the edge of the second vinyl plank over the exposed adhesive. Use a hand roller or hand pressure to ensure the seam is bonded together.
Note: It is important that the all seams are perfectly aligned. Any small error in alignment will multiply itself as you continue to add additional vinyl planks to the floor. If the vinyl plank flooring is not straight do not try to correct it by adjusting the next row. Peel back the vinyl planks that have been installed and re-install them paying attention to the alignment.