
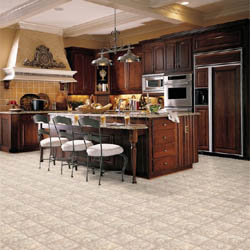
Figure 1 - Sheet vinyl flooring in kitchen
The major obstacle for the installation of the vinyl flooring is having access to an area that is large enough to unroll the sheet vinyl in order to cut it to size. If the room is a small bathroom where the installation width or length is 6 feet or less, and the vinyl that you want is sold in 6 foot widths, this may not be a problem. However, if the room is wider or longer than 6 feet you will be working with a 12 foot wide roll, you may find it difficult to find an area that will allow you to unroll the vinyl in order to cut it to size.
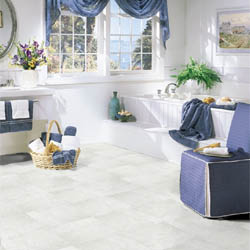
Figure 2 - Sheet vinyl flooring in bathroom
Because vinyl flooring is moisture resistant, it makes an excellent choice of material for many rooms in the home; kitchens, entryways, sunrooms, family rooms, and bathrooms. With the new patterns, it is easy to create the look of ceramic tile or hardwood flooring. Vinyl flooring has been proven to ease the stress on foot and calf joints, making it an excellent choice for kitchens.
Sheet vinyl comes in many grades and qualities. Some are cushioned to provide a spring when walked on. Some require adhesives to be used under the vinyl (full bond), others can be installed with adhesive used only around the edges (perimeter bond), and some require the use of adhesive at door openings only.
Power tools are not required to install vinyl flooring. A few basic hand tools are all that you will need.
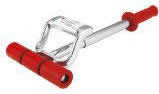
Figure 3 - Sheet vinyl flooring roller
- Tape Measure (at least as long as the length of the room where you are installing the vinyl flooring).
- Straight Edge (a carpenters square works extremely well).
- Utility Knife (extra blades).
- Floor Roller (Figure 3) (can be rented if required)
- Measure The Room:
- The largest dimension will determine the width of sheet vinyl that you must purchase. By far the most common width of sheet vinyl is 12 feet. However, some is available in 6 foot, and 15 foot widths.
- The most difficult part of the installation of sheet vinyl flooring is seaming – joining two pieces of flooring together. Some manufacturers have seaming kits, and although this makes the job a bit easier, it takes a lot of practice to create a perfect seam with vinyl flooring.
- If you have not installed and seamed sheet vinyl in the past, I recommend, that if at all possible you purchase a piece of sheet vinyl that can be laid in one piece, without the need for seaming.
- If you must seam two pieces together, and have not done this before, I suggest that you cut off a small piece from the sheet vinyl that you have purchased, that would be scrap and make a few practice seams before you attempt to seam the installed vinyl sheets.
- Room Preparation:
- Determine whether or not you are going to remove the baseboard, lay the sheet vinyl and then replace the baseboard. It is much easier to install the vinyl flooring under the baseboard rather than trying to trim it to the outside edges of the baseboard. If you have removed the baseboard, check for nails that are protruding from the walls and remove them. If it is a bathroom, you must decide whether or not you will be laying the vinyl under the toilet or trimming to the toilet. Again, I recommend laying the vinyl under the toilet, it makes for a more professional job and in the long run is much easier installation.
- Additional information on removing and re-installing a toilet
- Anything within the room that can be removed should be. This includes, furniture, refrigerators, stoves, portable dishwashers, floor mounted HVAC grills. If you have a built in dishwasher remove the base plate so that the vinyl can run a 1/2 inch or so under the base plate. Remove the bottom drawers in any of the kitchen cabinets or bathroom vanities, as the drawer handles, knobs or pulls will be obstacles when laying the vinyl.
- If there are doors on the room, I recommend that you remove them. It makes it much easier to trim the vinyl around the floor by the hinge side of the door, if the door has been removed. It is generally quite simple to remove the hinge bolts in order to remove the door.
- The area needs to be vacuumed thoroughly. Check for loose pieces of plaster or drywall located behind the baseboard and the area between the sub-floor and the wall.
Continued.....