
Figure 1 - Wallpaper in a home
To remedy the problems of wallpapering in corners there are some techniques that can be used. But before we discuss the techniques it may be of some help if you understand why the wallpaper wants to crease or wrinkle.
Drywall, the most common material used for indoor wall construction is flat, however, to join the drywall to the ceiling and to join one wall to a another wall, a paper tape is laid over the seam and drywall joint compound or mudd, as it is known in the trade, is applied to the surface of the joint. Although the joint between the ceiling drywall and the drywall joint on intersecting walls looks flat to the naked eye, it isn’t!
You can prove this by measuring the width of your wall at the center point and then measure it at the very top. The difference can be as much as 3/8 of an inch. Although 3/8 of an inch doesn’t sound like much, it means that the wallpaper, when it fits into the corner wants to rest at an angle when it moves from one wall to the adjacent wall. This creates excess wallpaper on the adjacent wall, which in order to sit flat, creates a crease or wrinkle.
The problem is exasperated when trying to wallpaper around the end of a wall, an outside corner. The top of the wall, where it meets the ceiling can easily be 1/4 of an inch wider than the middle of the wall. Hence the wallpaper has to travel less of a distance on the middle and bottom than it has to at the top of the wall. Where is this excess wallpaper supposed to go? In order to fit properly, it creates a crease or wrinkle to absorb the excess wallpaper.
Note: It is actually easier to hang inexpensive wallpaper on outside and inside corners than expensive wallpaper. The higher the quality of the wallpaper, the less it will stretch and that means that the creases or wrinkles will be more prevalent. This is not a recommendation to use low quality wallpaper, as low quality wallpaper has other problems, such as shrinkage, transparency and tearing while being hung.
A wallpaper crease or wrinkle widens the farther away it gets from the change in wall dimension. The crease is a triangle where one of the points of the triangle is at the location where the wall width dimension has changed – a corner.
Hanging wallpaper on inside corners:
There are basically two methods of wallpapering an inside corner.
- The first is the double cut method whereby, you bring the wallpaper around the corner approximately 1 inch, as shown in Figures 2 and 3, overlap the piece from the adjoining wallpaper, as shown in Figure 4 and then using a razor blade knife you cut through both pieces of wallpaper, approximately 1/4 inch from the corner as shown in Figure 5.
- You then remove the excess piece of wallpaper that is on the wall from the first sheet of wallpaper by pulling back the second sheet of wallpaper to expose it.
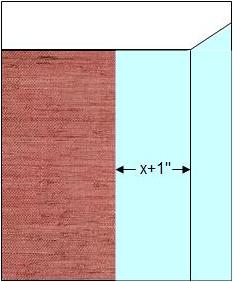
Figure 2 - Hanging wallpaper on inside corner - Method 1, Step 1
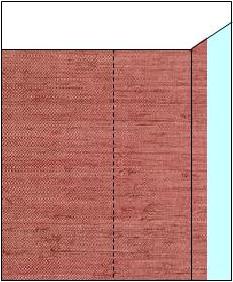
Figure 3 - Hanging wallpaper on inside corner - Method 1, Step 2
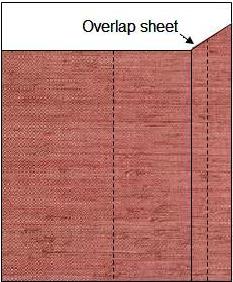
Figure 4 - Hanging wallpaper on inside corner - Method 1, Step 3
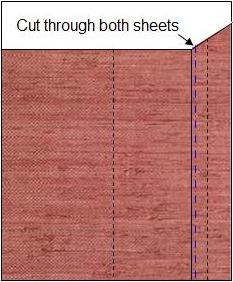
Figure 5 - Hanging wallpaper on inside corner - Method 1, Step 4
- The intent being that you should be able to eliminate any creases on the 1/4 inch piece that has wrapped around the inside corner using a wallpaper roller. I am not a big fan of this method, as I find that even a 1/4 inch can be a problem for creases or wrinkles, especially on quality wallpaper. I also find that if there is any shrinkage in the wallpaper after it dries, it is at the inside corner joints where the wallpaper will most likely separate.
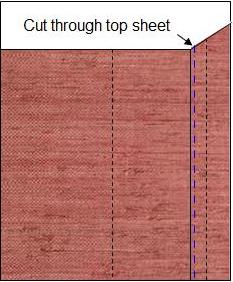
Figure 6 - Hanging wallpaper on inside corner - Method 2, Step 4
- The second method is the overlap method. You basically start off in the same manner by bringing the wallpaper around the corner approximately 1/2 an inch (see Figure 1, changing the “X+1 inch” to “X+1/2 inch”). If you have any serious creases in the 1/2 inch section that cannot be smoothed out with a wallpaper roller, you can cut the crease or wrinkle out of the wallpaper using a razor blade knife. These cuts will be hidden by the next sheet of wallpaper. You then hang the first corner sheet of the adjacent wall so that it fits tightly into the corner, overlapping the piece of wallpaper from the adjacent wall. You trim the top sheet only, using a razor blade knife of scissors so that it fits tightly in the top corner, as shown in Figure 6.
- This is the method that I prefer when hanging wallpaper on an inside corner. It takes care of potential problem of the wallpaper shrinking on the inside corner, because even if it shrinks, there is wallpaper on top which will hide the edge. The better the quality of the wallpaper, the better this method works.
Note: If the wallpaper that you have purchase is vinyl you will need to use a vinyl-to-vinyl adhesive between when adhering one piece of vinyl wallpaper on top of another piece of vinyl wallpaper (overlapping). The vinyl to vinyl adhesive will be available at the retailer where you purchased the wallpaper.
Note: I highly recommend the use of a razor blade knife with snap-off tips, as shown in Figure 7, rather than a utility knife for wallpaper work. Paper dulls sharp edges on knives and other types of blades very quickly. The razor blade knife with snap-off tips allows you to always have a sharp edge available for trimming.
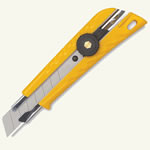
Figure 7 - Razor blade knife with snap-off blades
Hanging wallpaper on outside corners:
Hanging wallpaper on an outside corner can be very frustrating. But the easiest way is to use the same techniques described in method 2 of hanging the wallpaper on an inside corner.
Bring a sheet of wallpaper around the corner, approximately 1 inch. Then overlap that edge with the next sheet so that the edge of the wallpaper is approximately 1/8 inch from the edge of the wall. Leaving a 1/8 inch from the wall edge will help to prevent the wallpaper from fraying.
Many homeowners will use an outside corner wallpaper trim piece which fits over the corner of the wall, as shown in Figure 8. This trim or molding protects the wallpaper from damage, a common occurrence at outside corners.