
A 3-way switch, as shown in Figure 1, is used to turn a light fixture OFF
and ON
from two locations.
From a safety stand point. it is highly advantageous for stairway and hallway lighting as it allows the occupant of the home to turn the light ON
from the bottom or top on the stairs or from either end of a hallway.
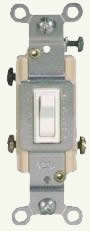
Figure 1 - 3-Way Switch
Selection of 3-way switches
The wiring of a 3-way switch can be confusing. However, there are only four possible combinations of wiring that can utilize a 3-way switch and three of those four situations are relative to where the fixture is in relationship to the 3 way switches and the incoming power to the circuit.
The fourth use of a 3-way switch is in conjunction with 4-way switches. 4-way switch circuits use 3-way switches at the ends of the circuit. Additional information on 4-way switch wiring
It should be noted that the circuit can control more than one light fixture. Additional light fixtures are run in parallel to the first fixture.
3- Way Switch Installation - Layout Diagram 1 (Figure 2):
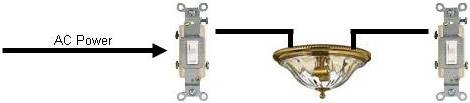
Figure 2 - 3-Way Switch Installation - Layout Diagram 1
3-Way Switch Wiring Diagram: Power enters at one 3-way switch box, proceeds to light fixture, proceeds to second 3-way switch (Figure 3):
Click on image for larger view
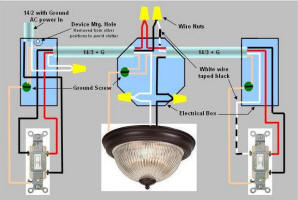
Figure 3 - 3-Way Switch Wiring Diagram: Power enters at one 3-way switch box, proceeds to light fixture, proceeds to second 3-way switch.
3- Way Switch Installation - Layout Diagram 2 (Figure 4):
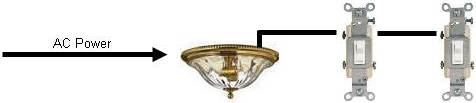
Figure 4 - 3-Way Switch Installation - Layout Diagram 2
3-Way Switch Wiring Diagram: Power enters at light fixture box, proceeds to first 3-way switch, proceeds to second 3-way switch (Figure 5):
Click on image for larger view
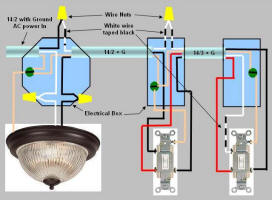
Figure 5 - 3-Way Switch Wiring Diagram: Power enters at light fixture box, proceeds to first 3-way switch, proceeds to second 3-way switch.
3- Way Switch Installation - Layout Diagram 3 (Figure 6):
Figure 6 - 3-Way Switch Installation - Layout Diagram 3
3-Way Switch Wiring Diagram: Power enters at one 3-way switch box, proceeds to second 3-way switch box, proceeds to light fixture (Figure 7).
Click on image for larger view

Figure 7 - 3-Way Switch Wiring Diagram: Power enters at one 3-way switch box, proceeds to second 3-way switch box, proceeds to light fixture.
If your application requires multiple light fixtures controlled by the same 3-way switches the additional light fixtures should be wired in parallel to the first fixture. The circuit should be connected to the point where the first light fixtures wires are connected to the power - after the switches.
Click on image for larger view
