
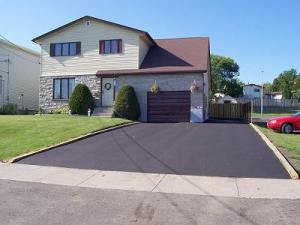
Figure 1 - Driveway paved with asphalt
That means that you will need to find a contractor that has the experience and credibility to provide you with a job that will last.
Finding a reliable contractor could be a challenge unto itself. There are many fly by night paving contractors. Check out your contractor thoroughly and be wary of people coldly knocking on your door or calling you on the telephone.
Ensure that the contract with your contractor spells out exactly what is going to be done:
- Removal and disposal of the current surface
- Grading the driveway for drainage
- Compacting the subsoil
- Thickness of the layer of the crushed rock
- Compacting the crushed rock (which should be done in two stages)
- Thickness and specification of the asphalt
- Compacting the asphalt
- Edge treatment
Note 1: If you have driveway gates, drainage gratings, surface boxes for water and/or gas shutoff valves, it is important that they are identified within the contract and that they are the contractor’s responsibility to either reinstall or configure as part of the project.
Note 2: You should also specify that it is the contractor’s responsibility to have the property surveyed for any underground cables, gas pipes and water lines and that any damage to those items are to the contractor’s account.
A properly installed asphalt driveway will last 30 to 40 years with little maintenance.
Someone should witness the project to ensure that the subsoil compaction actually takes place and that the proper thickness of crushed rock has been used.
As with many projects the key to a successful installation is the foundation. Depths vary depending on the condition of the sub-soil but, as a general rule you need to have 4 inches of compacted crushed rock in very sandy soils to 8 inches of compacted crushed rock above clay soil.
The driveway should be graded for water runoff of a minimum of a 1/4″ per foot. There should not be any low spots. Running a garden hose at the top end of the driveway and watching the water flow downward can easily check for the correct grading for proper drainage. At the same time ensuring that no puddles of water are left standing. Without proper drainage, water will end up below the surface of the asphalt causing it to heave, especially in climates that are subject to sub-freezing temperatures. If your driveway is virtually flat, have the contractor place a slight crown down the length of the driveway, which will force drainage to occur to the sides of the driveway.
The top layer of asphalt should be 2 inches to 3 inches thick. It is a misconception to think that the thicker the layer of asphalt the greater the weight it will carry. People who have RV’s, and trucks often want a thicker layer of asphalt to support the weight of these vehicles when in fact it is the crushed gravel layer that should be increased in thickness as it is this layer that actually supports the weight of any vehicles. Consider the asphalt as a veneer surface to a crushed gravel driveway.
There are many asphalt mixtures for different purposes and climate conditions. When writing your agreement with your contractor, have them specify the asphalt mix that they will be using.
All compacting should be done with a minimum 3,000 pound twin drum roller.
The best way to complete edges is with a concrete or paving stone border or curb. One of the most common failure points of asphalt driveways is the edge, when the weight of a vehicle runs over it. However, it is common to place a 45 degree angle applied to the hot asphalt for purposes of edging. If you are applying the 45 degree angle edging you may wish to consider having the crushed gravel extend 8 inches to 10 inches out from the driveway in order to support vehicles that cross over the asphalt edge.
Another consideration is the placement of one or more 2 inch PVC conduits under the driveway for future use.
The PVC conduits can be used for:
It is also wise to have the contractor spray the subsoil with a sterilizer to prevent weeds growing up through the crushed gravel and asphalt surface. A landscaping fabric works extremely well for this application.
Driveway sealing should not be undertaken for at least 9 months after the asphalt is installed. The asphalt needs time to cure and the sealers prevent the curing process from taking place. Your new asphalt driveway does not have to be resealed each and every year. Too much sealer and you will begin to get cracking with the sealer itself.
Figures 2 through 7 show the proper steps taken for the installation of an asphalt driveway.
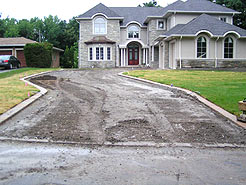
Figure 2 - Driveway prior to any work
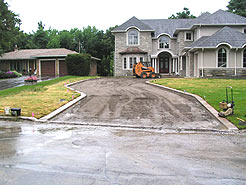
Figure 3 - Driveway foundation being graded
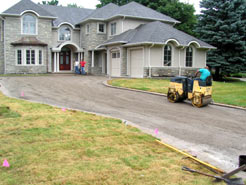
Figure 4 - Foundation being compacted with a two drum roller
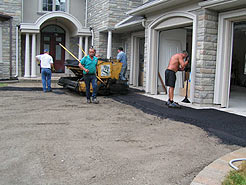
Figure 5 - Commencing installation of asphalt
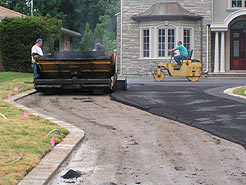
Figure 6 - Asphalt being laid and compacted
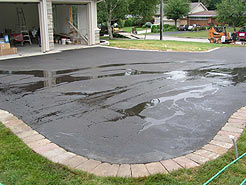
Figure 7 - Completed asphalt driveway
Additional information on the installation of concrete curbs and gutters with an asphalt driveway.
Additional information on the causes and repair of potholes.