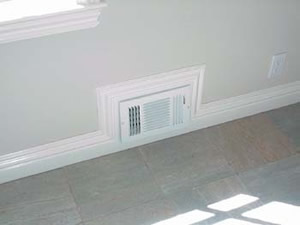
Figure 1 - Baseboard around wall vent
New baseboard, properly installed, as shown in Figure 1, can make a dramatic statement to any home. It is a home improvement definitely worth undertaking and requires only the basic in tools and diy handyman expertise.
Baseboard moldings come in a vast variety of shapes, as shown in Figure 2, finishes and materials.
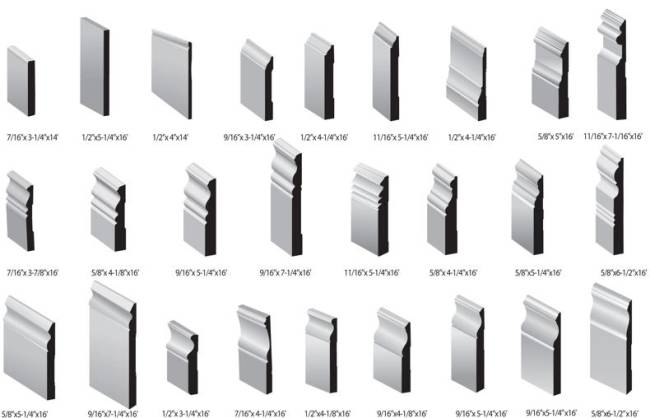
Figure 2 - Common baseboard shapes and sizes.
Materials and styles include MDF, solid hardwood, finger jointed hardwood, oak, cedar, mahogany, pine and exotic lumbers. As well, baseboard is available with vinyl covering and pre-painted.
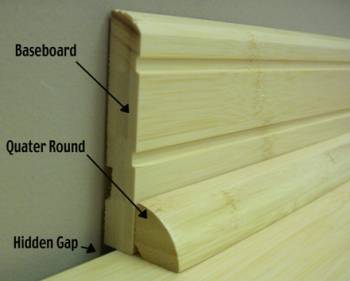
Figure 3 - Baseboard with quarter round trim.
It is not uncommon to add quarter round to the base of baseboards to add additional depth, as shown in Figure 3. The quarter round also helps to protect the face of the baseboard from damage.
The baseboard should be one of the last items installed after a renovation. It hides the imperfections where the wall material meets the flooring and provides the gap between the flooring material and the wall that is necessary for expansion and contraction.
If the baseboard is to be painted it is wise to paint it prior to installation and then touch-up nail marks and joints once it is installed. By painting it first, you avoid getting paint on the floor and adding brush marks at the point where the baseboard meets the wall.
If the baseboard that you are installing is to replace existing baseboard be careful not to damage the walls when removing the old baseboard. It is not difficult, if using the drywall as leverage to release the nails, to have the pry-bar or hammer put a dent in the drywall.
To avoid making dents in the wall surface use a piece of scrap plywood as a backer board between the wall and the tool you are using.
Once the old baseboard has been removed, you may find a bead of old paint stuck to the drywall, use a paint scraper to remove this bead. Vacuum up any debris and grit, before installing the new baseboard.
Inside and outside corners are the most complex part of the project. You may have to play with the angles as most walls are not true 90 degree corners. If you are painting the baseboard, gaps can be filled with spackle or wood putty to correct any joints that are not perfect. However, if you are staining the baseboard a natural wood color, the joints must be perfect.
Outside corners should be cut at a 45 degree angle and inside corners should be back cut with a coping saw to match the shape of the baseboard.
Transitioning from walls to stairs, over and around wall vents requires some thought. The picture at the top of this page shows one method of dealing with a wall register.
Figure 4, shows one method of dealing with the transition from a floor to a staircase.
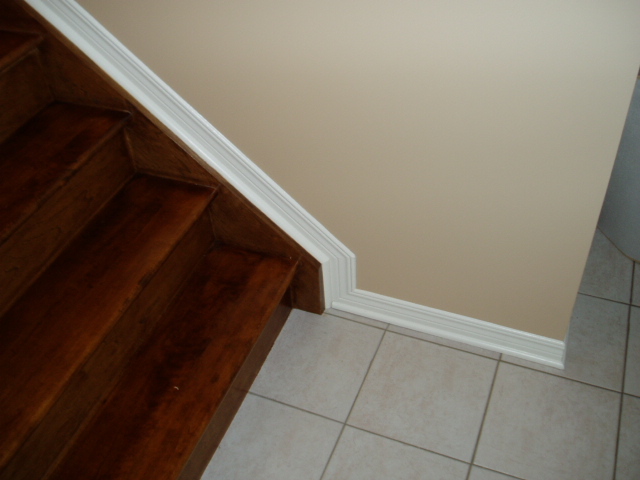
Figure 4 - Transitioning baseboard from floor to staircase
The baseboard should always butt up against doorway trim, rather than having the doorway trim sit on top of the baseboard, as shown in Figure 6. For that reason, the door trim should be installed before the baseboard.
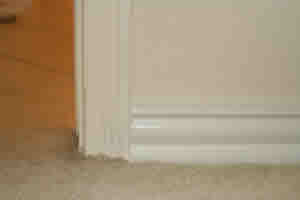
Figure 6 - Baseboard meets door trim
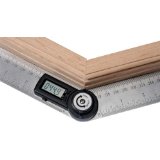
Not all angles will be true 45 or 90 degree angles and in cases where walls have unusual bends it will be necessary to match the baseboard to the angle of the walls. The easiest method of measuring and calculating the angles for cutting is to use an angle gauge, as shown in Figure 5.