
They provide a resting place where you can contemplate the world, read a novel, watch mother nature at work and if placed in a shady spot provide the perfect spot to doze off.
Most DIY home handymen are capable of building garden benches from these plans. The following plans are designed to inspire your imagination. They do not have to be constructed exactly as depicted. They can be made higher, longer, and/or wider.
Garden Bench With Concrete Pedestal Support:
As shown in Figure 1, this garden bench provides a set of concrete bases or supports with 2 X 4 lumber for the seats and back rest. The seat and back rest lumber is easily attached and makes it convenient to replace these slats over time if they deteriorate.
This bench is designed to be left in place, as the concrete bench supports make it relatively heavy.
The lumber for the seats and back can be pressure treated, cedar or western red cedar. It should be painted or stained and a weatherproof finish should be applied to add to its longevity. The concrete can also be painted or stained with a concrete stain.
The bench can be lengthened by adding additional supports every 4' on centers.
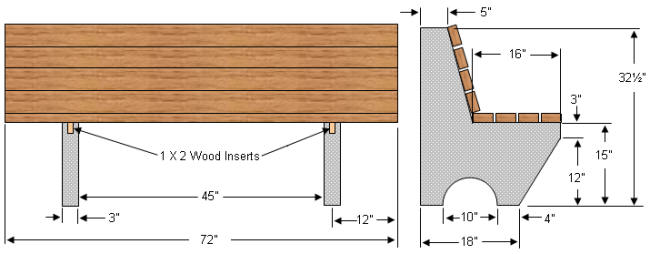
Figure 1 - Garden bench concrete supports and wood seat and back
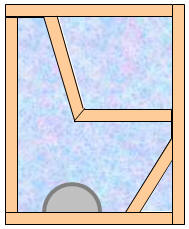
Figure 2 - Mold for concrete bench support
Construction:
- Build a mold to create the concrete bench supports as shown in Figure 2.
- Use 2 X 4 lumber to construct a frame. Note 1
- Use 1/2″ plywood or particle board for the base. Note 1
- The semi-circle in our design has a 10″ diameter. You can use half of a piece of metal or plastic pipe, a cookie tin, pail or bend a piece of flat metal to shape. Cover the outside with wax paper as described in Note 1.
- Use clamps around the outside edges of the mold frame to give it added strength.
Note 1: Cover the insides of the 2 X 4's and bottom with a layer of Formica or other smooth laminate material. This will allow the concrete to come away from the mold easily once it has cured.
If you do not have any scrap laminate available, cover the insides with a couple of layers of wax paper that would be used in a kitchen.
- The front top vertical edge of the concrete support and the horizontal seat support have pieces of 1 X 2 embedded in the concrete (see Figure 3) to provide an easy method to screw the 2 X 4 seat and back members to the concrete support.
- The 1 X 2 pieces are embedded in the concrete while it is being poured, so it is wise to make them ahead of time.
- Cut two pieces of 1 X 2 to length as designated in Figure 4.
- Insert 2 1/2 inch, galvanized or stainless steel finishing nails, staggered approximately every 3 inches into these members, allowing the tip of the nails to protrude through the piece of lumber by 1 1/8 inch as shown in Figure 5.
This will allow you to place the member in the mold as you are pouring the concrete, nail ends down and touching the base, and it will be in the correct position, centered in the mold and hence the support.
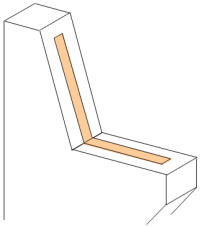
Figure 3 - 1 X 2 Lumber embedded in finished concrete base support
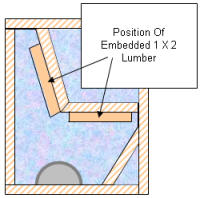
Figure 4 - Placing embedded wood inserts in concrete bench support mold
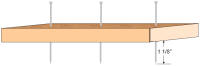
Figure 5 - Wood inserts for concrete bench
- Using some small finishing nails mark the height of the concrete on completion of the pour - 3″.
- The next step is to mix and pour your concrete. It is best to purchase pre-mix concrete in bags that has a small sized aggregate.
The pedestal support as shown here requires three - 60 lb. bags of concrete mix.
- Fill the mold to approximately half of the thickness of the pedestal support - 1 1/2″
- Insert the pieces of lumber that will act as the seat and back fastening strips. The tip of the finishing nails should point down and rest on the bottom of the mold. Make sure that there are no air pockets underneath these pieces of lumber.
- Pour the balance of the concrete into the mold to the level of the finishing nails.
- Tap on all the sides of the mold to release any air trapped.
- Smooth the surface of the concrete with a trowel.
- Keep the surface moist for 24 hours.
- After 24 hours you can remove the concrete pedestal support from the mold.