
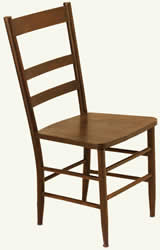
Figure 1 - Chair with curved back
There are basically 4 ways to curve a piece a piece of wood. While some projects could use more than one of the methods to provide the curved piece of wood, usually one method will be more practical for a specific situation.
Laminating:
Laminating wood is the process of gluing a number of thin pieces of wood together into the finished shape.
Laminating lumber is a common method of creating a thicker piece of lumber. It is the way that plywood is manufactured and many new structural beams and girders are laminated together. Laminated wood has a great deal of structural strength. It will also maintain its curve with little to any springing back.
Figure 2 illustrates laminating a multiple pieces of wood into a solid piece of curved wood. The curved rockers on this rocking chair have been created using laminated wood. For best results, the thickness of each piece of wood should be 1/8 inch or thinner, although I have seen laminated wood pieces using wood that is a 1/4 of an inch thick. The decision as to the thickness of each of the pieces of lumber is relative to the degree of curvature that you are trying to obtain. As a general statement - the tighter the curve you are trying to make, the thinner each piece of the wood.
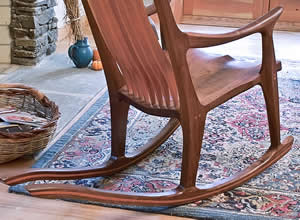
Figure 2 - Laminated wood used to create curved rockers
For best results, the thickness of each piece of wood should be 1/8 inch or thinner, although I have seen laminated wood pieces using wood that is a 1/4 of an inch thick. The decision as to the thickness of each of the pieces of lumber is relative to the degree of curvature that you are trying to obtain. As a general statement - the tighter the curve you are trying to make, the thinner each piece of the wood.
Note: On tight bends you can moisten the laminate strips and place them in the jig without an adhesive. Allow the laminate strips to dry, remove them from the jig and then apply the adhesive and replace them in the jig.
Note: It is best to place waxed paper over the surface areas of the jig to prevent the adhesive from bonding to the jig.
Note: The use of fast drying epoxy is not recommended as it does not have the strength of slow drying epoxies. Yellow carpenter’s wood glue will work extremely well for gluing the laminate strips together.
The biggest advantage to using laminated wood to create your curve is that you do not need to steam the wood. Secondarily, as previously mentioned a laminated piece of wood will maintain its shape. There is also a subtle advantage that it is easier to create your curve using this method over steaming. As steaming lumber is a bit of an art and requires a lot of practice to obtain a correctly curved piece of wood.
The biggest negative in using laminated wood is the edge appearance of the piece of wood. You can and will see the laminated layers on the edge of the finished piece of curved wood. It may be noted that some furniture manufactures actually use this as a benefit by incorporating the layered appearance into the design of the furniture.