
Once the two side walls are ready, erect the back wall. To build the sloping back wall of the firebox, cut a piece of plywood to the proper shape for your specifications. This piece of plywood can be placed inside the firebox as you lay each course of bricks to ensure that the slope of the back wall is correct, as shown in Figure 16. To give the wall added strength, plaster its back with mortar, as shown in Figure 17.
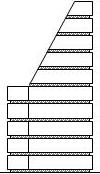
Figure 15 - Firebox side wall bricks mortared into position
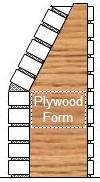
Figure 16 - Plywood form for back wall of firebox
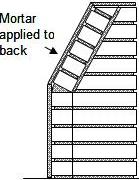
Figure 17 - Mortar plastered on the back of the firebox
When the firebox is completed, fill in the space left between the outer walls and the firebox with broken bricks and pieces of masonry to allow for firebox wall expansion. Care must be taken while doing this not to put undue pressure on the firebox’s vertical sloping wall. A sudden excessive weight may cause this wall to collapse.
Damper:
With the firebox walls erected, the damper, as shown in Figure 18, is set in place. You can, if you want, mortar it to the brick it rests on, but this is not necessary. Make sure to leave a space of at least 1/2″ between the ends of the damper and brickwork. The damper is subject to intense heat, which may cause it to expand. If there’s not sufficient clearance between the masonry and the damper, the expanding metal will push against the brickwork, causing it to crack.
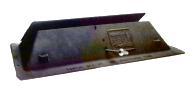
Figure 18 - Fireplace damper
After the damper is in place, it is a good idea to protect this clearance form accidentally dropped mortar by placing a few bricks or a piece of metal temporarily over the joint as a protective device.
Smoke Shelf:
The smoke shelf is created by the installation of the damper and the filling of the space between the perimeter walls of the fireplace and the firebox walls. To improve its efficiency, make the smoke shelf concave with cement, as shown in Figure 19.
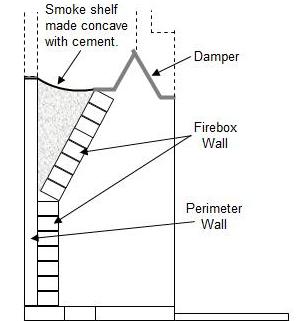
Figure 19 - Fireplace smoke shelf
Smoke Chamber:
The masonry work is corbelled to bridge the gap between the dimensions of the outer walls of the fireplace and those of the chimney. Corbelling is the stepping in of bricks for a few courses, until the smoke chamber narrows down to the flue size, as shown in Figure 20. This process is somewhat tricky because you’re corbelling from three directions – the front and two side walls, as shown in Figure 20. The walls should corbel quickly, with a minimum number of courses, to increase the funneling action of the chamber.
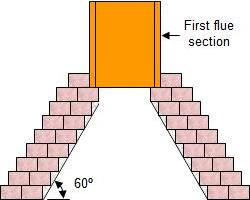
Figure 20 - Fireplace smoke chamber
The next to the last course of brick should provide a ledge for the flue to rest on, as shown in Figure 20. For minimum interference with the passage of exhaust from the chamber out the flue, smooth all the interior surfaces of the chamber by plastering the sides with mortar.