
With today's technologies finish carpentry can include products that are made to look like wood but are actually synthetic or man made composite materials.
Baseboards and door frames are the most common areas of finished carpentry, but other areas such as crown moldings, as shown in Figure 1, kitchen cabinets, bathroom vanities, fireplaces, stair and balcony railings are all considered finished carpentry projects.
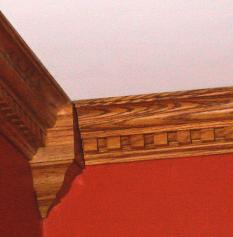
Figure 1 - Wood crown moulding
Finished carpentry requires more patience and a very good understanding of wood working tools, types of lumber and their suitability for different functions and finishes.
Probably the most difficult part of finished carpentry is joinery. Joinery is the term used when two pieces of lumber meet one another and they need to be joined to each other. There are many different types of joints that can be used, but in all cases the key to an excellent finished appearance is the ability to cut the lumber true.
Trying to miter a clean and tight 45° angle on a door frame can not be accomplished using a $1.95 plastic miter box and a $5.00 miter saw. If you are going to be serious about doing your own finished carpentry then you must invest in quality tools. Your finished joints are only as accurate as the tools that are used to make them.
Additional information on hand tools.
Additional information on hand power tools.
Additional information on stationary power tools.
The same situation applies to finishes. Using the wrong or a low quality brush or stain will not give you a professional looking finish.
One of the biggest frustrations that the home renovator will face when doing finished carpentry is hardwood that splits. Hardwood baseboard and door frame material creates the best look when stained, but if the wood splits when you attempt to nail it to a wall or another board the investment that you have made in quality hardwood has just been eliminated.
The key to nailing hardwood is to pre-drill holes, just slightly smaller in diameter than the nail you are using and then use a nail punch to drive the head slightly below the surface to allow for the use of a wood putty or filler over the head.
Do not try to drive the nail below the surface with a hammer as you will leave dent marks in the wood surface.
The same technique of pre-drilling should be used on all lumber if you are less than an inch away from the end of the board.