
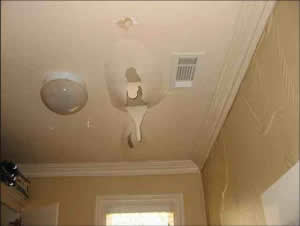
Figure 1 - Ceiling bulge due to water
Ceiling water damage can be relatively minor; a yellowing appears in small areas of the ceiling and/or drywall nail or screw heads become black (rust) and visible.
Or the ceiling water damage can be major; a bulge is holding back a considerable quantity or water, as shown in Figure 1, or the water has actually broken through the drywall on the ceiling, leaving debris and water everywhere.
Before a repair or fix, to the damaged ceiling can be attempted, you must identify the cause and ensure that no additional water will add to the current problem. If the water is from a leaking pipe, turning off the main water to the home or an inline shut-off valve will stop any additional water damage. If the water damage is roof related then temporary repairs can be made using a roof leak prevention product or caulking until you have the time to make the permanent repairs. You can also use caulking to repair leaks around window frames or attic gable end vents.
Note: Remember that roof leaks are not necessarily directly over the area of the ceiling that is damaged. Water often runs along rafters and joists.
A bulge in the ceiling drywall is the most serious of all possible ceiling problems. The bulge is caused by a quantity of water sitting on the drywall. The drywall, as it becomes wet expands and produces an area to collect the water. At some point the weight of the water will become so heavy that it will break through the drywall. The result is a floor and furnishings covered with pieces of drywall, water and possibly insulation if the ceiling is directly below the attic.
To repair a bulge in the ceiling, the first step is to remove as many of the furnishings from the room as possible. Cover the floor and remaining furnishings with a plastic sheet or tarpaulin.
Once you have protected the floor and furnishings in the room you can remove the water from the bulge. To do this puncture the bulge by inserting an awl or other sharp object in order to make a small quarter inch hole in the lowest part of the bulge. Catch the water that will exit with a bucket. Make sure you have a number of buckets available, as you may be amazed at the amount of water that is sitting above the bulge.
Note: In some cases, when attempting to puncture the bulge you may cause the entire piece of damaged drywall to give way and end up on the floor - so be careful!
Once the water has drained from the bulge in the ceiling you can remove the damage drywall. Remove the drywall back to the center of a ceiling joist, so that you will have a nailing surface for the new piece of drywall.
Note: Remove any drywall that has become damp even if it was not part of the bulge that you removed. Damp drywall will eventually develop rot which can lead to the growth of mold and mildew.
Once the area has been opened up, it is important that it be dry before you replace the ceiling drywall. To dry the area place a fan or fans pointing at the area that you want to dry. Place a dehumidifier in the room to collect any excess moisture that is in the air.
Note: Do not install the new drywall until you are sure that the area you are going to cover is completely dry.
Note: If the ceiling is directly below attic space do not forget to replace any attic floor insulation that may have been damaged by the water.
For water damage that has yellowed the surface of the drywall or made nail and screw heads visible you can paint the ceiling with a high quality primer or undercoat then paint with a finish coat of your choosing.
Although you could just paint over the yellow area or nail and screw heads, most likely the fresh paint will standout against the older ceiling paint.
It is not uncommon to have water come through a ceiling light fixture. The light fixture box is not sealed and water can travel along the wires that enter and exit the electrical box.
If you have water coming through a light fixture the first thing to do is turn off the circuit breaker of remove the fuse that powers the circuit.
Then remove the screws that hold the light fixture to the electrical box and allow the water to drain to a bucket placed on the floor. Make sure that all that the electrical box is completely dry before replacing the light fixture and turning the circuit breaker back on or replacing the fuse. You can use a hair dryer to aid the drying process.