
Figure 14 shows the finished underside of the false bottom of the platform for the Christmas village.

Figure 14 - Christmas village finished underside of platform
With the underside of the platform sealed, cover plate installed on the switch and the extension cord in position it was time to finish some of the smaller details of the Christmas village.
I needed to finish the staircase to the house on the raised deck, I also needed to glue the two units together at a 90 degree angle and add the railings. I hadn’t constructed a plastic model for many years and considering that I was building the staircase in a manner somewhat different than the manufacture had planned, it took a very sharp utility knife and some plastic glue to get it the way I wanted. I had a few pieces of railing left over so I added them to the area beside the staircase as a fence.
Considering that the Christmas village was supposedly nestled in a canyon, it seemed to make sense that there would be a lot of boulders and rocks around.
For boulders I went for a walk around my garden and found some stones that would work very well. I put them down in a manner that my wife liked and then glued them together. I was in a bit of a dilemma for rocks until I went to my local dollar store and found bags of river rocks, used as decorative additions to small plants. They are multi-colored and I think the rocks added a lot to the overall Christmas village appearance.
The final part of the construction was to finish the edge of the platform. Finding a material that would provide a bit of a cushion if someone accidentally bumped into the edge of the platform became a bit of a challenge. I looked at all sorts of materials including self adhesive cushioned weather strip, but I didn’t think that the final appearance of any of them would be appealing. I finally settled on using a 2 1/2 inch white vinyl self adhesive floor molding. I pulled the simulated snow matt over the edge of the platform and started to peel off the adhesive strip. The positioning of the adhesive on the back of the vinyl molding did not go to the very top of the molding so I had to add some white thumbtacks in order to secure it to the edge of the platform. I am not ecstatic about the appearance of the vinyl molding, but it serves the purpose and after a few days, I didn’t notice it any more.
It was my wife’s turn as it was time for the final details. She spread the powdered simulated snow which we purchased at our local craft store for what I think was an unbelievable amount of money for what it is! After the snow she placed the little accents, the dogs, cats, deer, elk, fire hydrant, garbage can, and the people.
Figures 15 through 20 show the completed Christmas village from different angles.
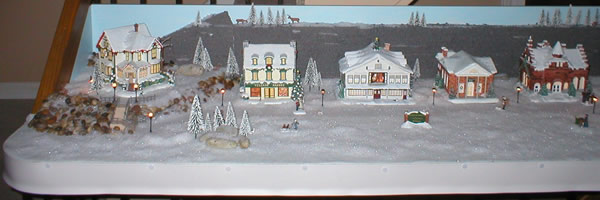
Figure 15 - Christmas village finished shows house on raised deck, village bakery, studio, bank and city hall
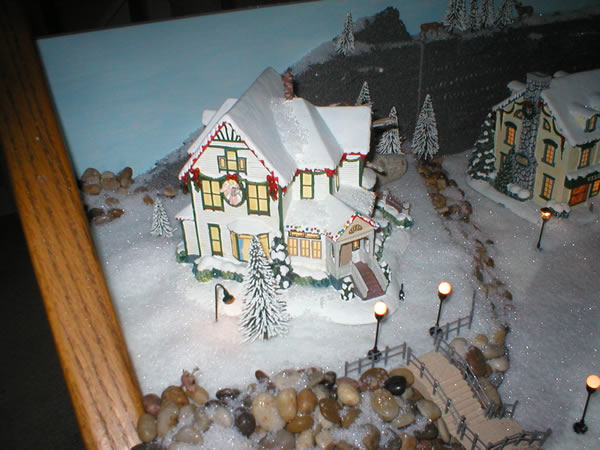
Figure 16 - Christmas village finished shows house on raised deck, staircase, rocks and house lamppost lights
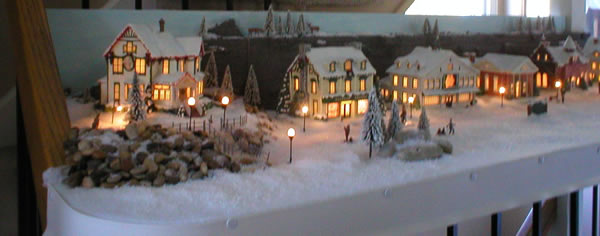
Figure 17 - Christmas village from left side
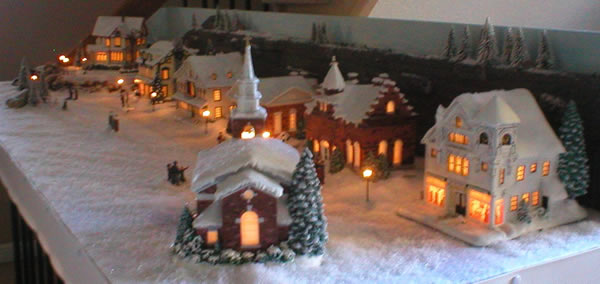
Figure 18 - Christmas village finished shows back of church and all other buildings
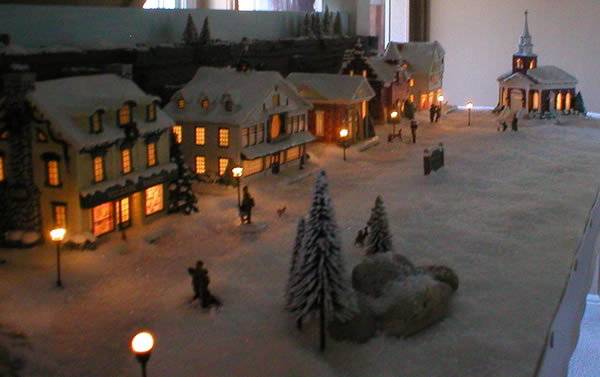
Figure 19 - Christmas village finished shows front of church, boulders surrounded by pine trees, street lampposts and people
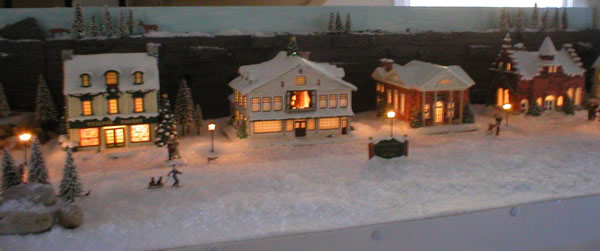
Figure 20 - Christmas village finished shows bakery, studio, bank and city hall
In all it took four weeks from start to finish, a lot of time was spent running around to different stores to find things and for paint and glue to dry. Without the shopping the time investment was about 24 hours. There was a lot of time spent in contemplating the project at various stages.
The Christmas village buildings were purchased online through eBay and a retailer.
One minor detail that perturbed us a little bit is that the Norman Rockwell Christmas village people are not made to the exact same scale as the buildings. The people are a little larger than they should be.
Overall we are very pleased with our finished Christmas village and hope that you enjoyed sharing it with us.