Note: Plan your cutting! This eliminates waste and takes advantage of the edges of a melamine faced MDF panel which are covered in melamine. If you plan your cutting carefully you should be able to have the edges that are exposed on the closet organizer with the melamine covered edge. If you use do end up with bare exposed edges, I recommend that you use a glue-on veneer or edge board.
Figure 7 shows a closet organizer with shelves added to the left side of the closet. Of course the shelves could just as easily be added to the right side of the closet.
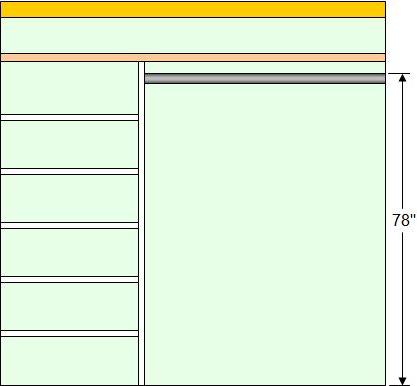
Figure 7 - Closet organizer - shelves on left side
The basic construction of this closet organizer mounts a vertical board, screwed to the top shelf and to the floor in the same manner as was shown in Figures 5 and 6. The vertical board is not drilled to take the closet rod. Instead, the closet rod is cut to the new length and the left hand closet bracket is relocated to the right hand side of the vertical board.
The shelves should be a minimum of 12 inches wide and go to the back wall of the closet. Providing that at least half of the shelf is supported by the vertical boards it is not necessary that the vertical boards be the same depth as the shelf, unless your are using the shelf standards that are described in the section on shelf mounting. However, enclosing the shelving, which means having the vertical boards at the same depth as the shelves does give a nicer overall appearance.
Shelf Mounting:
The shelves can be installed and held in position in three different manners:
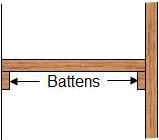
Figure 8 - Battens used to hold shelf in position
- You can use 1 X 2 battens on the wall and on the vertical board to support the shelf, as shown in Figure 8.
- You can use 1 X 2 battens on the wall and screw through the vertical board horizontally directly into the shelf, as shown in Figure 9.
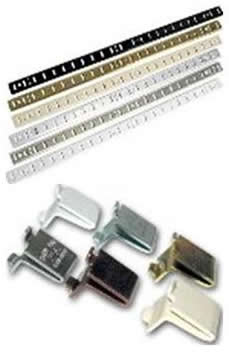
- For the ultimate in shelf flexibility vertical shelf standards and support clips, as shown in Figure 10, can be used on the wall and on the vertical.
Note: If you are attaching battens to the wall, try to find studs to mount the battens to. If you cannot find the studs or if the studs are not in the correct position, use drywall anchors for the screws to secure the battens.
Note: If you are using shelf standards and clips you can cut a dado in the vertical boards to recess the shelf standards or you can mount them on the surface of the vertical boards. If the shelf standards are surface mounted then you must allow for the thickness of the shelf standard when cutting the width of the shelves.
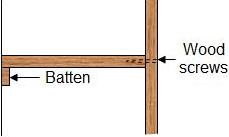
Figure 9 - Battens used on wall side and screws on vertical board to hold shelf in position