
There are a number of special rules that you must follow if you are planning on installing a 220VAC circuit for an outdoor air conditioner.
Note: An electrical permit may be required to do this work. Always check with your local building authority or a professional HVAC contractor.
The basic configuration of the electrical circuit needed to power your outdoor air conditioner condenser requires that the power comes from a double pole circuit breaker in your home load center, goes to an air conditioner disconnect switch and from the disconnect switch to the condenser.
Note: Because this is a 220 VAC circuit you must have two vacant circuit breaker positions above one another.
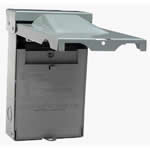
Figure 1 - Air conditioner disconnect switch
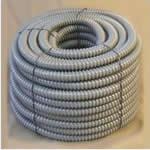
Figure 2 - Liquid tight flexible conduit
From the circuit breaker you will run the appropriate size cable (10/2 with a ground for 30 amp circuits and 8/2 with a ground for 45 amp circuits) to an outdoor air conditioning disconnect switch. From the disconnect switch you run the wires to the air conditioner.
Note: The installation instruction manual for the air conditioner condenser and the name plate on the unit should identify the current requirement for that specific model air conditioner condenser.
Step 1:
Mount the air conditioner disconnect, as shown in Figure 1, on the outside wall, as close to the air conditioner condenser as is reasonable. Ensure that it is securely fastened to the wall using proper fastening hardware for the wall material.
Step 2:
The air conditioner disconnect is connected to the air conditioner condenser with liquid-tight flexible metallic conduit, as shown in Figure 2.
Note: For 10/2 (30 amp) use 1/2″ conduit and for 8/2 (45 amp) use 3/4″ conduit.
The conduit is mechanically connected to the disconnect and the condenser using the appropriate straight or 90° flexible metallic conduit fittings, as shown in Figure 3.
Add conduit clamps, as shown in Figure 4, one within 12” of the disconnect and another at the last point on the wall prior to the conduit heading towards the condenser.
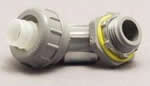
Figure 3 - 90° conduit fitting
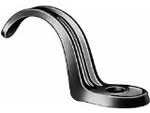
Figure 4 - Conduit clamp
Step 3:
Remove the sheath from a length of the cable so that you have the individual wires available to run from the disconnect, through the flexible conduit to the air conditioner condenser. The length of the wire should be about 18” longer than the conduit itself. Remember, you can always cut off the excess, you cannot add to a wire that is too short!
Step 4:
Connect the wires in the air conditioning condenser junction box.
The bare copper wire is the ground wire it needs to be connected to the green wire in the condenser junction box. This may be a lug or screw connection depending on the manufacturer. In either case the ground wire is connected to the metal frame of the air conditioner condenser.
The other 2 wires supply the 220 VAC to the condenser. The location and method of connection for these two wires will be described in the installation manual that came with the condenser.
Note: If you purchased either 10/2 or 8/2 cable you will have a white, black and copper wire in the cable sheath. The white wire will be used as a hot wire and for this reason you must tape the ends of the white plastic covering on the wire with black tape to signify that it is not a neutral wire. If you purchased either 10/3 or 8/3 cable you will have a white, black, red and copper wire in the cable sheath. Use the black, red and copper wire and discard the white wire. There is no need to apply black tape to the red wire as the color red indicates that it is a hot wire.
Step 5:
Connect the wires to the inside terminals or lugs in the disconnect. The bare copper wire will attach to a lug or screw that is connected to the frame of the disconnect. The other two wires will connect to lugs or screws that are identified as load
. It does not matter which load wire goes to which lug or screw.