
When you install the drywall on top of the paneling the face of the electrical boxes will no longer be flush with the outside edge of the finished wall surface, as shown in Figure 6. This is a potential fire hazard!
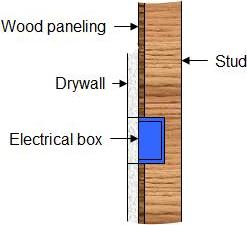
Figure 6 - Face of electrical box is not flush with face of drywall
- Baseboards will also have to be removed, lengths adjusted and reinstalled.
- A lot of effort will be put into tapping the drywall seams.
- Once hung and tapped,the completed drywall walls will still have to be primed, painted or wallpapered.
- You could remove the wood paneling and replace it with another finish material such as drywall or modern paneling of some form.
- You would still have to deal with the ceiling as related in Alternative 1.
- This would allow you to set the face of the electrical boxes to be flush with the outer surface of the new finish material.
- Baseboards will still have to be removed and lengths adjusted and reinstalled.
- If drywall or sheetrock is the material of choice it will have to be taped and painted or wallpapered.
- You would have to deal with the disposal of the wood paneling.
On the positive side it would allow you to add insulation and a vapor barrier if they were not installed originally. It would also allow you to modify the electrical installation. As examples you could take this opportunity to increase the number of electrical outlets (receptacles) or modify the lighting in the room. You could also add cabling for home entertainment, such as surround sound for a home theater.
There are some finish materials that would not require additional work once installed but they are not inexpensive.
- The least expensive method is to fill the groves of the paneling is with drywall joint compound so that the grooves are no longer visible and then paint or wallpaper directly over the wood paneling.
Note: To cover the wood paneling in this manner you do not need to remove the L
trim for the suspended ceiling although it will be easier to sand and you will get a much better finished job if the suspended ceiling L
trim is on top of the joint compound rather than trying to bring the joint compound to the edge of the L
trim.
Note: In this case the suspended ceiling L
trim and none of the ceiling panels, cross member supports or baseboard will have to be cut to a new size as the internal room dimensions are not changing.
Steps to cover the wood paneling:
- If you have a suspended ceiling remove the ceiling panels that are on the outside edge of the ceiling and the support members that sit on the edge of the
L
trim and theL
trim from the suspended ceiling and/or any moldings that may be in place. - Remove the baseboard.
- Wash the paneling and make sure that all grease and grime has been removed. Dishwashing detergent added to some clean warm water should be sufficient to clean the paneling. Rinse the paneling with clean water and allow it to dry.
- Ensure that the panels are properly nailed to the studs.
If you have ceiling tiles or other finished material on the ceiling remove any molding that may be installed between the ceiling and the walls.
Note: The baseboard presents the same situation as the suspended ceiling L
trims. It does not have to be removed but it will make for a better job if it is removed.
Note: It was very common on original wood paneling installations to use a very small quantity of nails. Often panels, especially where they butt against each other will have some movement when you press against the panel. This movement is not acceptable and additional nails or screws must be used to ensure that there is no movement. Drywall screws can be used to secure the panels. Make sure that they are countersunk below the face of the wood paneling and then fill with drywall joint compound as you would in any drywall installation.
Note: Wood paneling will expand and contract due to temperature and humidity changes. If the wood paneling is not tightly nailed to the studs the joint compound that you place in the seams where two wood panels meet will crack and fall out.