
Step 7:
Dealing with corners.
The corners should not only be nailed but they should be glued. Because you are using MDF you must use an adhesive that works well with MDF material. Yellow carpenter’s glue and white glue, primarily because they are water based, do not work well with MDF as they have the potential to cause the fiberboard to swell. As well, yellow carpenter’s glue and white glue always remain slightly flexible no matter how long they have cured and this can cause the fibers in the lumber to slip.
The best adhesive to use is a product called Mitre Bond
. Mitre Bond is a thin solvent based adhesive that produces an invisible joint (Figure A).
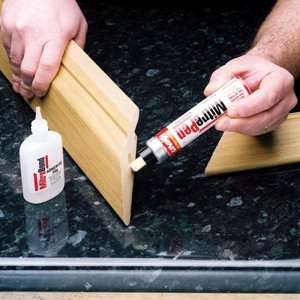
Figure A - Mitre Bond
Step 8:
Dealing with joints in a long run.
If your room is longer than the longest piece of cornice molding that you can purchase you will have to seam the joint along its length.
The best way to make this joint as invisible as possible is to use the following techniques.
- Never join the two pieces so that the seam is in the middle of the wall. As an example if the wall is 16 feet long you should use an 11 foot and a 5 foot piece. When individuals look at a wall, their eyes are drawn to the middle of that wall, any seams will stand out more if they are in that location than anywhere else on the wall.
- Cut the joints at a 30 degree angle rather than a straight cut. By cutting a 30 degree angle you will be providing more area for the adhesive.
- Add a gluing block to the back of the crown molding at the joint. The gluing block must not interfere with the crown molding when it is placed against the wall and ceiling and should be approximately 8 to 10 inches long. Attach the gluing block to the piece of crown molding being installed first, with half of the gluing block protruding from the end of the crown molding.
- Apply some adhesive to the exposed gluing block and the joint between the two pieces of crown molding and place the adjoining piece of crown molding over the gluing block.
- Nail the joint into the wall and ceiling, on both sides, approximately 3 inches in from the joint.
Step 9:
Once all of the crown molding has been nailed securely into position it is time to perform the finishing touches.
Use a paintable latex caulk to seal any gaps between the ceiling and the crown molding and the wall and the crown molding.
Use a spackling compound to fill in the depressions where you nailed the crown molding to the walls and the ceiling and any imperfections in inside and outside corner joints, do not use the latex caulk for this purpose.
Once the spackling compound is completely cured, use a 200 grit sandpaper to sand it flush with the surface of the crown molding.
Step 10:
You are now ready to paint the cornice molding.
Tip:
Sharp saw blades create much better invisible joints than dull saw blades. Use a 60 to 80 tooth 10″ carbide tipped saw blade for best performance.