
Crown molding or as it is often called cornice molding
, as shown in Figure 1, is not overly difficult to install. However, to have a finished job that looks like it was installed by professionals requires the right tools, patience and some knowledge. For the home handyman it is not as simple as watching a professional on an Internet video who has taken the time to choose the installation location that he is recording.
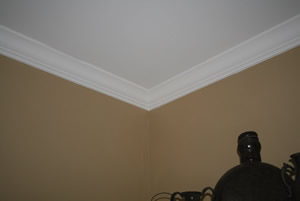
Figure 1 - Crown molding
There is definitely more than one way to install cornice molding and if you surveyed a few professionals I am sure that each would have their own methods and secret tips that go with those methods. After installing cornice molding in a few homes that I have owned and talking with the pros, I believe that this is the easiest method for the home handyman to create a professional looking cornice molding project.
I apologize to those home handymen who are very knowledgeable wood workers because I am going to explain the installation procedure in very simplistic terms, so that even the most novice of home handymen will understand and be able to emulate the installation procedure.
Safety: When MDF (Medium Density Fiberboard) is cut with a saw blade, it produces a very fine dust. Because of this when cutting MDF you should always where safety goggles, as shown in Figure 2 and a dust mask, as shown in Figure 3.

Figure 2 - Safety goggles

Figure 3 - Dust mask
Tools:
A tape measure– longer than the longest wall where cornice molding will be installed.
A sturdy step ladder of an appropriate height.
A pneumatic nailer, as shown in Figure 4 – you can use a hammer, but a pneumatic nailer makes the job so much easier!
A sliding compound miter saw, as shown in Figure 5, with a minimum 10 inch draw.
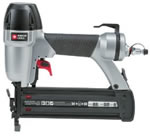
Figure 4 - Pneumatic nailer

Figure 5 - Sliding compound miter saw
Note: Both the pneumatic nailer and the sliding compound saw can be rented from most tool rental facilities.
Note: As previously stated MDF creates a very fine dust when cut with a saw blade. You should, if at all possible, cut the MDF outside on the patio, driveway or in a garage. If you cut the MDF crown molding in the house you will be finding and vacuuming saw dust for months!
Step 1:
Clear the area against the walls so that you have at least 30 inches of clear space. This entails moving furniture to the middle of the room, unplugging all lamps and other items from wall receptacles and removing pictures and any other objects on the walls.
It is best to remove any fragile items to another room as you will be maneuvering long pieces of molding into position and they can become somewhat unwieldy as you are bringing them into the room and you do not want to knock over a lamp or vase
Step 2:
This step only applies if you are installing your cornice molding against a popcorn ceiling. There are three methods that can be used.
- You can lay the crown molding directly against the popcorn ceiling, as shown in Figure 6.
- You can remove the popcorn ceiling so that the crown molding just fits in the gap between the wall and the popcorn, as shown in Figure 7.
- You can remove the popcorn ceiling 2 to 3 inches past the cornice molding, as shown in Figure 8. This is my aesthetic preference.
This article will help you to remove a popcorn ceiling.
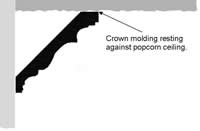
Figure 6 - Attaching crown molding to popcorn ceiling - Method 1
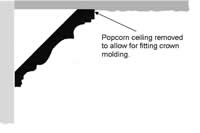
Figure 7 - Attaching crown molding to popcorn ceiling - Method 2
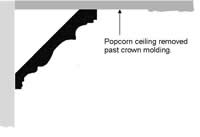
Figure 8 - Attaching crown molding to popcorn ceiling - Method 3
Note: If you have a stucco ceiling – small swirls on the ceiling you can mount the crown molding directly against the swirls and fill in the gaps with paintable latex caulk after all the molding is securely hung.