
Note: In this article we will refer to the material as drywall. Depending on your geographic location you may refer to the same product as sheetrock or gypsum board.
One of the common problems experienced by amateur and professional drywall installers is that six months to a year after installing the drywall on walls or ceilings the joints between the sheets appear to shift out of position and a bead or ridge appears. This problem is known in the trade as beading
or joint ridging
.
Figure 1 shows a basic drywall joint after it has been finished.
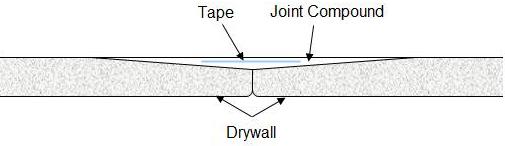
Figure 1 - Basic tappered drywall joint
There are two primary factors that cause drywall beading or joint ridging:
- Beading or joint ridging can occur when the edges of two pieces of drywall are forced very tightly together. This is probably the most common cause of beading or joint ridging and can occur when two pieces of drywall are installed very tightly together and then as the temperature and humidity levels change in the home, the drywall expands and with nowhere to go, it creates a beading or ridging effect at the drywall joint.
Note: Red arrows indicate the direction of force.
Figure 2 shows a drywall joint, where both edges of the drywall are tapered and joint ridging or beading has occurred.
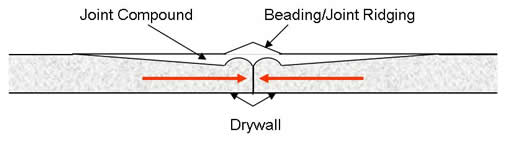
Figure 2 - Tapered drywall joints with beading/joint ridging.
Figure 3 shows a drywall joint, where one edge of the drywall is tapered and the other piece is not and joint ridging or beading has occurred.

Figure 3 - Beaded tapered drywall against butt drywall joint
- Beading or joint ridging can also occur due to studs twisting when they dry. As you can see in Figure 4 the twisting of the stud no longer provides a surface which allows the face of both pieces of drywall to be flush with one another.

Figure 4 - Drywall beading due to twisted stud
Repairing Drywall Beading or Joint Ridging:
Note: It makes little sense to try to repair the drywall beading or joint ridging for a year after installation. One year allows the drywall to undergo a complete cycle of heating and cooling. If you do not wait for a complete cycle of heating and cooling you will probably end up doing the repairs again!
Note: It is best to undertake the repair when the ambient temperature is warm with little humidity in the air.
- Gently sand the ridge so that the seam is flush with both pieces of drywall. Do not damage the paper of fiberglass tape that was embedded into the original joint.
- Using a wide taping knife feather out a new layer of joint compound until you have a recreated the flat surface across the pieces of drywall.
- Allow this layer of joint compound to dry for at least 24 hours.
- Sand the joint compound to feather the edges and make a smooth surface.
- Inspect the joint and ensure that the beading or joint ridging has been removed. If you can still see the beading or joint ridging apply another coat of joint compound and allow it to dry for 24 hours. Repeat steps 2 through 5 until you are satisfied that the seam between the two pieces of drywall is virtually invisible.
- Prior to applying finish coats of paint or wallpaper you should seal the fresh joint compound with a quality paint primer or wallpaper sizing as the case may be.