
One of the most frustrating and time consuming parts of any drywall project, for the diy home handyman, is taping (mudding) the seams between sheets and over the screw or nail heads, as shown in Figure 1.
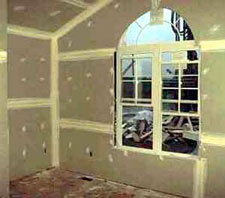
Figure 1 - First coat of drywall compound
Installing sheets of drywall, even those that have to be cut to accommodate, receptacles and switches or door and window frames is not difficult nor tricky.
However, taping drywall sheet joints takes time and patience.
If you have read the any of the many do-it-yourself drywall installation instructions, the taping portion of the instructions is simplistic. But, when you attempt to follow the simple instructions you have no end of problems.
Taping drywall, fast and efficiently is a project that takes practice. Professional tapers do it day-in and day-out. The more taping that you do, the better you will become.
If this is a first time taping project or if you are having difficulties in obtaining a good finished taping job, there are some tips that will make your life easier.
- If you are using the pre-mixed drywall joint compound that comes in 3 and 5 gallon pails, it needs to be reconstituted by mixing it thoroughly before use. It is almost impossible to mix a 3 or 5 gallon pail of drywall compound by hand, without the use of an electric beater or mixer on the end of a robust 1/2 inch electric drill.
- When applying the joint tape over the seam, it helps if you moisten the tape in water first. Do not use fiberglass mesh tape as it is impossible to get this level with the face of the drywall boards where the seams are not recessed. It is much thicker than paper tape.
- Sand between coats. If you do not sand, as you run the drywall knives over the dry joint compound they will knock off pieces and those pieces will scratch the surface. They wipe the dust off the drywall with a damp cloth or sponge that is rinsed often in clean water. The small pieces of grit created by the sanding will continually leave scratch marks in the joint compound as you run the drywall knives over it.
- Drywall compound is relatively inexpensive. Do not wipe the excess drywall off the drywall knives and back into the bucket. Odds are there are pieces of dried joint compound on the drywall knife and you are just adding it back into the mixture.
- Take a quantity of joint compound out of the pail and put it in a drywall tray. Put the lid securely on the top of the pail. Failure to do so will cause the drywall compound on the edges and lid of the pail to dry and flake into the joint compound in the pail below when you open it. Then when you use the joint compound the hard flakes will scratch the surface as you run the drywall knives over the joint.
- If you start to see scratches in the surface of the drywall compound, wipe the compound that is on the drywall knife off with a rag and then wash the edge in clean water.
- Use the proper tools for the job. Drywall knives, come in different sizes to allow you to make feather the joint farther with each coat. Only a professional taper can get away with using one size trowel to complete the taping project.
- If there is any spring in the drywall at the point of the seam, it is very difficult to get a smooth finish. That is why it is important that the ends of the drywall sheets overlap the edge of a stud or joist.
- You cannot tape a drywall seam that is not recessed flat with the rest of the wall. This may sound obvious, but I have witnessed many handymen attempting to do the impossible. If the tape sits on top of the drywall and then there are layers of joint compound, it cannot end up flush.
- In many cases, there will be very little drywall that is not covered with joint compound. You cannot feather a drywall seam only 6″ in width.
- Do not overlap the paper tape. This is always a major problem in the corners, especially where the ceiling meets the corner of a wall. The more layers of tape, the harder it is to get a feathered finish.
- Ensure that all screws and nails used to secure the drywall are dimpled below the surface of the drywall. If you run your drywall knife over a nail or screw that is protruding, set it into the drywall before proceeding.
On of the most common mistakes that the home handyman makes is only mixing the upper third of the joint compound.
The second mistake with respect to mixing is not mixing often. You should re-mix the compound at least every hour.
Always wash the drywall tray after each project and remove any and all pieces of hardened drywall compound.
If, when you open the pail of joint compound you see dry compound on the lid or sides, remove it using a cloth before you mix the product.
Plastic drywall knives are okay for repairs, but they do not have the flexibility (spring) that the metal knives have. Plastic trays for holding the drywall are fine.