
Your kitchen and bathroom faucets are part of the overall aesthetics of the décor. Faucets that are dull, and water marked can make the entire bathroom or kitchen look and feel dirty. Many homeowners believe that having a dull faucet is just a matter of time and that the deterioration in the finish means that the faucet must be replaced.
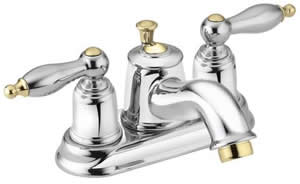
Figure 1 - Bathroom faucet
In most cases, this is not true. Dull faucets can be brought back to their original luster, as shown in Figure 1, with little expense.
There are two separate parts, in most faucets, which need to be cleaned.
Aerator
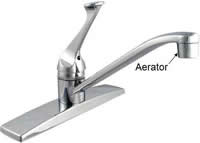
Figure 2 - Kitchen faucet aerator
The aerator is mounted to the end of the faucet spout, as shown in Figure 2. The aerator’s function is to mix the water coming out of the faucet with air. The air mixed into the water stream reduces or eliminates the splashing that occurs when the water hits the sink bowl.
If the faucet water flow appears reduced, or the water pressure appears sporadic, or the water switches from aerated to non-aerated you probably have a dirty or clogged aerator and need to clean the inside of the aerator.
Note: There are many styles of aerators on the market and yours may be larger, have the ability to direct the water flow and/or other features. Internally the aerators all work in the same basic manner.
How to Clean a Faucet Aerator:
The aerator screws on to the end of the faucet spout. Some faucets have the thread on the outside of the faucet spout body while others have the thread on the inside of the faucet spout body. In either case it is removed by turning the aerator in a counterclockwise direction.
Note: In some cases the aerator will not unscrew easily, especially if it has never been removed and the threads are locked. Do not use the jaws of a wrench or pliers directly on the aerator as this will most likely scratch or create deep nicks in the sides of the aerator body. If you need to use a wrench or pliers to loosen the aerator from the faucet you must first protect the outside surface of the aerator. This can be accomplished by wrapping a layer of duct or electrical tape over the aerator or placing a wash cloth over the aerator prior to gripping it with the wrench or pliers. As an alternative you can place a layer of duct or electrical tape over the jaws of the wrench or pliers.
When you have removed the aerator, disassemble the parts.
Note: Do not disassemble the aerator over the bathroom or kitchen sink. The parts are small and in some cases will end up going down the sink drain.
The internal parts of the aerator are generally held in by a heavy rubber washer, as shown in Figure 3. You may have to use a small screwdriver to pry the washer out, being careful not to put a nick in the washer or the aerator will leak when reinstalled. Once the washer is removed the other parts should just fall out. If you do damage the rubber washer, you do not have to replace the aerator. You can purchase replacement aerator rubber washers at most hardware stores and big box home improvement centers.
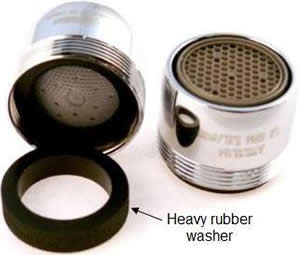
Figure 3 - Aerator
Note: Most aerators are made up of four parts; the body of the aerator, a rubber washer, a mixer and a screen. Some of the new aerators also incorporate a flow restrictor while others may have an internal secondary body and/or bushing.
Make sure you layout the aerator parts and make a written note of how (direction of water flow), and in what order they were inserted in the aerator. If you assemble the parts in the wrong order the aerator will not work.
To clean the parts, allow them to soak in white vinegar overnight. Use an old toothbrush to scrub the lime build-up off the parts and a thin sewing needle to clean out the holes.
Once the aerator parts are clean, you can reassemble the aerator and screw it back into the faucet. The threads on the aerator are very fine and it is easy to cross thread the aerator when attempting to screw it back onto the faucet. Take extra care and make sure that there is no debris on or in the faucet spout threads. If a wrench or pliers are needed to tighten the aerator onto the faucet, don’t forget to protect the outside of the aerator in the same manner as when you removed the aerator.
Note: It is common to have lime deposits in the area where the aerator meets the faucet spout. If you have lime deposits in this area clean the faucet before reinstalling the aerator as described in the following section.
Cleaning & Polishing the Faucet Body:
Even though you may be diligent and regularly wipe the faucet with a damp cloth and dry it with a clean towel over periods of time built-up grime will get into those hard to reach places. Hand soap that flows from the handles to the faucet deck and then under the handles is one of the most common cleaning problems. Other problem stains include those incurred by hard water and other mineral deposits.
Note: Never use abrasive cleaners, cleansers or steel wool scouring pads as they will scratch and mar the surface finish of the faucet.
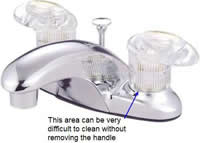
Figure 4 - Difficult cleaning areas on a bathroom faucet
Note: Depending on the design of your faucet, you may have to remove the handles in order to clean the area between the bottom of the handles and the base of the faucet, as shown in Figure 4.
Note: Old toothbrushes make excellent mini-scrubbing brushes.
There are excellent commercial cleaners that will remove lime and mineral build-up on faucets without harming the finish. We however are listing some homemade cleaning alternatives, which will cost much less than the commercial cleaners and generally work just as well.
Sodium Carbonate:
Sodium carbonate, also termed washing soda or soda ash is an excellent cleaner. Make a paste using a ½ cup of sodium carbonate and a few drops of warm water. Rub the paste onto the body of the faucet using a soft clean cloth continue rubbing until the faucet shines. Rinse the faucet with clean warm water and dry it with a clean absorbent cloth.
Note: Sodium carbonate can be purchased at most large grocery stores in the laundry detergent isle as washing soda and swimming pool supply retailers.
White Vinegar:
White vinegar works extremely well at removing mineral deposits left by hard water. These deposits may be the result of the hard water that was used to wipe down the faucets on a regular basis.
Soak a clean cloth in vinegar. Wipe down the entire faucet, if there are mineral deposits that remain, place the cloth on the area where the mineral deposit is. Cover it with food plastic wrap so that the vinegar does not evaporate and leave it sit for an hour. Remove the plastic wrap and wipe the area with the cloth. Rinse with clean water and dry with an absorbent towel.
White Vinegar & Baking Soda:
Combine 1 part white vinegar with 1 part baking soda. Using a soft cloth apply the mixture to the faucet and rub, it should bring back the original faucet finish. Rinse with clean water and dry with an absorbent towel.
Green Stains:
It is not uncommon to have green stains or deposits on the bottom edge of the aerator and in the area where the aerator meets the faucet.
These green stains occur when the home’s water system is copper and can also occur if the pipes leading directly into the faucet are copper. In fact the stains or deposits are the oxidation of copper.
It is important that these stains or deposits are removed as soon as they are noticed. If you do not remove them from the faucet and/or aerator they will eat the finish.
The best way to remove green stains or deposits is to use a commercial metal cleaner/polish such as Tarn-X or Brasso. Rub the cleaner into the stain or deposit using a clean, soft, dry cloth. The cleaning/polishing compound will clean the copper oxidation from the faucet. Once cleaned allow a white haze to form on the faucet and wipe the haze off with a clean cloth.