
- Install any drainage for toilets and/or sinks if it means running the drains under the current concrete floor. This is also the time to install any electrical boxes with conduit for floor receptacles for power, cable TV, or telephone. Repair any concrete damage.
- If you are installing a fireplace, the fireplace hearth and flue should be installed next. If it is a wood burning stove that does not require a hearth you should add the flue at this point so that it protrudes through the wall or ceiling at a length sufficiently long enough to be able to connect to after the wall or ceilings are finished.
- Install any ductwork for ventilation and HVAC if required.
- If a bathtub, or stall shower is to be installed this is when it should be done (some plumbing for hot and cold water supplies may have to be done at this point. Only do what is necessary to bring the water lines outside of any unreachable area).
- If you are installing a sub-floor and vapor barrier, it should be done at this stage.
- Install the vapor barrier on the walls, overlapping the floor vapor barrier by 12 to 18 inches (Figure 2).
- Frame all wood or steel studs along walls and construct any room dividers needed (Figure 2).
- Install all drain lines and water supply lines that run in the walls and ceilings, don’t forget water lines for ice makers and/or humidifiers if required.
- Install all ceiling and wall ventilation units with the exception of kitchen exhaust hoods, which would be installed after the installation of the kitchen cabinets.
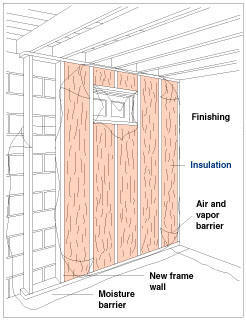
Figure 2 - Basement wall vapor barrier, insulation and stud installation
- Electrical: Install electrical outlets (receptacles), switch and light boxes and run all wiring from the electrical panel to those boxes as appropriate, electrical heaters and kitchen appliances if required.
- Install all insulation in walls and/or ceilings (Figure 2).
- If the ceiling will require strapping in order to attach the ceiling material that you have chosen, install it at this stage.
- Install the wall and ceiling finish material, drywall, wood paneling, or other. Tape and sand drywall. (If you are installing a suspended ceiling, tape, sand, and paint the drywall on the walls before hanging the suspended ceiling).
- Do all painting to final finished coat.
- Install the flooring (I prefer to install kitchen base cabinets and bathroom vanities on top of flooring in order to maintain counter heights).
- Install all bathroom fixtures, including vanities and kitchen cabinets, base and wall units, sinks and faucets.
- Install all door trims baseboards, other moldings, and doors (if you are moving large items into the area you can remove the doors by popping the hinge bolts after installation). Paint these items before installing and do touch-up after installation.
- Install ceiling and wall sconce lights, smoke detectors, do trim out on electrical boxes (install the actual electrical outlets (receptacles), switches and cover plates) and ventilation grills.
- Install wood burning stove if appropriate.
- Move in heavy furniture and appliances.
- Install banisters and railings on the staircase.
Also, run all wiring for cable TV, computers, speakers, or other entertainment devices.
Note: It is wise to run additional cables in the walls for cable TV, computers, telephone, speakers and other entertainment devices that can be captured at a later date should you decide to move the furniture around in your new finished basement. Cable is inexpensive!