
It is recommended by most manufacturers of hot water heaters that you flush the sediment that will collect in the bottom of your water tank at regular intervals. Flushing your hot water tank not only extends its life but it will reduce the amount of energy necessary to heat the water and hence lower your energy costs.
The interval between flushing is relative to how hard the incoming water is in your area. The harder or the more mineral content in the incoming water the more often you should flush your hot water tank.
In order to flush your hot water tank, follow these simple steps:
- If you have a hot water heater that is powered by natural gas or propane you should set the gas control valve, as shown in Figure 1, to the
pilot
position. The burns will not activate while the gas control valve is in the pilot position which provides a level of safety.
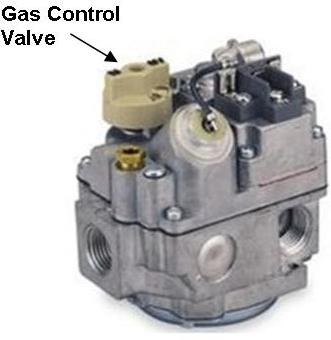
Figure 1 - Hot water tank gas control valve
- All hot water heaters have a drain spout located at the bottom of the tank, as shown in Figure 2. Connect one end of a hose (the drain valve has the same female fitting as an outdoor spigot, so a garden hose will be quite sufficient) to the drain spout and have the other end positioned over a floor drain. Place a weighted object, such as a hammer over the end of the hose that is over the floor drain so that the hose remains in position. The object that you place over the hose should not be heavy enough to actually crush the hose.
For electric hot water heaters the circuit breaker in the load center or distribution panel should be turned to the off
position. If your load center or distribution panel uses fuses, the fuse should be removed. You do not want the heater elements to come on while you are draining or flushing the hot water tank, as the heating elements need to be surrounded by water to ensure that they do not burn out.
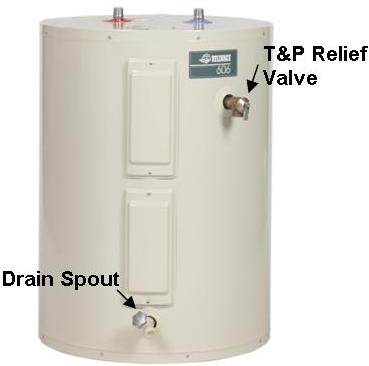
Figure 2 - Hot water tank drain and P&T relief valve
- There should be water shut off valve on the incoming line to the hot water tank. Follow the incoming water line until you identify the valve and turn it to the off position.
- Using caution open the T&P (temperature and pressure) relief valve, as shown in Figure 2. The T&P relief valve will have a lever that should be in the down position, lift up the lever to open the valve.
- Open the drain valve, located at the bottom of the hot water tank, as shown in Figure 2. This should allow the water to flow through the hose and down the drain.
- Once the water coming out of the hose or out of the drain valve hole is clear the flushing of the hot water tank is complete.
- Set the hot water tank drain valve to the closed position and remove the hose.
- Close the T&P relief valve.
- Turn the incoming water supply valve to the on position.
- Open a hot water faucet at the highest point of the house to allow the air to escape from the system. There will be a lot of splashing from the faucet until all the air has cleared the water pipes.
- If you have an electric hot water tank turn the circuit breaker back to the on position or replace the fuse. If you have a natural gas or propane hot water tank verify that the pilot light is still on. If it is, turn the gas control valve back to the on position. If the pilot light has gone out it will have to be relit.
Caution: The water that comes out of the hose could be quite hot, to the point where someone could get scalded. Make sure that children and pets are clear of the hose prior to turning the drain valve on!
Note: In some cases, sediment may block the hot water tank drain valve. To disturb the sediment try closing the T&P relief valve and turn the incoming water supply valve to the on position. This may provide enough pressure to force the sediment to move and flow through the hose.
If the sediment cannot be disturbed by the aforementioned method it will be necessary to remove the drain valve from the tank. In order to accomplish this, allow the tank to cool to room temperature. Remove the hose from the drain valve. The drain valve screws into the tank, using a pipe wrench you should be able to unscrew it – counterclockwise. Once the valve is removed you can use a long screwdriver to disturb the sediment.
Remember that the only thing holding all the water that is in the tank from coming out the hole where the drain valve was is the sediment. So as soon as the sediment is cleared, the water will flow! It will make mess!!
You can attempt to screw the valve back into position in order to reattach the hose once you have disturbed the sediment. It won’t be easy.
Additional information on lighting a pilot light.