These procedures must be done in exactly that order. Once the steel bars are in place it is impossible to successfully prepare the ground. Steel reinforcement bars are not always used for house footings. Unless specifically required by the local building code, footing reinforcement is optional. We recommend its use, however, as reinforcement provides insurance against settling problems.
Immediately before pouring the concrete, wet the base of the footing forms with a garden hose. Be sure not to over water the forms and see to it that there are no remaining puddles when the concrete is poured. We wet down the soil bed, or for that matter, any surfaces that come in contact with wet concrete, to prevent the dry soil from absorbing the moisture in the concrete which will cause it to lose strength. Tamp (press) the earth down firmly with a square shovel and wet again.
Reinforcing bars are usually placed in the lower half of the footing. They must be held up in some way at their final position which is 2 inches from the bottom of the trench, until the concrete is poured. This temporary support may take a variety of forms. The most professional support is a small plastic device called a rebar chair, as shown in Figure 18.
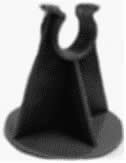
Figure 18 - Rebar chair
A more primitive way of accomplishing the same end is to support the bars on small, thin pieces of masonry such as a concrete block or brick. The recommended diameter of reinforcing bars is 1/2 inch, unless otherwise specified by local building codes. When you have to join two lengths of reinforcement bar, the bars should overlap about 20 inches (40 times the diameter of the rebar). It is crucial that the bars are solidly joined where they overlap. Tie them securely together with rebar tie wire.
The last thing to do before you pour the concrete into the forms is to add some cross member support across the forms to prevent them from spreading, as shown in Figure 19. These cross members should be installed every 4 feet, in between the stakes.
You are now ready to pour the concrete. Find out whether the work must be inspected by a building inspector before pouring. When planning the date of the pour, keep two things in mind:
- you will not be able to continue with the foundation work for a couple of days after the footing is poured. The mixture needs sufficient time to set before the foundation walls can be started. This is why many contractors will pour footings on a Friday so that the concrete will cure over the weekend.
- Plan to pour in weather that is neither too hot nor too cold, since extreme temperatures can alter the setting process of concrete. Building authorities can actually stop you from pouring in freezing temperatures. Once these two factors have been taken into account, you can call the ready-mix company and have them deliver the quantity and quality of concrete needed.
Additional information on calculating the quantity of concrete required.
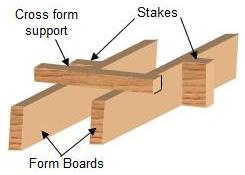
Figure 19 - Footing form cross member support
While close to a phone, make a few more calls, this time to friends. Get them of volunteer their help during the pour since plenty of extra hands will be welcome. Now for a few tips on concrete pouring:
- Have all the formwork ready before the truck arrives. Should the forms be located in such a way that the concrete truck cannot reach them all, have one or two wheelbarrows, planks, and the friends you just recruited at hand. The truck can deliver the concrete mix to wheelbarrows; don’t overload it, that will in turn travel over the planks. The concrete can be poured from the wheelbarrows into the forms before it sets. While your friends
work
the concrete that has just been poured, you can go back for another load.Working
concrete is the term used to describe the process of helping the mixture compact itself and preventing pockets or voids from forming. With the aid of a flat hoe or a spade, move the mixture at the center of the forms, the sides can be handled by lightly tapping the forms with a hammer. Be careful not to work the concrete excessively since this will tend to separate the materials within the mixture. Some ready-mix concrete companies have a pumper, which hooks onto a concrete truck and has a long hose that can deliver concrete up to 50 feet or more away from the truck. These concrete pumpers can also be rented.
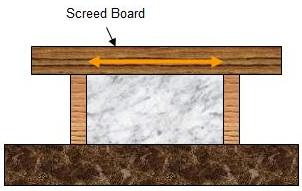
Figure 20 - Screed board on footing forms
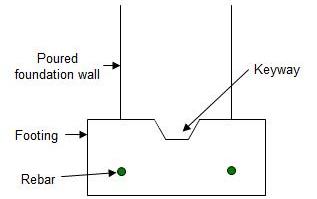
Figure 21 - Keyway in footing
- It is important that the concrete be evenly distributed within the forms. This is done by pouring the mixture at several points and spreading it to where it is needed with a garden rake or a hoe. Work the concrete into the forms by using a pointed trowel, moving it around to fill any depressions and get rid of any excess. To help the mixture flow into gaps and compact itself, tap the sides of the forms lightly with a hammer. The concrete at the top of this footing is leveled with a screed board, this can be any straight piece of wood that is longer than the footing is wide. With a person positioned on either side of the footing, move the board along the top of the form. Move the board back and forth (left and right) as you are moving it forward, as shown in Figure 20.
- If you are building the foundation walls out of poured-in-place concrete, you will have to provide a tie between the footing and the wall. There are many ways to do this, the most popular being the keyway method. A keyway is a 2″ X 4″ tapered wooden board that is inserted on top of the footing, as shown in Figure 21.
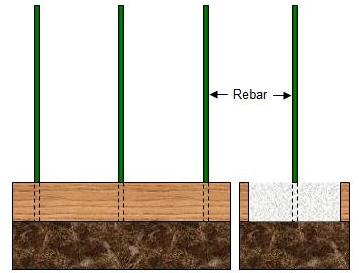
- If you are planning to build the foundation walls out of concrete block instead of poured concrete, use vertical reinforcing bars in the footing as a tie to the wall above in place of the keyway. These reinforcing bars are placed at regular intervals, usually every 2 feet, but the distance does vary according to local building codes. The steel is inserted in the footing forms while the concrete is still wet, as shown in Figure 22.
To hold it in place, it is attached to straps running along the top of the forms. Don’t forget to oil the keyway board for ease of removal. Once the concrete is dry and the keyway removed, the remaining cavity becomes a concrete tie to the foundation wall.