Cement And Concrete Are Not The Same Thing!
- Cement is a product made of finely ground limestone and clay and is used in the creation of concrete and mortar.
- Concrete is a mixture of aggregate (usually gravel), sand, cement and water.

Although mixing your concrete by hand will save a substantial amount of money, it is definitely back breaking work and for any slab that requires more than 1 cubic yards of concrete one should consider using a powered portable concrete mixer that operates using an electric motor or gas engine, as shown in Figure 1, 2 and 3. These mixers can be purchased, new and used, or rented.
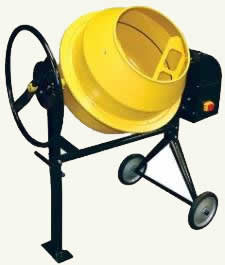
Figure 1 - 3.5 cu. ft. Electric Cement Mixer

Figure 2 - 5 cu ft Wheel Barrow Portable Electric Cement Mixer
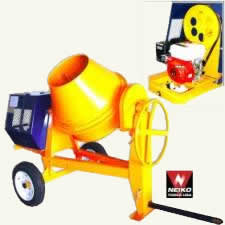
Figure 3 - 9 cu. ft., 13 HP Gas-Powered Cement Mixer
If you require 3 cubic yards or more of concrete you should consider buying ready mix concrete.
For most applications the proper mixture of components for a good concrete mix is:
- 3 Parts Gravel
- 2 Parts Sand
- 1 Part Cement
- Water As Required (The amount of water is very dependent on the moisture within the sand and gravel, so it is difficult to provide an exact amount relative to the cement, sand, gravel ratio of 1:2:3. However if the sand and gravel are reasonably dry for each 100 lbs. of cement you will need approximately 6.5 US gallons of water.)
Blending the mixture of gravel, sand and cement is one of the keys to producing a good concrete.
If you are using a wheelbarrow or concrete mixing trough following these steps will help with the blending.
Note: Using a wheelbarrow to mix and or move wet concrete is common and so is having the wheelbarrow tip over as you are mixing or as you commence to move it. A wheelbarrow filled with wet concrete is very heavy!
- Always use the same size shovel to add the gravel, sand and cement. If you use a level shovel full of cement, use level shovels of the other 2 components - sand and gravel. Likewise, if you use a heaping shovel full of cement then use a heaping shovel for the other 2 components.
- If you are using a wheelbarrow or mixing trough use a rugged hoe to blend the dry products together. Mix the sand and cement together thoroughly, add the gravel and mix together. Once the dry components are thoroughly mixed, commence adding the water, a little at a time. You can always add more water, you cannot take it away.
If you are using a portable concrete mixer then you will get the best results by:
- Place three quarters of the estimated water in the mixer first.
- Turn the mixer on.
- Add half of the sand and half of the gravel.
- Once the sand and gravel is thoroughly mixed with the water add all of the cement and then the remaining sand, gravel and water.
Note: Always wash out the mixer before starting to mix a fresh batch of concrete. Make sure there are no left over pieces of dried concrete still remaining in the mixer.
The amount of water is key to a successful concrete mix.
- Too much water = weak concrete that will most likely crack.
- Too little water = concrete that cannot be worked.
- Should you accidentally add to much water and end up with a thin sloppy mixture, thicken the mixture using small quantities of sand and cement in the ratio of 2 parts sand to 1 part cement.
Concrete Slump Test
If you are concerned about the quality of a batch of concrete that you have just made you can perform a simple slump test
to verify its suitability, as shown in Figure 4.
Note: This slump test works well for concrete slabs such as patios, driveways and sidewalks. However, it is not a good enough test if you are constructing concrete countertops or other architectural concrete items. If you are building concrete countertops or other architectural concrete items follow these concrete slump test instructions.
- Obtain a large paper or Styrofoam cup to act as a cone.
- Remove the bottom
- Invert it on a level piece of plywood.
- Fill the cup, while it is resting on the plywood with the concrete, pack it down a few times as you are filling it.
- Remove the cup from the concrete mixture.
- Place the inverted cup next to the concrete cone that remained after removing the cup.
- Without the support of the cup, the concrete should be 50% to 75% of the height of the cup.
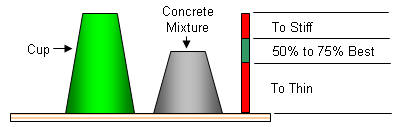
Figure 4 - Concrete slump test
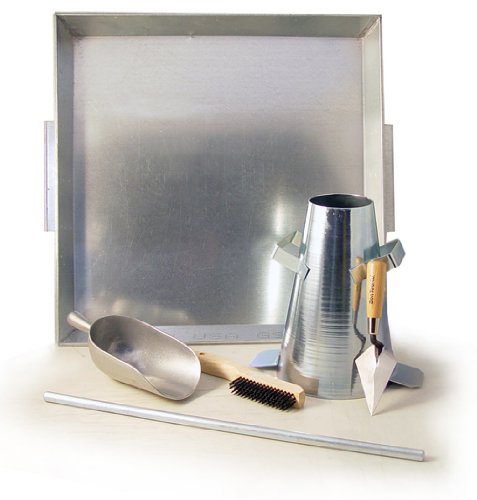
Note: If you are doing a lot of concrete work, you may wish to consider the purchase of a manufactured slump test kit, as shown in Figure 5.